# Commanding with C1Toolbar (Silverlight Tutorial)
## Content
Silverlight 4 supports the ICommand interface on any object that derives from the **ButtonBase** class. Any button, including **C1ToolbarButton**, can be associated with an object that implements ICommand through the control’s **Command** property. Although the **ICommand** interface is supported, Silverlight does not provide any built-in implementation. **Silverlight Edition** includes a couple implementations, **C1Command** and [C1ToolbarCommand](/componentone/api/wpf/online-toolbar/dotnet-framework-api/C1.WPF.Toolbar.4.6.2/C1.WPF.Toolbar.C1ToolbarCommand.html), so you do not have to write one yourself.
The **C1Command** class is included in the **C1.Silverlight** assembly. **C1ToolbarCommand**, included in the **C1.Silverlight.Toolbar** assembly, extends **C1Command** by adding a few extra toolbar related properties for labels and images.
The following steps demonstrate how to use commanding with **C1Toolbar**.
**Using C1ToolbarCommand**
1. Open or create a new Silverlight application.
2. Add two **RowDefinitions** to the default **Grid** element, giving the first row an automatic height, such as this:
```xml
```
3. Add a **C1Toolbar** to the fill the first row.
4. Add a **TextBox** in the second row.
5. Paste the following **C1ToolbarCommand** to the UserControl Resources such as this:
```xml
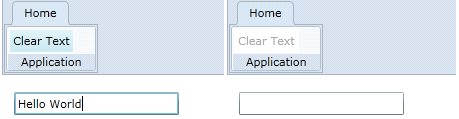
```
6. This command will be used to clear the contents from the **TextBox**. You can specify a **LargeImageSource** and a **SmallImageSource** for **C1ToolbarCommand**, although this is not required.
7. Paste the following XAML to fill **C1Toolbar** with a tab, group and button:
```xml
```
8. Here we are setting the attached **c1:CommandExtensions.Command** property to our command. Note that **C1ToolbarButton** also has an inherited **Command** property. It is better to use the attached property **CommandExtensions.Command** to set the command when using **C1Commands**.
9. Add a **TextBox** to the page below the toolbar named “textBox1”.
10. Next, you need to register the command after the page initializes with this code:
```csharp
// register command methods
CommandManager.RegisterClassCommandBinding(GetType(), new CommandBinding((C1ToolbarCommand)Resources["cmdClear"], Clear, CanClear));
// check the ability of registered commands to execute
CommandManager.InvalidateRequerySuggested();
```
11. The **C1.Silverlight.CommandManager** provides command related utility methods for registering commands.
12. Paste the following **Clear** and **CanClear** event handlers which perform the logic for the command:
```csharp
private void Clear(object sender, ExecutedRoutedEventArgs e)
{
textBox1.Text = "";
}
private void CanClear(object sender, CanExecuteRoutedEventArgs e)
{
if (textBox1.Text.Length > 0)
{
e.CanExecute = true;
}
else
e.CanExecute = false;
}
```
13. In Silverlight you need to explicitly check the ability of registered commands in code. In the **TextBox** **TextChanged** event, add the following code:
```csharp
private void textBox1_TextChanged(object sender, TextChangedEventArgs e)
{
CommandManager.InvalidateRequerySuggested();
}
```
14. Run the sample and you can now clear the contents of the textbox using a command in **C1Toolbar** using **C1Command**.