# Appointment Operations
## Content
Appointments can be created at run time by double-clicking the time for the appointment to begin or by pressing ENTER key, which opens the **Appointment** dialog box. For more information about appointments, see [Appointments](/componentone/docs/wpf/online-scheduler/Appointments).
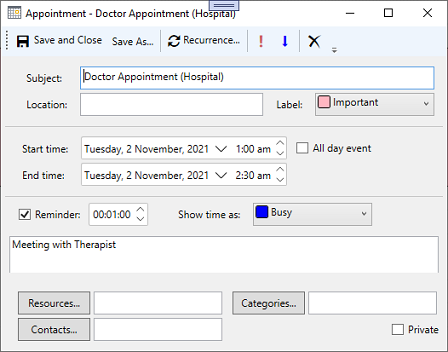
## Add and Save an Appointment
Appointments can be added to the **Scheduler** using the **Appointment** dialog box.
1. Double-click the desired appointment time to open the **Appointment** dialog box, or simply press the ENTER key to create an in-place appointment.
2. In **Appointment dialog box,** specify a **Subject**, **Location** and any additional information you would like to assign to the appointment.
3. Click the **Save & Close** button to add the new appointment to the schedule.
Appointments can be also created programmatically using the **Appointment** class and its properties such as, **Start**, **Duration**, **Body**, etc. and added to the Scheduler using the **Add** method as showcased in the following code.
```csharp
// Showing Appointment
var appointment = new Appointment();
appointment.Start = new DateTime(DateTime.Now.Year, DateTime.Now.Month, DateTime.Now.Day, 1, 0, 0);
appointment.Duration = TimeSpan.FromHours(1.5);
appointment.Subject = "Doctor Appointment (Hospital)";
appointment.Body = "Meeting with Therapist";
//Adding appointment to scheduler.
scheduler.DataStorage.AppointmentStorage.Appointments.Add(appointment);
```
## Edit an Appointment
Appointments can be changed and updated in Scheduler either in-place or through the Appointment dialog box.
1. Use the F2 key to edit the Subject in-place. Press the Enter key to save edited text or Escape key to cancel editing.
2. Double-click an existing appointment to open the **Appointment** dialog box. Alternatively, use the Enter key to open the Appointment dialog box of the selected appointment.
3. After editing all the desired fields in the dialog use the **Save** button on the rightmost corner of the Appointment dialog box or Ctrl+S key to update the appointment in the schedule.
You can also edit an appointment in the Scheduler programmatically. For doing so, you can add a Button control to edit an appointment and a Scheduler control to your application as shown in the following steps:
1. Add a Button control to edit an appointment and a Scheduler control to your application as shown in the following code:
```xml
```
2. Switch to the code view and add the following code to add an appointment to the Scheduler and edit the appointment on the button click.
```csharp
public EditingAppointment()
{
InitializeComponent();
InitAppointments();
}
private void InitAppointments()
{
for (int day = 1; day <= 7; day++)
{
scheduler.DataStorage.AppointmentStorage.Appointments.Add(new Appointment()
{
Start = new DateTime(2021, DateTime.Now.Month, day),
Duration = TimeSpan.FromHours(1),
Subject = $"Test Appointment {day}",
Body = "New Appointment"
});
}
}
private void btnEdit_Click(object sender, RoutedEventArgs e)
{
if (scheduler.SelectedAppointment == null)
MessageBox.Show("No Appointment selected.", "Select Appointment", MessageBoxButton.OK, MessageBoxImage.Information);
else
{
scheduler.EditAppointmentDialog(scheduler.SelectedAppointment); // Opens edit dialog for provided appointment
scheduler.SelectedAppointment = null;
}
}
```
## Delete an Appointment
Selected appointments can be easily removed from your schedule through the **Edit Appointment** dialog box.
1. Select the appointment you would like to remove from the schedule.
2. Click the **Delete** key on your keyboard. The appointment is removed from the schedule.
Scheduler allows you to delete an appointment programmatically as well. For doing so, you can add a Button control to delete an appointment and a Scheduler control to your application as shown in the following steps:
1. Add a Button control to edit an appointment and a Scheduler control to your application as shown in the following code:
```xml
```
2. Switch to the code view and add the following code to add an appointment to the Scheduler and edit the appointment on the button click.
```csharp
public DeleteAppointment()
{
InitializeComponent();
InitAppointments();
}
private void InitAppointments()
{
for (int day = 1; day <= 7; day++)
{
scheduler.DataStorage.AppointmentStorage.Appointments.Add(new Appointment()
{
Start = new DateTime(2021, DateTime.Now.Month, day),
Duration = TimeSpan.FromHours(1),
Subject = $"Test Appointment {day}",
Body = "New Appointment"
});
}
}
private void btnDelete_Click(object sender, RoutedEventArgs e)
{
if (scheduler.SelectedAppointment == null)
MessageBox.Show("No Appointment selected.", "Select Appointment", MessageBoxButton.OK, MessageBoxImage.Information);
else
{
scheduler.SelectedAppointment.Delete(); // Deletes the appointment from the scheduler.
scheduler.SelectedAppointment = null;
}
}
```
## Recurring Appointments
Appointments can be set to recur at specified intervals. An appointment can recur daily, weekly, monthly, or yearly.
1. Double-click an existing appointment. The **Appointment** dialog box appears.
2. Click the **Recurrence** button. The **Appointment Recurrence** dialog box appears.
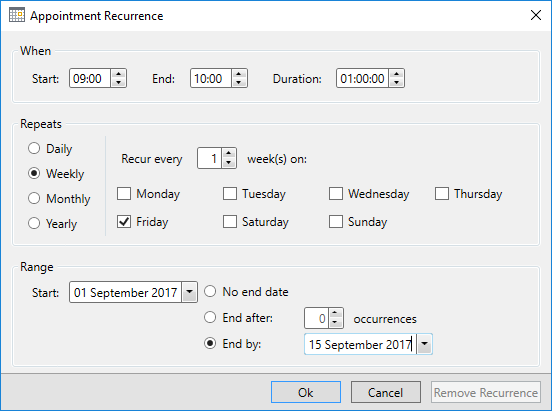
3. Set the desired recurrence pattern:
**When**
The properties in the **When** group allow you to set the start time, end time, and duration of the appointment.

Repeats
The **Repeats** group settings change depending on whether the appointment recurs **Daily**, **Weekly**, **Monthly**, or **Yearly**.
| Daily | The **Daily** settings allow you to repeat an appointment every specified number of days or only on working days. 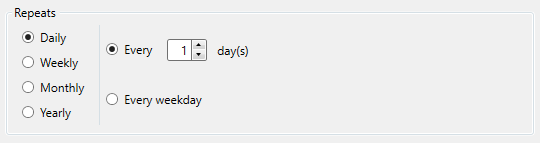 For example, setting the appointment to every 2 day(s) will make the appointment appear every other day. Setting the appointment to on working days will make the appointment appear only Monday through Friday, by default. |
| ----- | ------------------------------------------------------------------------------------------------------------------------------------------------------------------------------------------------------------------------------------------------------------------------------------------------------------------------------------------- |
| Weekly | The **Weekly** settings allow you to repeat the appointment on every specified week on specified days. 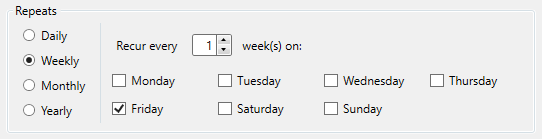 For example, setting the appointment to **every 2 week(s) on** and selecting **Tuesday** and **Thursday** will repeat the appointment every other week on Tuesdays and Thursdays. |
| Monthly | The **Monthly** settings allow you to repeat an appointment on every specified date at a specified interval of months or on a specified day and week of the month at a specified interval of months. 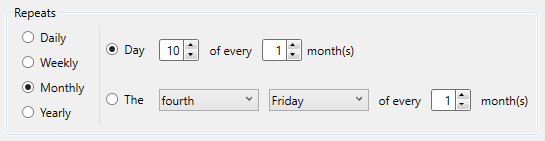 For example, setting the appointment to **on the 8 day of every 2 month** will make the appointment appear on the 8th of every other month. Setting the appointment to **on the third Monday of every 2 month** will make the appointment appear on the third Monday of every other month. |
| Yearly | The **Yearly** setting allows you to repeat an appointment on a specified date or a specified day and week of a specified month. 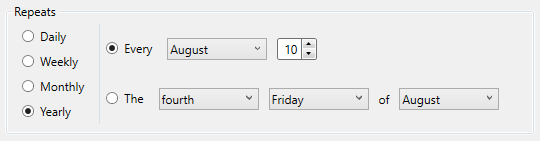 For example, setting the appointment to **on the 2 day of January** will make the appointment appear on January 2nd every year. This setting is ideal for birthdays and anniversaries. Setting the appointment to **on the first Friday of January** will make the appointment appear on the first Friday in January every year. |
**Range**
The **Range** group allows you to set a time span for the recurrence.
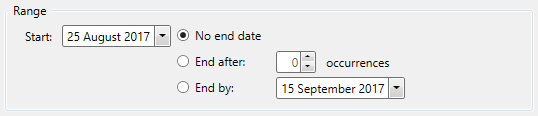
The **Start** drop-down calendar allows you to select the date from which the recurrence will start. There are three options to choose from for an end date:
* **No end date** will make the appointment recur indefinitely.
* **End after 0 occurrences** will make the appointment recur a specified number of times. For example, if an appointment repeated every day, setting **End after 25 occurrences** would allow the appointment to repeat every day 25 times.
* **End by** will make the appointment recur until the date specified.
4. Click **Save** to close the **Appointment Recurrence** dialog box.
Recurring appointments can also be created programmatically using the following code:
```csharp
var appointment = new Appointment();
appointment.Start = DateTime.Now;
appointment.Duration = TimeSpan.FromHours(1);
appointment.Subject = "Finance Meeting";
appointment.Body = "Meeting with Mr. Willson";
appointment.Importance = ImportanceEnum.High;
// Setting Recurring pattern for appointment.
var recurrencePattern = appointment.GetRecurrencePattern();
recurrencePattern.RecurrenceType = RecurrenceTypeEnum.Daily; // will occur daily
recurrencePattern.PatternStartDate = DateTime.Now;
recurrencePattern.Occurrences = 10; // will occur for 10 days
// Adding appointment to scheduler.
scheduler.DataStorage.AppointmentStorage.Appointments.Add(appointment);
```
## Keyboard Shortcuts for Appointment
Scheduler provides keyboard options for the following actions:
| **Key** | **Action** |
| --- | ------ |
| Enter | Creates new in-place appointment or opens the **Appointment** dialog for an existing selected appointment. |
| Esc | Cancels in-place appointment editing. |
| F2 | Turns on in-place appointment editing for selected appointment. |
| Tab (SHIFT+Tab) | Moves selection and keyboard focus to the next or previous appointment in the current view |