# Labels

## Content


A label is simply a color-coded marker that can be added to appointments so that you and others know what type of appointment it is without even having to view its details. There are twelve predefined labels available in Scheduler. The color of the label is visible in every data view in the Scheduler control.
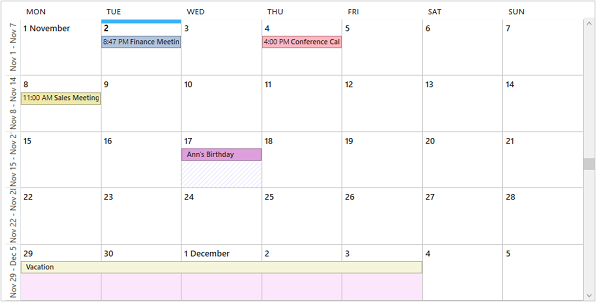
![](https://cdn.mescius.io/document-site-files/images/4c5f07fe-a0aa-4d09-95ef-6685908019cd/graphics/labels.png)

Labels can be set for any appointment at design time by selecting the desired label from the Label dropdown in the Appointment dialog as showcased in the image below.
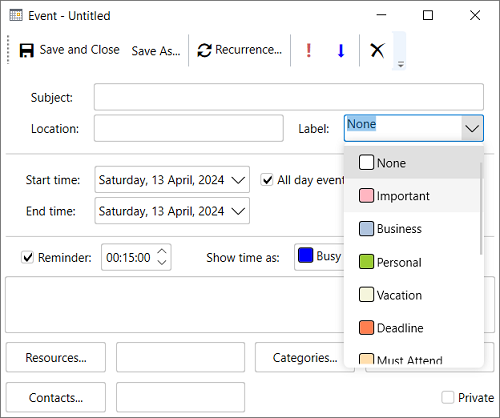
![](https://cdn.mescius.io/document-site-files/images/4c5f07fe-a0aa-4d09-95ef-6685908019cd/images/labelappointmentdialog.png)

### Predefined Labels

The predefined labels include the following:

|   **Label**   |   **Color**   |   **Index**   |
| --- | --- | --- |
|   None   |   ![](https://cdn.mescius.io/document-site-files/images/4c5f07fe-a0aa-4d09-95ef-6685908019cd/labels_files/image001.png)   |   0   |
|   Important   |   ![](https://cdn.mescius.io/document-site-files/images/4c5f07fe-a0aa-4d09-95ef-6685908019cd/labels_files/image002.png)   |   1   |
|   Business   |   ![](https://cdn.mescius.io/document-site-files/images/4c5f07fe-a0aa-4d09-95ef-6685908019cd/labels_files/image003.png)   |   2   |
|   Personal   |   ![](https://cdn.mescius.io/document-site-files/images/4c5f07fe-a0aa-4d09-95ef-6685908019cd/labels_files/image004.png)   |   3   |
|   Vacation   |   ![](https://cdn.mescius.io/document-site-files/images/4c5f07fe-a0aa-4d09-95ef-6685908019cd/labels_files/image005.png)   |   4   |
|   Deadline   |   ![](https://cdn.mescius.io/document-site-files/images/4c5f07fe-a0aa-4d09-95ef-6685908019cd/labels_files/image006.png)   |   5   |
|   Must Attend   |   ![](https://cdn.mescius.io/document-site-files/images/4c5f07fe-a0aa-4d09-95ef-6685908019cd/labels_files/image007.png)   |   6   |
|   Travel Required   |   ![](https://cdn.mescius.io/document-site-files/images/4c5f07fe-a0aa-4d09-95ef-6685908019cd/labels_files/image008.png)   |   7   |
|   Needs Preparation   |   ![](https://cdn.mescius.io/document-site-files/images/4c5f07fe-a0aa-4d09-95ef-6685908019cd/labels_files/image009.png)   |   8   |
|   Birthday   |   ![](https://cdn.mescius.io/document-site-files/images/4c5f07fe-a0aa-4d09-95ef-6685908019cd/labels_files/image010.png)   |   9   |
|   Anniversary   |   ![](https://cdn.mescius.io/document-site-files/images/4c5f07fe-a0aa-4d09-95ef-6685908019cd/labels_files/image011.png)   |   10   |
|   Phone Call   |   ![](https://cdn.mescius.io/document-site-files/images/4c5f07fe-a0aa-4d09-95ef-6685908019cd/labels_files/image012.png)   |   11   |

To add a label associated to an appointment programmatically, you can use <span data-popup-content="This property is available in both \u003ca href=\u0022/componentone/docs/wpf/online-scheduler/\u0022\u003e.NET\u003c/a\u003e and \u003ca href=\u0022C1.WPF.Schedule.4.6.2~C1.C1Schedule.Appointment~Label.html\u0022\u003e.NET Framework\u003c/a\u003e." data-popup-title="Label" data-popup-theme="ui-tooltip-green qtip-green">Label</span> property of the <span data-popup-content="This class is available in both \u003ca href=\u0022/componentone/docs/wpf/online-scheduler/\u0022\u003e.NET\u003c/a\u003e and \u003ca href=\u0022C1.WPF.Schedule.4.6.2~C1.C1Schedule.Appointment.html\u0022\u003e.NET Framework\u003c/a\u003e." data-popup-title="Appointment" data-popup-theme="ui-tooltip-green qtip-green">Appointment</span> class and set its index (from the above table) based on your requirements. For instance, the following code demonstrates how you can add "Important" label to an appointment:

```csharp
//Showing Labels
// adding 'Important' label.
appointment.Label = scheduler.DataStorage.LabelStorage.Labels[1];
```

### Custom Labels

Predefined labels are fixed categories that are already available within the Scheduler control. However, you can also create your own set of labels (or custom labels) to display specific information instead of predefined labels in the scheduler control.

With the **Scheduler** control, you can bind labels and availability statuses to your own custom collections easily. Custom labels override the predefined labels and appear in the **Scheduler** control on binding. To bind custom labels with the Scheduler control, you need to create a class that provides custom labels. Perform the following steps to create and bind your custom labels collection with the **Scheduler** control:

1.  Create a class with the name **Label** in the code-behind file and define the Text, Color and Index properties in it:
    
    ```csharp
    public class Label
    {
        public int Index { get; set; }
        public string Text { get; set; }
        public string Color { get; set; }
    }
    ```
    
2.  Initialize a collection with the name **Labels** of **List** datatype which holds instances of the **Label** class. The collection then adds a new Label object to this list with specific values of properties:
    
    ```csharp
    this.Labels = new List<Label>();
    this.Labels.Add(new Label { Text = "None", Color = "255,0,128,128", Index = 1 });
    this.Labels.Add(new Label { Text = "Weekly meet", Color = "255,0,255,255", Index = 2 });
    this.Labels.Add(new Label { Text = "Fortnight meet", Color = "255,0,255,128", Index = 3 });
    this.Labels.Add(new Label { Text = "Monthly meet", Color = "255,0,0,255", Index = 4 });
    this.Labels.Add(new Label { Text = "Semi-annual meet", Color = "255,255,0,0", Index = 5 });
    this.Labels.Add(new Label { Text = "Annual meet", Color = "255,255,255,0", Index = 5 });
    ```
    
3.  In the XAML view, add four property setters with the name **NestedPropertySetter** within <c1:C1Scheduler></c1:C1Schedule> tags to bind and map the **Labels** collection with the **C1Scheduler** control.
    
    ```xml
    <c1:NestedPropertySetter  PropertyName="DataStorage.LabelStorage.DataSource"  Value="{Binding Path = Labels}" />
    <c1:NestedPropertySetter  PropertyName="DataStorage.LabelStorage.Mappings.TextMapping.MappingName" Value="Text"/>
    <c1:NestedPropertySetter  PropertyName="DataStorage.LabelStorage.Mappings.ColorMapping.MappingName" Value="Color"/>
    <c1:NestedPropertySetter  PropertyName="DataStorage.LabelStorage.Mappings.IndexMapping.MappingName" Value="Index"/>
    ```
    
4.  Run the application and click the **Label** drop-down list to select a custom label, as shown in the following figure:

![Custom label](https://cdn.mescius.io/document-site-files/images/4c5f07fe-a0aa-4d09-95ef-6685908019cd/images/customlabel.png)