# Availability Status

## Content


The availability status lets everyone know if you will be available at the time when an appointment is scheduled. There are four predefined availability statuses available in Scheduler: _Busy_, _Free_, _Out of Office_, _Tentative, and Working Elsewhere_. The status is specified by the following colors:

|   **Status**   |   **Color**   |   **Index**   |
| --- | --- | --- |
|   Busy   |   ![](https://cdn.mescius.io/document-site-files/images/4c5f07fe-a0aa-4d09-95ef-6685908019cd/availability_status_files/image001.png)   |   0   |
|   Free   |   ![](https://cdn.mescius.io/document-site-files/images/4c5f07fe-a0aa-4d09-95ef-6685908019cd/availability_status_files/image002.png)   |   1   |
|   Out of Office   |   ![](https://cdn.mescius.io/document-site-files/images/4c5f07fe-a0aa-4d09-95ef-6685908019cd/availability_status_files/image003.png)   |   2   |
|   Tentative   |   ![](https://cdn.mescius.io/document-site-files/images/4c5f07fe-a0aa-4d09-95ef-6685908019cd/availability_status_files/image004.png)   |   3   |
|   Working Elsewhere   |   ![](https://cdn.mescius.io/document-site-files/images/4c5f07fe-a0aa-4d09-95ef-6685908019cd/availability_status_files/workingelsewhereicon.png)   |   4   |

The status can be specified at runtime in the Appointment dialog box next to the **Show time as** drop-down list.
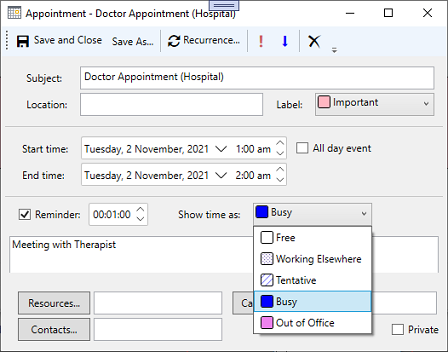
![](https://cdn.mescius.io/document-site-files/images/4c5f07fe-a0aa-4d09-95ef-6685908019cd/graphics/showtimeas.png)

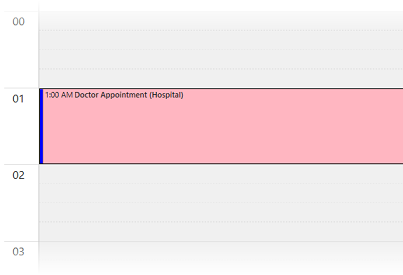
The color of the availability status is only visible in the **OneDayStyle** and **WorkingWeekStyle** views of a schedule. For appointments, the color appears in the area to the left of the appointment. Note that if you select the appointment, it will appear highlighted in the status color.
![WPF Scheduler availablility status](https://cdn.mescius.io/document-site-files/images/4c5f07fe-a0aa-4d09-95ef-6685908019cd/graphics/availabilitystatus.png)

To set the availability status during an appointment, you can use <span data-popup-content="This property is available in both \u003ca href=\u0022/componentone/docs/wpf/online-scheduler/\u0022\u003e.NET\u003c/a\u003e and \u003ca href=\u0022C1.WPF.Schedule.4.6.2~C1.C1Schedule.Appointment~BusyStatus.html\u0022\u003e.NET Framework\u003c/a\u003e." data-popup-title="BusyStatus" data-popup-theme="ui-tooltip-green qtip-green">BusyStatus</span> property of the <span data-popup-content="This class is available in both \u003ca href=\u0022/componentone/docs/wpf/online-scheduler/\u0022\u003e.NET\u003c/a\u003e and \u003ca href=\u0022C1.WPF.Schedule.4.6.2~C1.C1Schedule.Appointment.html\u0022\u003e.NET Framework\u003c/a\u003e." data-popup-title="Appointment" data-popup-theme="ui-tooltip-green qtip-green">Appointment</span> class and set its index (from the table given at towards the top of the topic) based on your requirements. For instance, the following code demonstrates how you can set "Busy" status for an appointment:

```csharp
//Showing Availability status
appointment.BusyStatus = scheduler.DataStorage.StatusStorage.Statuses[0]; // adding 'Busy' status.
```