# Create Rules
## Content
**Rules Manager** allows a user to perform different actions to manage the rules. These actions include creating, applying and deleting rules as discussed below.
A wide range of conditional formatting rules can be created in the **Rules Manager** using the **C1RulesEngine in WPF**. To explore how to define and apply these rules programmatically in WPF application, take a look at the section below.
### Color Scale Rule
Use the following code to create a color scale rule
```xml
```
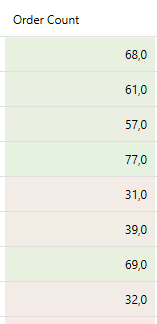
In the above example, the color scale rule is applied to the **OrderCount** column based on the values in each cell. Two color stops are defined in the rule: one at a value of 0 with a light red color and one at a value of 100 with light green color. When the rule is evaluated, it interpolates the background of each value. If the value is closer to 0 it will appear towards the red spectrum and if the value is closer to 100 it will appear towards the green, hence creating a visual gradient that helps the user to assess the magnitude of the value.
### Data Bar Rule
Use the following code to create a data bar rule
```xml
```
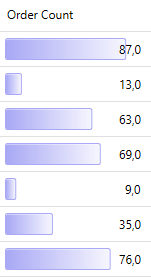
In the above example, the data bar rule is applied to **OrderCount** column to visually represent the size of each value using horizontal bars. The color of the bar is set to soft purple and the **IsGradient** property is set to true to give the data bar a gradient effect. Setting **IsSolidBorder** property to true gives the data bar solid border for better definition.
### Expression rule
Use the following code to create an expression rule
```xml
```
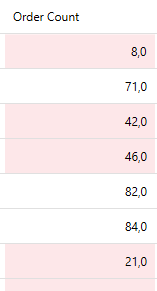
In the above example, expression rule is applied to the **OrderCount** Column that gives the values a conditional style. The condition is set to values under 50 in the **OrderCount** column and the background is set to red. The expression rule checks this condition and applies the specified formatting to values that are true.
### Segments rule
Use the following code to create a segments rule
```xml
```
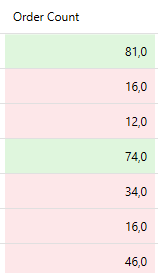
In the above example, segments rule is applied to the **OrderCount** column. It defines 2 segments: For values that are less than 50 the background is set to red color and for values that are more or equal to 50 the background is set to green.
### Custom rule
Use the following code to create a custom rule
```xml
```
```csharp
public RulesEngineStyle GetFirstNameStyle(IRulesEngineContext context)
{
var firstName = context.GetValue();
if (firstName == "Andy")
return new RulesEngineStyle
{
Background = new SolidColorBrush(Colors.Purple),
Foreground = new SolidColorBrush(Colors.White)
};
return null;
}
```
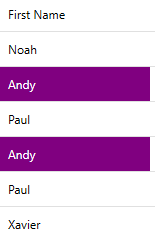
The example code above defines a custom rule in the **FirstName** column. In the **XAML** part, **RulesEngineCustomRule** targets the field FirstName and applies logic defined in the **GetFirstNameStyle** method. The corresponding **GetFirstNameStyle** method written in C# checks if the value of the **FirstName** field equals Andy. If the condition is true, the background is set to purple, and the foreground is set to white.