# Menu and ContextMenu Quick Start
## Content
The following quick start guide is intended to get you up and running with the C1Menu control. In this quick start, you'll start in Visual Studio to create a new project and add a menu items, submenus and context menu to your application.
### Create an Application using C1Menu Control
1. In Visual Studio, select **File | New | Project**.
2. In the **New Project** dialog box, select **WPF Application**.
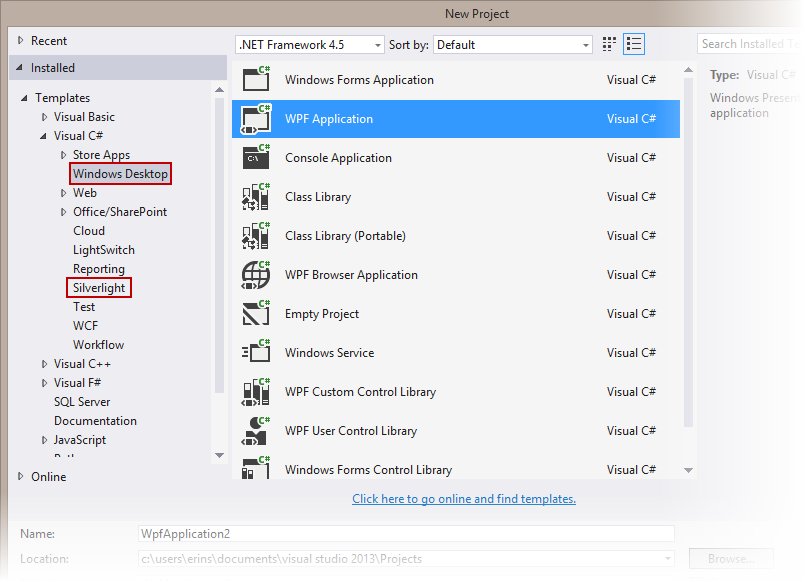
New Project Dialog Box
3. Enter a **Name** and **Location** for your project and click **OK** to create the new application.
4. From the Toolbox, double-click the **C1Menu** control to add it to the application.
5. Edit the control's markup to add **Height= "Auto"** and **Width= "Auto"** to the **** tag. It should resemble the following:
```xml
```
You have completed the first step of the **Menu for WPF** quick start. In this step, you created a project and added a **C1Menu** control to it. In the next step, you will add top-level menu items to the control.
### Add Menu Items
In the last step, you created a WPF project with a C1Menu control attached to it. In this step, you will add three menu items to the **C1Menu** control.
1. Add three C1MenuItems to your **C1Menu** control. You can do this by editing the control's markup so that it resembles the following:
```xml
```
2. Select the first **C1MenuItem** you added and edit the markup so that it resembles the following:
```xml
```
3. Select the second **C1MenuItem** you added and edit the markup so that it resembles the following:
```xml
```
4. Select the third **C1MenuItem** and edit the markup so that it resembles the following:
```xml
```
In this step, you added top-level menu items to the **C1Menu** control. In the next step, you will use XAML to add submenus to two of those items.
### Add Submenus to Menu Items
In the last step, you added the top-level menu items. In this step, you will add submenus to two of the menu items using XAML.
1. Switch to XAML view.
2. Select the first two **** tags. For reference, they should resemble the following:
```xml
```
3. To add a submenu to the "File" menu item, add the following markup between the **** and **** tags:
```xml
```
4. To add a submenu to the "Edit" menu item, following markup between the **** and **** tags:
```xml
```
In this step, you added submenus to two of the **C1Menu** control's menu items. In the next step, you will add a C1ContextMenu control to the **C1Menu** control.
### Add the ContextMenu
In the last step, you added submenus to two of the C1Menu control's menu items. In this step, you will add a C1ContextMenu control to the **C1Menu** control. This context menu will have one item that, when clicked, will add submenu items to the **C1Menu** control's top-level "Added Items" top-level menu item that you created in **Step 2 of 5: Adding Menu Items**.
Complete the following steps:
1. In XAML view, place the following XAML markup right before the **** tag:
```xml
```
The above markup adds a ContextMenu to the **C1Menu** control using the [C1Menu](/componentone/api/wpf/online-menu5/dotnet-api/C1.WPF.Menu/C1.WPF.Menu.C1Menu.html) class. Note that the ContextMenu contains one **C1MenuItem** that is attached to a **Click** event named **"AddedItems"**.
2. Add **x:Name="AddedItems"** to the **** tag. This gives the item a unique identifier so that you can call it in code. The markup will resemble the following:
```xml
```
3. Open the **MainPage.xaml.cs** page and add the following **Click** event handler to the project:
```vbnet
Private Sub AddItemClick(ByVal sender As Object, ByVal
e As RoutedEventArgs)
Dim menuItem As New C1MenuItem()
menuItem.Header = "Added Item"
AddedItems.Items.Add(menuItem)
End Sub
```
```csharp
private void AddItemClick(object sender, RoutedEventArgs e)
{
C1MenuItem menuItem = new C1MenuItem();
menuItem.Header = "Added Item";
AddedItems.Items.Add(menuItem);
}
```
In this step, you added a ContextMenu to the **C1Menu** control. In the next step, you will run the project and see the result of the **Menu for WPF** quick start.
### Run the Application
Now that you have created a WPF project with a **C1Menu** control, the only thing left to do is run the project and observe the results of your work.
Complete the following steps:
1. From the toolbar, select **Debug | Start Debugging** to run the application. The application appears as follows:

2. Click **File** and observe that a submenu appears.
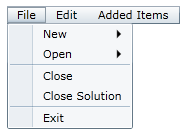
3. Hover your cursor over **New** and observe that another submenu appears.
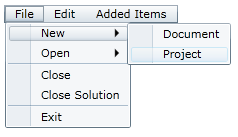
4. Hover your cursor over **Open** and observe that another submenu appears. Note that **Recent Document 1** is checked.
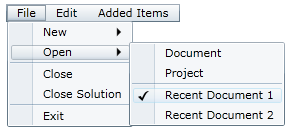
5. Click **Recent Document 2**.
The Open submenu closes.
6. Select **File | Open** and observe that **Recent Document 2** is checked instead of **Recent Document 1**.
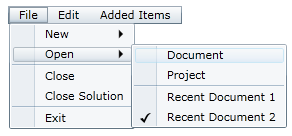
The two checkable items, Recent Document 1 and Recent Document 2, are grouped together to form a list of mutually exclusive checkable items. You can read more about this by visiting the Checkable Menu Items topic.
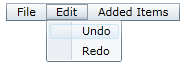
7. Click **Edit** and observe that the **Edit submenu** appears.
8. Click **Added Items** and observe that it has no submenu.
9. Right-click the menu to bring up the context menu.
10. On the context menu, click **Add Item**.

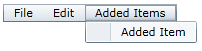
11. Click **Added Items** and observe that it has a submenu consisting of one new item, which is named **Added Item**.
**Congratulations!**
You have completed the **Menu for WPF** quick start.