# Quickstart
This topic provides the user an easy-to-follow and step-by-step implementation of Maps in WPF applications.
## Content
This quick start guides you through the steps of creating a simple WPF application in .NET using the Maps control.
Complete the steps given below to see how the Maps control appears after data binding and setting the properties.
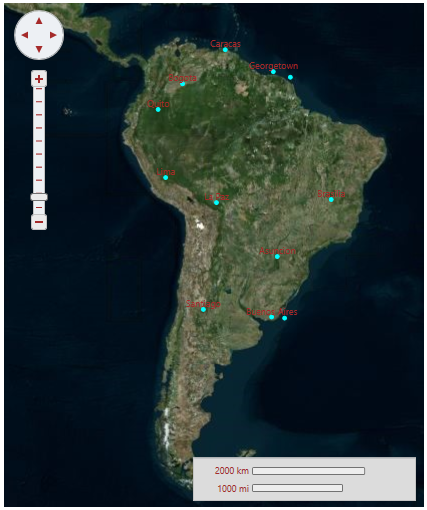
1. Create a new WPF application.
2. Install NuGet packages using the '**Manage NuGet Packages**' option.
3. Switch to the code view and add a class named **City** with the **cityName** property to get or set city name, and the **location** property to get or set location of the city.
```csharp
public class City
{
private Point _LongLat;
public Point LongLat
{
get
{
return _LongLat;
}
set
{
_LongLat = value;
}
}
private string _Name;
public string Name
{
get
{
return _Name;
}
set
{
_Name = value;
}
}
public City(Point location, string cityName)
{
this.LongLat = location;
this.Name = cityName;
}
public City()
{
}
}
```
4. Add the following code beneath the InitializeComponent() method to create the array collection that will populate the **Name** property and the **LongLat** property:
```csharp
City[] cities = new City[]
{
new City(){ LongLat= new Point(-58.40, -34.36), Name="Buenos Aires"},
new City(){ LongLat= new Point(-47.92, -15.78), Name="Brasilia"},
new City(){ LongLat= new Point(-70.39, -33.26), Name="Santiago"},
new City(){ LongLat= new Point(-78.35, -0.15), Name="Quito"},
new City(){ LongLat= new Point(-66.55, 10.30), Name="Caracas"},
new City(){ LongLat= new Point(-56.11, -34.53), Name="Montevideo"},
new City(){ LongLat= new Point(-77.03, -12.03), Name="Lima"},
new City(){ LongLat= new Point(-57.40, -25.16), Name="Asuncion"},
new City(){ LongLat= new Point(-74.05, 4.36), Name="Bogota"},
new City(){ LongLat= new Point(-68.09, -16.30), Name="La Paz"},
new City(){ LongLat= new Point(-58.10, 6.48), Name="Georgetown"},
new City(){ LongLat= new Point(-55.10, 5.50), Name="Paramaribo"},
};
maps.DataContext = cities;
```
5. Drag the Maps control on the XAML designer, that is **MainWindow.xaml**. Place the following XAML markup between the \ and tags:
```xml
```
In the XAML code above, we have created a data template using the [VectorPlacemark](/componentone/api/wpf/online-maps5/dotnet-api/C1.WPF.Maps/C1.WPF.Maps.VectorPlacemark.html) and [VectorLayer](/componentone/api/wpf/online-maps5/dotnet-api/C1.WPF.Maps/C1.WPF.Maps.VectorLayer.html) classes. The following properties are used in the XAML code:
* [FadeInTiles](/componentone/api/wpf/online-maps5/dotnet-api/C1.WPF.Maps/C1.WPF.Maps.C1Maps.FadeInTiles.html), [Center](/componentone/api/wpf/online-maps5/dotnet-api/C1.WPF.Maps/C1.WPF.Maps.C1Maps.Center.html), and [Zoom](/componentone/api/wpf/online-maps5/dotnet-api/C1.WPF.Maps/C1.WPF.Maps.C1Maps.Zoom.html) properties of [C1Maps](/componentone/api/wpf/online-maps5/dotnet-api/C1.WPF.Maps/C1.WPF.Maps.C1Maps.html) class to customize the appearance of the map.
* [GeoPoint](/componentone/api/wpf/online-maps5/dotnet-api/C1.WPF.Maps/C1.WPF.Maps.VectorPlacemark.GeoPoint.html) and [Label](/componentone/api/wpf/online-maps5/dotnet-api/C1.WPF.Maps/C1.WPF.Maps.VectorPlacemark.Label.html) properties of [VectorPlacemark](/componentone/api/wpf/online-maps5/dotnet-api/C1.WPF.Maps/C1.WPF.Maps.VectorPlacemark.html) class is used to set the element position in geographical coordinates of longitude/latitude, and display the tooltips. Here, the **GeoPoint** property is bound to the value of the LongLat property while its **Label** property is set to the value of the Name property of City class.
* [ItemsSource](/componentone/api/wpf/online-maps5/dotnet-api/C1.WPF.Maps/C1.WPF.Maps.VectorLayer.ItemsSource.html) property of [VectorLayer](/componentone/api/wpf/online-maps5/dotnet-api/C1.WPF.Maps/C1.WPF.Maps.VectorLayer.html) class is bound to the entire data source.
6. Run the program and view the results of the quick start project.
## See Also
[End User Interaction](/componentone/docs/wpf/online-maps5/enduser-interaction)