# Quick Start
## Content
The following quick start guide is intended to get you up and running with MaskedTextBox for WPF. In this quick start, you add a C1MaskedTextBox control to your application and customize the appearance and behavior of the controls.
### Set up the Application
In this step you'll begin in Visual Studio to create a WPF application using **MaskedTextBox for WPF**. When you add a C1MaskedTextBox control to your application, you'll have a complete, functional input editor. You can further customize the control to your application.
To set up your project and add **C1MaskedTextBox** controls to your application, complete the following steps:
1. In Visual Studio, select **File | New | Project**.
2. In the **New Project** dialog box, select **WPF** **Application**.
3. Enter a **Name** and **Location** for your project and click **OK** to create the new application.
4. In XAML, add the following code:
```xml
```
Follow the rest of the steps to add **C1MaskedTextBox** and **Label** controls to the **StackPanel**.
1. Navigate to the Toolbox and double-click the **C1MaskedTextBox** icon to add the control. Repeat this step 3 more times to add a total of 4 **C1MaskedTextBox** controls.
2. In the Toolbox, double-click the **Label** icon to add the control to your application. Repeat this step 4 more times to add a total of 5 standard **Label** controls.
3. Resize and rearrange the controls. Alternate the Label and **C1MaskedTextBox** controls, making sure that they are arranged as in the image below.
Your application should now appear similar to the following image. Note that the controls are labeled:
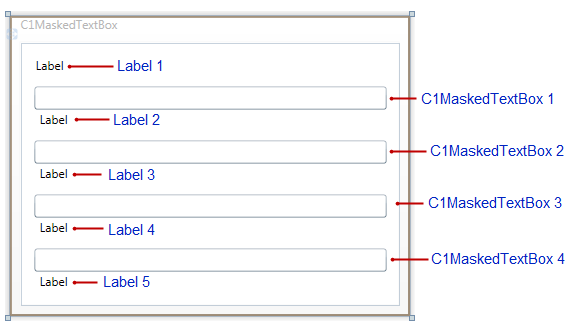
You've successfully created a WPF and added **C1MakedTextBox** controls to the application. In the next step you'll customize those controls and complete setting up the application.
### Customize the Appearance
In the previous step you created a new WPF project and added four **C1MaskedTextBox** and five **Label** controls to the application. In this step you'll continue by setting properties to customize those controls.
Complete the following steps:
1. In **Design** view, click once on the **Label1** control to select it, navigate to the **Properties** window, and set its **Content** property to "**Employee Information**".
2. Select each remaining **Label** control in turn, navigate to the **Properties** window, and set the following for each:
* Delete the default "Label" text next to Content property.
* Set the **FontSize** property to "**9**".
3. Switch to XAML view and customize **C1MaskedTextBox1** by adding **Watermark="Name"** to the **** tag so it appears similar to the following:
```xml
```
This will add a watermark to the control.
4. Switch to XAML view and customize **C1MaskedTextBox2** by adding **Watermark="Employee ID" Mask="000-00-0000"** to the **** tag so it appears similar to the following:
```xml
```
This will add a watermark and mask to the control.
5. Switch to XAML view and customize **C1MaskedTextBox3** by adding **Watermark="Hire Date" Mask="00/00/0000"** to the **** tag so it appears similar to the following:
```xml
```
This will add a watermark and mask to the control.
6. Switch to XAML view and customize **C1MaskedTextBox4** by adding **Watermark="Phone Number" Mask="(999) 000-0000"** to the **** tag so it appears similar to the following:
```xml
```
This will add a watermark and mask to the control.
You've successfully set up your application's user interface. In the next step you'll add code to your application.
### Add Code to the Application
In the previous steps you set up the application's user interface and added controls to your application. In this step you'll add code to your application to finalize it.
Complete the following steps:
1. In **Design** view, double-click **C1MaskedTextBox1** to switch to **Code** view and create the **C1MaskedTextBox1\_TextChanged** event handler. Return to **Design** view and repeat this step with each of the **C1MaskedTextBox** controls so that they each have a **C1MaskedTextBox1\_TextChanged** event handler.
2. In **Code** view, add the following import statement to the top of the page:
```vbnet
Imports C1.WPF
```
```csharp
using C1.WPF;
```
3. Add code to the **C1MaskedTextBox1\_TextChanged** event handler so that it appears like the following:
```vbnet
Private Sub C1MaskedTextBox1_TextChanged(ByVal sender As System.Object, ByVal e As System.Windows.Controls.TextChangedEventArgs) Handles C1MaskedTextBox1.TextChanged
Me.Label2.Content = "Mask: " & Me.C1MaskedTextBox1.Mask & " Value: " & Me.C1MaskedTextBox1.Value & " Text: " & Me.C1MaskedTextBox1.Text
End Sub
```
```csharp
private void c1mtb1_TextChanged(object sender, TextChangedEventArgs e)
{
this.lbl2.Content = "Mask: " + this.c1mtb1.Mask + " Value: " + this.c1mtb1.Value + " Text: " + this.c1mtb1.Text;
}
```
4. Add code to the **C1MaskedTextBox2\_TextChanged** event handler so that it appears like the following:
```vbnet
Private Sub C1MaskedTextBox2_TextChanged(ByVal sender As System.Object, ByVal e As System.Windows.Controls.TextChangedEventArgs) Handles C1MaskedTextBox2.TextChanged
Me.Label3.Content = "Mask: " & Me.C1MaskedTextBox2.Mask & " Value: " & Me.C1MaskedTextBox2.Value & " Text: " & Me.C1MaskedTextBox2.Text
End Sub
```
```csharp
private void c1MaskedTextBox2_TextChanged(object sender, TextChangedEventArgs e)
{
this.label3.Content = "Mask: " + this.c1MaskedTextBox2.Mask + " Value: " + this.c1MaskedTextBox2.Value + " Text: " + this.c1MaskedTextBox2.Text;
}
```
5. Add code to the **C1MaskedTextBox3\_TextChanged** event handler so that it appears like the following:
```vbnet
Private Sub C1MaskedTextBox3_TextChanged(ByVal sender As System.Object, ByVal e As System.Windows.Controls.TextChangedEventArgs) Handles C1MaskedTextBox3.TextChanged
Me.Label4.Content = "Mask: " & Me.C1MaskedTextBox3.Mask & " Value: " & Me.C1MaskedTextBox3.Value & " Text: " & Me.C1MaskedTextBox3.Text
End Sub
```
```csharp
private void c1MaskedTextBox3_TextChanged(object sender, TextChangedEventArgs e)
{
this.label4.Content = "Mask: " + this.c1MaskedTextBox3.Mask + " Value: " + this.c1MaskedTextBox3.Value + " Text: " + this.c1MaskedTextBox3.Text;
}
```
6. Add code to the **C1MaskedTextBox4\_TextChanged** event handler so that it appears like the following:
```vbnet
Private Sub C1MaskedTextBox4_TextChanged(ByVal sender As System.Object, ByVal e As System.Windows.Controls.TextChangedEventArgs) Handles C1MaskedTextBox4.TextChanged
Me.Label5.Content = "Mask: " & Me.C1MaskedTextBox4.Mask & " Value: " & Me.C1MaskedTextBox4.Value & " Text: " & Me.C1MaskedTextBox4.Text
End Sub
```
```csharp
private void c1MaskedTextBox4_TextChanged(object sender, TextChangedEventArgs e)
{
this.label5.Content = "Mask: " + this.c1MaskedTextBox4.Mask + " Value: " + this.c1MaskedTextBox4.Value + " Text: " + this.c1MaskedTextBox4.Text;
}
```
In this step you completed adding code to your application. In the next step you'll run the application and observe run-time interactions.
### Run the Application
Now that you've created a WPF application and customized the application's appearance and behavior, the only thing left to do is run your application. To run your application and observe **MaskedTextBox for WPF** run-time behavior, complete the following steps:
1. From the **Debug** menu, select **Start Debugging** to view how your application will appear at run time. It will appear similar to the following:
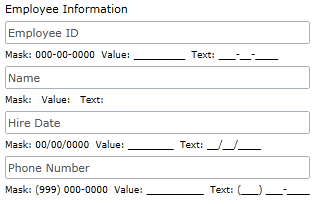
Notice the watermark that appears in each **C1MaskedTextBox** control.
2. Enter a number in the first **C1MaskedTextBox** control:
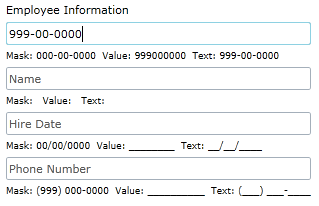
The label below the control displays the mask, current value, and current text.
3. Enter a string in the second **C1MaskedTextBox** control:
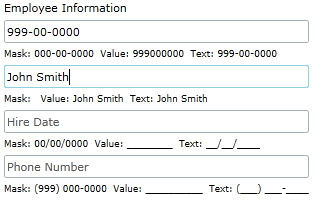
Notice that there was no mask added to this control – if you chose, you could type numbers or other characters in the control.
4. Try entering a string in the third **C1MaskedTextBox** control. Notice that you cannot – that is because the **Mask** property was set to only accept numbers. Enter a numeric value instead – notice that this does work.
5. Enter numbers in each of the remaining controls. The application will appear similar to the following image:
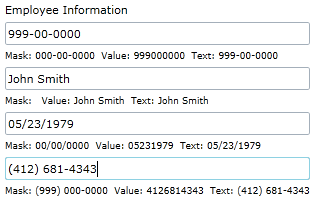
Notice that the **Value** property displayed under each **C1MaskedTextBox** control does not include literal characters, while the **Text** property does.
**Congratulations!**
You've completed the **MaskedTextBox for WPF** quick start and created a **MaskedTextBox for WPF** application, customized the appearance and behavior of the controls, and viewed some of the run-time capabilities of your application.