# Step 3 of 5: Adding Items to the C1CoverFlow Control
## Content
In the last step, you customized the **StackPanel**, **C1CoverFlow**, and **TextBlock** controls by setting a few properties. In this step, you’ll add four items – a **TextBox** control and three images – to the **C1CoverFlow** control. You will also customize each item by settings its properties.
Complete the following steps:
1. Add a **TextBox** control to the **C1CoverFlow** control by completing the following steps:
1. In the **Objects and Timeline** panel, select **C1CoverFlow1.**
2. In the Assets panel, enter "TextBox" into the search bar.
3. The **TextBox** control's icon appears.
4. Double-click the **TextBox** icon to add the control to the **C1CoverFlow** control.
2. Add the first image to the control by completing the following steps:
1. In the **Objects and Timeline** panel, select **C1CoverFlow1**.
2. In the **Projects** panel, expand the **Images** folder if it’s not already expanded.
3. Double-click **cover1.jpg** to add the image to the **C1CoverFlow** control.
4. Double-click **cover2.jpg** to add the image to the **C1CoverFlow** control.
5. Double-click **cover3.jpg** to add the image to the **C1CoverFlow** control.
In the **Objects and Timeline** tab, the layout looks as follows:
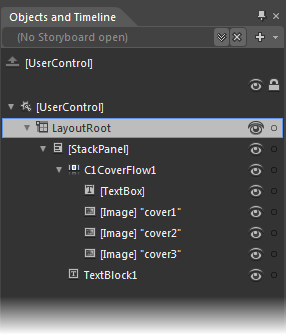
3. In the **Objects and Timeline** panel, select **[TextBox]** and set the following properties in the Properties panel:
* Set the **Background** property to a light purple by entering “#FFB3AED8” into the Hex value text box.
* Set the **Width** property to “150”.
* Set the **Height** property to “150”.
* Set the **Text** property to the following string: “As you scroll through the list of album covers, the TextBlock control will display the title of the currently selected item.”
4. In the **Objects and Timeline** panel, select **[Image] “cover1”** and set the following properties in the Properties panel:
* Set the **Width** property to “150”.
* Set the **Height** property to “150”.
5. In the **Objects and Timeline** panel, select **[Image] “cover2”** and set the following properties in the Properties panel:
* Set the **Width** property to “150”.
* Set the **Height** property to “150”.
6. In the **Objects and Timeline** panel, select **[Image] “cover3”** and set the following properties in the Properties panel:
* Set the **Width** property to “150”.
* Set the **Height** property to “150”.
In this step, you added four items to the **C1CoverFlow** control and then set the items’ properties. In the next step, you’ll add code to the project.