# Adding Icons
## Content
You can add an icon to a C1MenuItem in either XAML or Code
### In XAML
Complete the following steps:
1. Add an icon image to your Silverlight project. A 12x12 pixel image is best.
2. Add the following XAML markup between the \ and tags, replacing the value of the Source property with your image's name:
```xml
```
3. Run the project.
### In Code
Complete the following steps:
1. Add an icon image to your Silverlight project. A 12x12 pixel image is best.
2. Add **x:Name="C1MenuItem1"** to the item you wish to add an icon to.
3. Import the following namespace:
```vbnet
Imports System.Windows.Media.Imaging
```
```EXAMPLE
using System.Windows.Media.Imaging;
```
4. Enter Code view and add the following code beneath the **InitializeComponent()** method:
```vbnet
'Create an image and assign it a source, margin, and width
Dim ItemIcon As New Image()
ItemIcon.Source = New BitmapImage(New Uri("02.png", UriKind.RelativeOrAbsolute))
ItemIcon.Margin = New Thickness(5, 0, 0, 0)
ItemIcon.Height = 12
ItemIcon.Width = 12
'Set the C1MenuItem's icon property to the new image
C1MenuItem.Icon = ItemIcon
```
```csharp
//Create an image and assign it a source, margin, and width
Image ItemIcon = new Image();
ItemIcon.Source = new BitmapImage(new Uri("02.png", UriKind.RelativeOrAbsolute));
ItemIcon.Margin = new Thickness(5,0,0,0);
ItemIcon.Height = 12;
ItemIcon.Width = 12;
//Set the C1MenuItem's icon property to the new image
C1MenuItem1.Icon = ItemIcon;
```
5. Run the project.
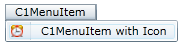
The following image depicts a **C1MenuItem** with a 12x12 pixel icon.