# TileList Box Quick Start
## Content
The following quick start guide is intended to get you up and running with the **C1TileListBox** control. In this quick start you'll start in Visual Studio and create a new project, add **C1TileListBox** to your application, and customize the appearance and behavior of the control.
### Step 1
In this step, you'll create a WPF or Silverlight application in Visual Studio using **TileListBox for WPF and Silverlight**.
To set up your project, complete the following steps:
1. In Visual Studio, select **File \| New Project**.
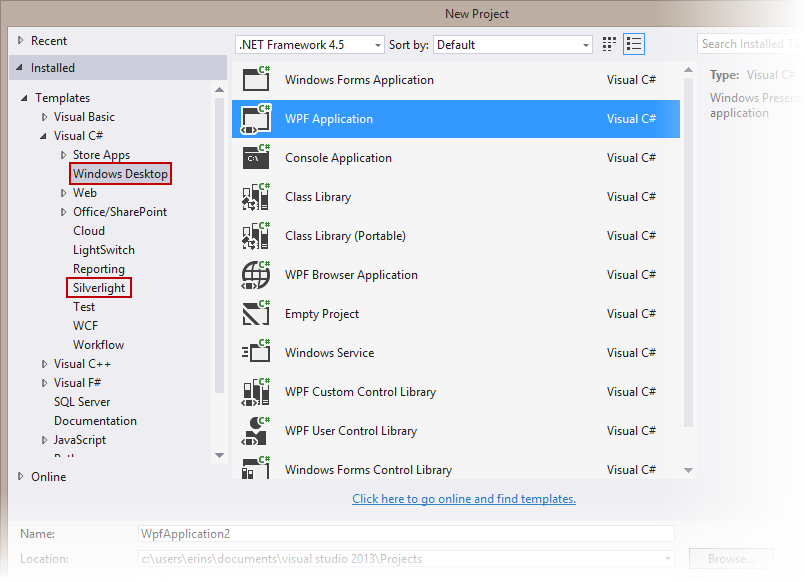
2. In the **New Project dialog box**, select either **Windows Desktop** or **Silverlight** from the **Templates** in the left-hand pane.
> 
>
> New Project Dialog
3. Select **WPF Application** or **Silverlight Application**, depending on the template you chose.
4. Enter a **Name** for your project, for example "QuickStart", and click **OK**. In a **WPF Application**, the **MainWindow.xaml** file will open.
1. If you selected a **Silverlight Application**, when you click **OK**, the **New Silverlight Application** dialog box will appear.
2. Click **OK** to accept default settings. This will close the **New Silverlight Application** dialog box and create your project.
3. The **MainPage.xaml** file should open.
5. Add the following assemblies to your application by right-clicking the **References** folder and selecting **Add Reference**:
* **WPF**: C1.WPF.4.dll
* **Silverlight**: C1.Silverlight.5.dll
6. Place the cursor between the \ and \, navigate to the Toolbox, and double-click the **C1TileListBox** icon to add the control to the grid. This will add the reference and XAML namespace automatically.
7. Edit the **\** tag to customize the control:
```xml
```
This gives the control a name, sets the **ItemsSource** property (you'll customize this in code in a later step), and sets the size of the control.
8. Add markup between the **\** and **** tags so it looks like the following:
```xml
```
This markup adds data templates for the **C1TileListBox** control's content. You'll complete binding the control in code in the next step.
### Step 2
In the last step, you added the **C1TileListBox** control to the application. In this step, you will add code to bind the control to data.
Complete the following steps to add data to the control:
1. Right-click the page and select **View Code** to open the Code Editor.
2. Add the following imports statements to the top of the page:
```vbnet
Imports System
Imports System.Collections.Generic
Imports System.Diagnostics
Imports System.Linq
Imports System.Net
Imports System.Windows;
Imports System.Windows.Controls;
Imports System.Xml.Linq;
Imports C1.WPF
OR
Imports System
Imports System.Collections.Generic
Imports System.IO
Imports System.Linq
Imports System.Xml.Linq
Imports System.Net
Imports C1.Silverlight
```
```csharp
using System;
using System.Collections.Generic;
using System.Diagnostics;
using System.Linq;
using System.Net;
using System.Windows;
using System.Windows.Controls;
using System.Xml.Linq;
using C1.WPF;
OR
using System;
using System.Collections.Generic;
using System.Linq;
using System.Net;
using C1.Silverlight;
```
3. Add the following code inside the initial event handler within the **MainPage** class:
```vbnet
DataContext = Enumerable.Range(0, 100).[Select](Function(i) New Item() With {.Title = i.ToString()})
```
```csharp
DataContext = Enumerable.Range(0, 100).Select(i => new Item { Title = i.ToString() });
```
4. Add the following code below the initial event handler but within the **MainPage** class:
```vbnet
#Region "** public properties"
Public Property Orientation() As Orientation
Get
Return tileListBox.Orientation
End Get
Set(value As Orientation)
tileListBox.Orientation = value
End Set
End Property
Public Property ItemWidth() As Double
Get
Return tileListBox.ItemWidth
End Get
Set(value As Double)
tileListBox.ItemWidth = value
End Set
End Property
Public Property ItemHeight() As Double
Get
Return tileListBox.ItemHeight
End Get
Set(value As Double)
tileListBox.ItemHeight = value
End Set
End Property
Public Property ZoomMode() As ZoomMode
Get
Return tileListBox.ZoomMode
End Get
Set(value As ZoomMode)
tileListBox.ZoomMode = value
End Set
End Property
#End Region
```
```csharp
#region ** public properties
public Orientation Orientation
{
get
{
return tileListBox.Orientation;
}
set
{
tileListBox.Orientation = value;
}
}
public double ItemWidth
{
get
{
return tileListBox.ItemWidth;
}
set
{
tileListBox.ItemWidth = value;
}
}
public double ItemHeight
{
get
{
return tileListBox.ItemHeight;
}
set
{
tileListBox.ItemHeight = value;
}
}
public ZoomMode ZoomMode
{
get
{
return tileListBox.ZoomMode;
}
set
{
tileListBox.ZoomMode = value;
}
}
#endregion
```
The code above binds the **C1TileListBox** to a list of numbers.
5. Add the following code just below the **MainPage** class:
```vbnet
Public Class Item
Public Property Title() As String
Get
Return m_Title
End Get
Set(value As String)
m_Title = Value
End Set
End Property
Private m_Title As String
Public Property Thumbnail() As String
Get
Return m_Thumbnail
End Get
Set(value As String)
m_Thumbnail = Value
End Set
End Property
Private m_Thumbnail As String
End Class
```
```csharp
public class Item
{
public string Title { get; set; }
public string Thumbnail { get; set; }
}
```
You have successfully added data to **C1TileTileListBox**. In Step 3, you'll examine the **TileListBox for WPF and Silverlight** features.
### Step 3
Now that you've created a WPF or Silverlight application and customized the application's appearance and behavior, the only thing left to do is run your application.
To run your application and observe TileListBox for WPF and Silverlight's run-time behavior, complete the following steps:
1. From the Debug menu, select Start Debugging to view how your application will appear at run time.
2. The application will appear, displaying a tiled list of numbers.
3. Use the scroll bar on the right of the control, to scroll through the numbered squares.
4. If you have touch capabilities, try pinching to zoom an image.
**Congratulations!**
You've completed the **TileListBox for WPF and Silverlight** quick start and created an application using the **C1TileListBox** control and viewed some of the run-time capabilities of your application.