# Quick Start

## Content


This quick start will guide you through the steps of creating a simple travel form using the Input controls. Follow the steps below to get started.
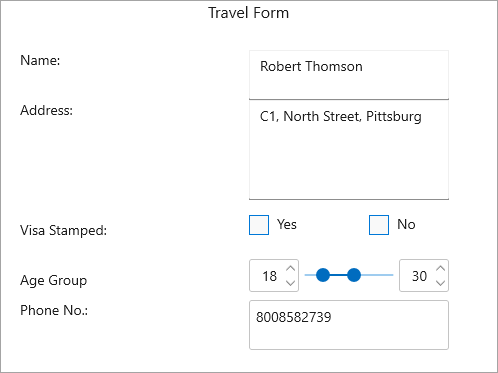
![](https://cdn.mescius.io/document-site-files/images/2d49eac2-0942-4770-99ef-52b14e6815bd/images/input-travel-form.png)

## Create a WinUI Application and add References

1.  In Visual Studio, create a new WinUI App. For detailed steps, see [Configure WinUI Application](/componentone/docs/winui/online-winui/configuring-winui-app).
2.  In the **Solution Explorer**, right click **Dependencies** and select **Manage NuGet Packages**.
3.  In **NuGet Package Manager**, select **nuget.org** as the **Package source**.
4.  Search and select the following package and click **Install**.
    *   **C1.WinUI.Input**

## Add and Configure Input Controls

In this step, we are adding and configuring various Input controls to make you familiar with each one of them.

1.  In XAML view, declare the namespace using the following code in XAML.
    
    ```xml
    xmlns:c1="using:C1.WinUI.Input"
    ```
    
2.  Place the cursor between the \<Grid>\</Grid>tag to add the C1TextBox, C1AutoCompleteTextBox C1MaskedTextBox, C1RangeSlider, C1NumericBox, and several TextBlock controls using the following code to create the desired layout as given in the image provided above.
    
    ```xml
    <TextBlock Text="Travel Form" Grid.ColumnSpan="2" HorizontalAlignment="Center" FontSize="16"/>
    <TextBlock Text="Name: " Grid.Row="1" Margin="20,0,0,0"/>
    <c1:C1TextBox Text="{Binding Person.Name}" Grid.Column="1" Grid.Row="1" Width="200" HorizontalAlignment="Left"/>
    <TextBlock Text="Address: " Grid.Row="2" Margin="20,0,0,0"/>
    <c1:C1AutoCompleteTextBox Text="{Binding Person.Address}" Grid.Column="1" Grid.Row="2" Width="200" HorizontalAlignment="Left"/>
    <TextBlock Text="Visa Stamped: " Grid.Row="3" Margin="20,20,0,0"/>
    <StackPanel Grid.Row="3" Grid.Column="1" Orientation="Horizontal">
        <c1core:C1CheckBox Content="Yes" />
        <c1core:C1CheckBox Content="No"/>
    </StackPanel>
    <TextBlock Text="Age Group" Grid.Row="4" Margin="20,20,0,0"/>
    <StackPanel Orientation="Horizontal" Grid.Column="1" Grid.Row="4" Width="200" HorizontalAlignment="Left">
        <c1:C1NumericBox Value="{Binding Person.MinAge,Mode=TwoWay,UpdateSourceTrigger=PropertyChanged}" Width="50" VerticalAlignment="Center"/>
        <c1:C1RangeSlider Maximum="60" Minimum="5" UpperValue="{Binding Person.MaxAge,Mode=TwoWay,UpdateSourceTrigger=PropertyChanged}" LowerValue="{Binding Person.MinAge,Mode=TwoWay,UpdateSourceTrigger=PropertyChanged}" Width="100" />
        <c1:C1NumericBox Value="{Binding Person.MaxAge,Mode=TwoWay,UpdateSourceTrigger=PropertyChanged}" Width="50" VerticalAlignment="Center"/>
    </StackPanel>
    <TextBlock Text="Phone No.: " Grid.Row="5" Margin="20,0,0,0"/>
    <c1:C1MaskedTextBox Value="{Binding Person.PhoneNo}" Mask="0000000000" Grid.Column="1" Grid.Row="5" Width="200" HorizontalAlignment="Left"/>
    ```
    

## Build and Run the Project

1.  Click **Build | Build Solution** to build the project.
2.  Press **F5** to run the project.