Tutorial 6: Defining Unbound Columns in a Bound Grid
In This Topic
In this tutorial, you will learn how to use the UnboundColumnFetch event to display two fields (FirstName and LastName) together in one column. You will also learn how to use an SQL statement to create a join between two tables in a database.
Complete the following steps:
- Create a new .NET project.
- From the Toolbox on the left side of the IDE double-click the C1TrueDBGrid icon to add the control to the form. The C1TrueDBGrid icon looks like this:

- In the C1TrueDBGrid Tasks menu, locate the Choose Data Source drop-down and select Add Project Data Source. In the adapter's Data Source Configuration Wizard, either select a connection to C1NWind.mdb or create a new connection to this database. On the Choose your database objects page of the wizard, select all fields in the Contacts table and type "DsContacts" into the DataSet name box, and then finish out the wizard.
- Double click DsContacts.xsd in the Solution Explorer window to edit it in the Designer. Right click on the Contacts table and choose Configure from the context menu.
- Modify the SQL string in the Table Adapter Configuration Wizard to:
SELECT Customers.FirstName, Customers.LastName, Customers.CustType, Contacts.ContactType, Contacts.Callback, Contacts.ContactDate, Contacts.UserCode, Customers.UserCode AS Expr1 FROM Contacts INNER JOIN Customers ON Contacts.UserCode = Customers.UserCode - The Contacts table is now joined with the Customers table. Click the Finish button to exit the wizard.
- Return to Design view and if prompted to replace existing column layout, click Yes.
Note: If all of the columns are not showing up in C1TrueDBGrid, select the DataSource again from the drop-down box in the C1TrueDBGrid Tasks menu. Here, you would re-select the Contacts table under DSContacts. - Declare a new global DataTable object in Form1:
To write code in Visual Basic
Visual Basic Copy CodeDim dtCopy As New DataTable
To write code in C#
C# Copy CodeDataTable dtCopy = new DataTable;
- Now in the Form_Load event add the following code. The first line, supplied by Visual Studio, fills the dataset and the second line makes a copy of this DataSet, which we will use later to populate the unbound column:
To write code in Visual Basic
Visual Basic Copy CodeMe.ContactsTableAdapter.Fill(Me.DsContacts.Contacts) dtCopy = Me.DsContacts.Tables(0).Copy()
To write code in C#
C# Copy Codethis.ContactsTableAdapter.Fill(this.DsContacts.Contacts); dtCopy = this.DsContacts.Tables(0).Copy();
- To create an unbound column, open up the C1TrueDBGrid Designer by clicking on the ellipsis button (…) next to the Columns property in the Properties window. Next click the Appendcolumn button to create a new column. Set the new column's Caption property to "Name" in the left pane. Notice that a value resides in the Caption field, but no value in the DataField, which is how the grid knows that this is an unbound column. The grid now knows to fire the UnboundColumnFetch event. Click the OK button to close the C1TrueDBGrid Designer.
- Open the SplitCollection editor by clicking on the ellipsis button next to the Splits property in the Properties window. Now open up the C1DisplayColumnCollection editor by clicking on the ellipsis button next to the DisplayColumns property. In this editor, find the unbound column in the left pane that we just created. It is positioned as the last column in the grid. The DisplayColumns Collection determines the position of the field. Maneuver the column to the desired location by using the up and down arrow buttons in the left pane. Then in the right pane, set its Visible property equal to True. Now our unbound column is visible to the end-user and not just the True DBGrid for WinForms control.
You can hide columns here that are used in the unbound column. Select the FirstName column from the left pane, then in the right, set its Visible property equal to False. This hides the FirstName column from view. Repeat, selecting the LastName column.
Select OK to close the C1DisplayColumnCollection editor and click OK again to close the SplitCollection editor. - Add the following code to the UnboundColumnFetch event. This code uses dtCopy to gather values to place into the unbound column, then setting these values equal to e.Value, places the value into the unbound column:
To write code in Visual Basic
Visual Basic Copy CodePrivate Sub C1TrueDBGrid1_UnboundColumnFetch(ByVal sender As System.Object, ByVal e As C1.Win.C1TrueDBGrid.UnboundColumnFetchEventArgs) Handles C1TrueDBGrid1.UnboundColumnFetch If e.Column.Caption = "Name" AndAlso e.Row < dtCopy.Rows.Count Then e.Value = Me.C1TrueDBGrid1(e.Row, "FirstName").ToString + " " + Me.C1TrueDBGrid1(e.Row, "LastName").ToString End If End SubTo write code in C#
C# Copy Codeprivate void c1TrueDBGrid1_UnboundColumnFetch(object sender, C1.Win.C1TrueDBGrid.UnboundColumnFetchEventArgs e) { if(e.Column.Caption == "Name" && e.Row < dtCopy.Rows.Count) { e.Value = this.c1TrueDBGrid1[e.Row, "FirstName"].ToString()+ " " + this.c1TrueDBGrid1[e.Row, "LastName"].ToString(); } }
Run the program and observe the following:
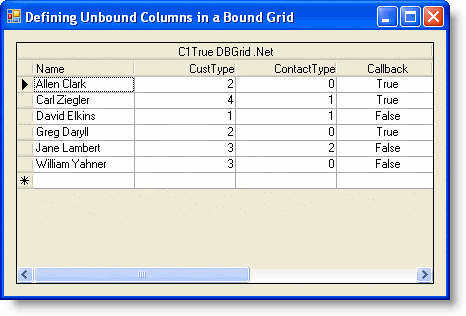
When the application runs, it should look like the following:

- C1TrueDBGrid1 displays data from the joined table according to the five columns configured at design time.
- The first column displays the combined FirstName and LastName fields as defined in the UnboundColumnFetch event.
- The CustType, ContactType and Callback columns display numeric values that are quite cryptic to users and provide an unappealing data presentation. In the next three tutorials (7, 8, and 9), techniques will be illustrated that improve both the display and the user interface.
This concludes this tutorial; you've successfully completed defining unbound columns in a bound grid.