Tutorial 11: Using Styles to Highlight Related Data
In This Topic
In this tutorial, you will learn how to change the grid's display to highlight rows by creating row styles depending upon a value in the grid. True DBGrid uses the FetchRowStyle event to create style characteristics and apply them to rows dynamically.
Complete the following steps:
- Start with the project used in Tutorial 10: Enhancing the User Interface with In-Cell Bitmaps.
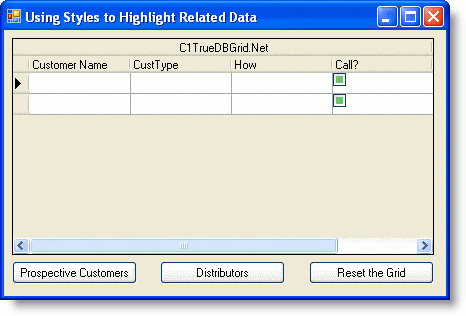
- Add thee buttons to the form. Change the caption of Button1 to Prospective Customers, Button2 to Distributors, and Button3 to Reset the Grid so that the form appears as follows.

- Add the following declarations to the General section of Form1:
To write code in Visual Basic
Visual Basic Copy CodeDim bflag As Integer
To write code in C#
C# Copy Codeint bflag;
- Enter the following code in the Click event of Button1:
To write code in Visual Basic
Visual Basic Copy Code' Prospective Customers. Me.C1TrueDBGrid1.FetchRowStyles = True bFlag = 1 Me.C1TrueDBGrid1.Refresh()
To write code in C#
C# Copy Code// Prospective Customers. this.c1TrueDBGrid1.FetchRowStyles = true; bFlag = 1; this.c1TrueDBGrid1.Refresh();
- Enter the following code in the Click event of Button2:
To write code in Visual Basic
Visual Basic Copy Code' Distributors. Me.C1TrueDBGrid1.FetchRowStyles = True bFlag = 2 Me.C1TrueDBGrid1.Refresh()
To write code in C#
C# Copy Code// Distributors. this.c1TrueDBGrid1.FetchRowStyles = true; bFlag = 2; this.c1TrueDBGrid1.Refresh();
- Enter the following code in the Click event of Button3:
To write code in Visual Basic
Visual Basic Copy Code' Reset the grid. Me.C1TrueDBGrid1.FetchRowStyles = False Me.C1TrueDBGrid1.Refresh()
To write code in C#
C# Copy Code// Reset the grid. this.c1TrueDBGrid1.FetchRowStyles = false; this.c1TrueDBGrid1.Refresh();
- Next enter the following code into the FetchRowStyles event. This code interacts with the setting of the FetchRowStyles property in the click event. When the FetchRowStyles is set to True, the grid fires the FetchRowStyle event when it needs to repaint the cells. Thus the row style is applied according to the value of the bflag flag integer:
To write code in Visual Basic
Visual Basic Copy CodePrivate Sub C1TrueDBGrid1_FetchRowStyle(ByVal sender As Object, ByVal e As C1.Win.C1TrueDBGrid.FetchRowStyleEventArgs) Handles C1TrueDBGrid1.FetchRowStyle If bFlag = 1 And Me.C1TrueDBGrid1 (e.Row,"CustType") = 1 Then Dim fntFont As New Font(e.CellStyle.Font.Name, e.CellStyle.Font.Size, FontStyle.Bold) e.CellStyle.Font = fntFont e.CellStyle.ForeColor = System.Drawing.Color.Blue End If If bFlag = 2 And Me.C1TrueDBGrid1 (e.Row, "CustType") = 4 Then e.CellStyle.ForeColor = System.Drawing.Color.White e.CellStyle.BackColor = System.Drawing.Color.Red End If End SubTo write code in C#
C# Copy Codeprivate void C1TrueDBGrid1_FetchRowStyle(object sender, C1.Win.C1TrueDBGrid.FetchRowStyleEventArgs e) { if (bFlag == 1 && (int)this.c1TrueDBGrid1 [e.Row, "CustType"] == 1 ) { Font fntFont = new Font(e.CellStyle.Font.Name, e.CellStyle.Font.Size, FontStyle.Bold); e.CellStyle.Font = fntFont; e.CellStyle.ForeColor = System.Drawing.Color.Blue; } if (bFlag == 2 && this.c1TrueDBGrid1 [e.Row, "CustType"] == 4 ) { e.CellStyle.ForeColor = System.Drawing.Color.White; e.CellStyle.BackColor = System.Drawing.Color.Red; } }
Run the program and observe the following:
- C1TrueDBGrid1 displays data as in Tutorial 10: Enhancing the User Interface with In-Cell Bitmaps.
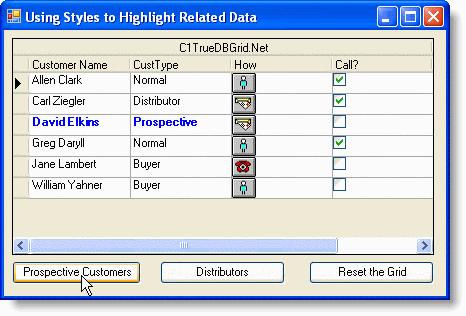
- Click the Prospective Customers button. The grid should appear as follows.

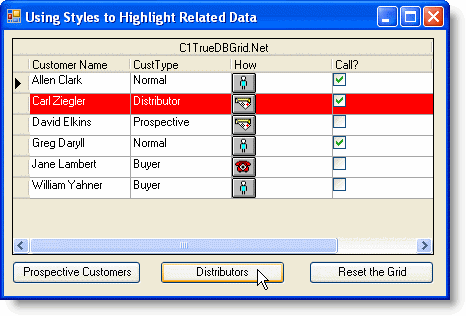
- Click the Distributors button. The grid should now appear as follows:

- Finally, click the Reset the Grid button. The grid should now clear itself of the styles.
You've successfully completed using styles to highlight related data; this concludes tutorial 11.