# Quick Start
This topic provides details about creating a simple TreeView application.
## Content
The following quick-start guide will take you through the basics of TreeView control.
### .NET Framework
This quick start will guide you through the steps of creating a simple .NET application using the TreeView control. Follow the steps below to get started:
### Step 1: Adding TreeView to the Application
To add the TreeView control to your application, complete the following steps:
1. Create a new **Windows Forms Application**.
2. In the **Design** view, drag and drop the **C1TreeView** control to the form from the Toolbox.
The **TreeView** control appears with **Column1** added by default.
3. Click the **Smart Tag**, and select **Dock in Parent Container**.
You have successfully added the **TreeView** control to the application.
### Step 2: Creating Nodes in TreeView
You can create nodes in TreeView either by using designer or through code in your application.
**Using Designer**
To create nodes in TreeView using designer, complete the following steps:
1. Click the **Smart Tag**, and select **Edit columns**.
**C1TreeColumn Collection Editor** appears.
2. Enter the relevant name and header text in the **Name** and the **HeaderText** fields respectively.
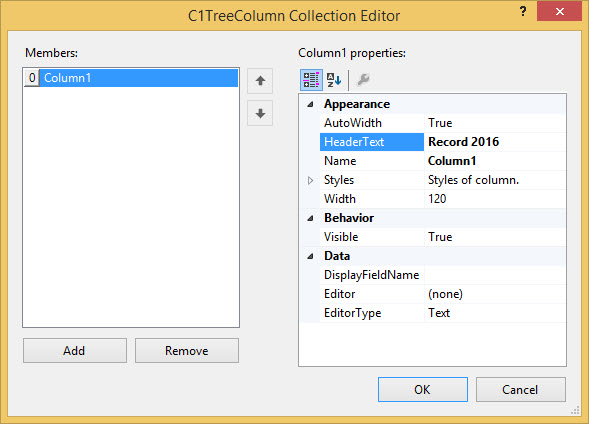
3. Close **C1TreeColumn Collection Editor.**
4. Click the Smart Tag, and select **Edit nodes**.
**TreeNodes Editor** appears.
5. Click **Add** to create a top-level node.
6. Specify a custom label for the node in the **Value** property.
7. Click **Add child** to add a child node to the selected node.
8. Specify a custom label for the child node in the **Value** property.
9. Repeat steps 7 to 10 as required in the application.
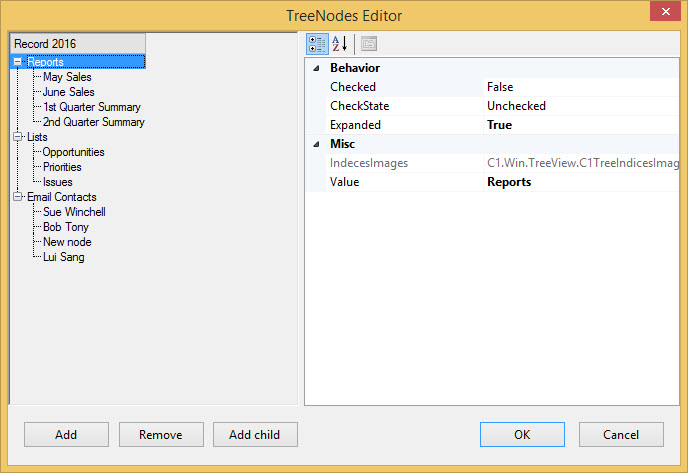
10. Click **OK** to save the changes.
**Through Code**
To create nodes in TreeView programmatically, complete the following steps:
1. Create new instances of a node.
2. Add the parent node to the TreeView nodes collection.
3. Set the value of the parent node.
**csharp**
```csharp
// create new instances of node
C1.Win.TreeView.C1TreeNode node1 = new C1.Win.TreeView.C1TreeNode();
C1.Win.TreeView.C1TreeNode node2 = new C1.Win.TreeView.C1TreeNode();
// add parent node to the TreeView nodes collection
c1TreeView1.Nodes.Add(node1);
// set the value of parent node
node1.SetValue("Reports");
```
**VB**
```vbnet
' create new instances of node
Dim node1 As New C1.Win.TreeView.C1TreeNode()
Dim node2 As New C1.Win.TreeView.C1TreeNode()
' add parent node to the TreeView nodes collection
C1TreeView1.Nodes.Add(node1)
' set the value of parent node
node1.SetValue("Reports")
```
4. Add the child node to the parent node.
5. Set the value of the child node.
**csharp**
```csharp
// add child node to parent node
node1.Nodes.Add(node2);
//set the value of child node
node2.SetValue("May Sales");
```
**VB**
```vbnet
' add child node to parent node
node1.Nodes.Add(node2)
'set the value of child node
node2.SetValue("May Sales")
```
6. Repeat steps 3 to 7 to add more parent nodes and child nodes.
### Step 3: Running the Application
Now that you have successfully created nodes in TreeView, you just need to run the application.
The following output appears once you have run the application.

### .NET
Please note that the WinForms latest .NET Edition does not include rich design-time support yet. Hence, we will enhance our code accordingly in future releases.
To create a simple WinForms application in .NET for TreeView control, complete the following steps:
1. Create a new Windows Forms .NET Core Application.
2. Switch to code editor and initialize C1TreeView control.
```csharp
//Initialize and Configure C1TreeView
C1TreeView c1TreeView1 = new C1TreeView();
c1TreeView1.Dock = DockStyle.Fill;
```
3. Configure C1TreeView by adding the Header text.
```csharp
// Add header text to TreeView
c1TreeView1.Columns[0].HeaderText = "Record 2016";
this.Controls.Add(c1TreeView1);
```
4. Create root nodes using the C1TreeNode class and set their values using SetValue method.
```csharp
//Create root nodes and set their values
C1.Win.TreeView.C1TreeNode rnode1 = new C1.Win.TreeView.C1TreeNode();
rnode1.SetValue("Reports");
C1.Win.TreeView.C1TreeNode rnode2 = new C1.Win.TreeView.C1TreeNode();
rnode2.SetValue("Lists");
C1.Win.TreeView.C1TreeNode rnode3 = new C1.Win.TreeView.C1TreeNode();
rnode3.SetValue("Email Contacts");
```
5. Add root nodes to the TreeView nodes collection using the Nodes property and Add method.
```csharp
//Add root nodes to the TreeView nodes collection
c1TreeView1.Nodes.Add(rnode1);
c1TreeView1.Nodes.Add(rnode2);
c1TreeView1.Nodes.Add(rnode3);
```
6. Create children nodes and add them to the first root node.
```csharp
//Create and add children nodes for first root node
C1.Win.TreeView.C1TreeNode cnode1_1 = new C1.Win.TreeView.C1TreeNode();
cnode1_1.SetValue("May Sales");
c1TreeView1.Nodes[0].Nodes.Add(cnode1_1);
C1.Win.TreeView.C1TreeNode cnode1_2 = new C1.Win.TreeView.C1TreeNode();
cnode1_2.SetValue("June Sales");
c1TreeView1.Nodes[0].Nodes.Add(cnode1_2);
C1.Win.TreeView.C1TreeNode cnode1_3 = new C1.Win.TreeView.C1TreeNode();
cnode1_3.SetValue("1st Quarter Summary");
c1TreeView1.Nodes[0].Nodes.Add(cnode1_3);
C1.Win.TreeView.C1TreeNode cnode1_4 = new C1.Win.TreeView.C1TreeNode();
cnode1_4.SetValue("2nd Quarter Summary");
c1TreeView1.Nodes[0].Nodes.Add(cnode1_4);
```
7. Create children nodes and add them to the second root node.
```csharp
//Create and add children nodes for second root node
C1.Win.TreeView.C1TreeNode cnode2_1 = new C1.Win.TreeView.C1TreeNode();
cnode2_1.SetValue("Opportunities");
c1TreeView1.Nodes[1].Nodes.Add(cnode2_1);
C1.Win.TreeView.C1TreeNode cnode2_2 = new C1.Win.TreeView.C1TreeNode();
cnode2_2.SetValue("Priorities");
c1TreeView1.Nodes[1].Nodes.Add(cnode2_2);
C1.Win.TreeView.C1TreeNode cnode2_3 = new C1.Win.TreeView.C1TreeNode();
cnode2_3.SetValue("Issues");
c1TreeView1.Nodes[1].Nodes.Add(cnode2_3);
```
8. Create children nodes and add them to the third root node.
```csharp
//Create and add children nodes for third root node
C1.Win.TreeView.C1TreeNode cnode3_1 = new C1.Win.TreeView.C1TreeNode();
cnode3_1.SetValue("Sue Winchell");
c1TreeView1.Nodes[2].Nodes.Add(cnode3_1);
C1.Win.TreeView.C1TreeNode cnode3_2 = new C1.Win.TreeView.C1TreeNode();
cnode3_2.SetValue("Bob Tony");
c1TreeView1.Nodes[2].Nodes.Add(cnode3_2);
C1.Win.TreeView.C1TreeNode cnode3_3 = new C1.Win.TreeView.C1TreeNode();
cnode3_3.SetValue("New Node");
c1TreeView1.Nodes[2].Nodes.Add(cnode3_3);
C1.Win.TreeView.C1TreeNode cnode3_4 = new C1.Win.TreeView.C1TreeNode();
cnode3_4.SetValue("Lui Sang");
c1TreeView1.Nodes[2].Nodes.Add(cnode3_4);
```
9. Run the code and view the output.

>type=note
> **Note**: The latest WinForms .NET Edition does not include rich design-time support yet. We will enhance it in future releases.