# Work with SuperErrorProvider
This topic provides programming and design time info about working with supererrorprovider.
## Content
The following topics cover how to work with SuperErrorProvider:
### .NET framework
### Error Message and Icon
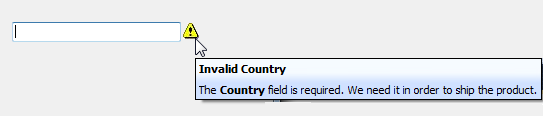
With C1SuperErrorProvider, you can create error messages and icons.
**Creating an Error Message**
**SuperTooltip for WinForms** supports adding images, including animated images, at design time. First, add the image to the C1SuperTooltip Image collection, and then specify the image in the **C1SuperTooltip Editor**.
1. Add a C1SuperTooltip control to your form.
2. Select the C1SuperTooltip control and click the **ellipsis** button next to the **Images** property in the Properties window. The **Edit Image Collection** editor appears.
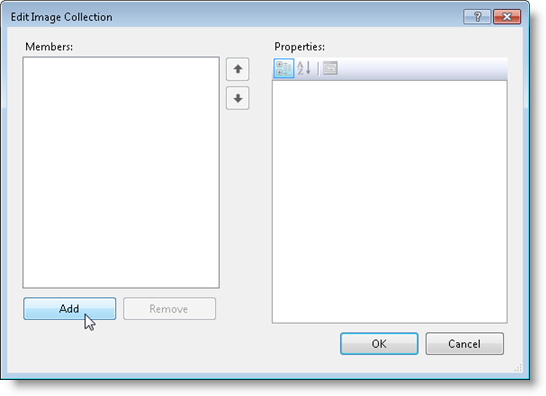
3. Click the **Add** button and browse to find the image you want to use.
4. Select the image and click **Open**. The image is added to the ToolTip's image collection.
5. Click **OK** to close the **Edit Image Collection** editor.
6. Select the control being associated with the C1SuperTooltip.
7. Click the **ellipsis** button next to the **ToolTip on C1SuperTooltip1** property.
The image you added to the ToolTip's image collection can be selected from the **Image** or **Subimage** drop-down list on the **Office** tab. If you are using your own HTML code, click the **Html** tab and reference the image in your code like this:
```auto
 ```
**Changing the Error Message Icon**
When you create an error message with **C1SuperErrorProvider**, a default warning icon is used . You can change this to any icon file you like using the **Icon** property. Assuming you have a C1SuperErrorProvider control on you form, follow these steps to change the error message icon:
1. Right-click the C1SuperErrorProvider control and select **Properties** to open the Visual Studio Properties window.
2. Click the **ellipsis** button next to the Icon property.
3. Choose an icon file (\*.ico) and click **Open**.
When you run your project, notice the new icon image used for the error message.
```
**Changing the Error Message Icon**
When you create an error message with **C1SuperErrorProvider**, a default warning icon is used . You can change this to any icon file you like using the **Icon** property. Assuming you have a C1SuperErrorProvider control on you form, follow these steps to change the error message icon:
1. Right-click the C1SuperErrorProvider control and select **Properties** to open the Visual Studio Properties window.
2. Click the **ellipsis** button next to the Icon property.
3. Choose an icon file (\*.ico) and click **Open**.
When you run your project, notice the new icon image used for the error message.
### Blink Style
When you create an error message with **C1SuperErrorProvider**, by default, the error message icon blinks. You have the option of making it blink sometimes, always, or never. It stops blinking when you click on it. To specify the blink style, follow these steps:
1. Add a C1SuperErrorProvider control to your form.
2. Click the C1SuperErrorProvider smart tag to open the **Tasks** menu.
3. Click the drop-down arrow next to the **BlinkStyle** property and select **BlinkIfDifferentError**, **AlwaysBlink**, or **NeverBlink**.
### Image on Hover
You can use the **ImageHot** property to provide feedback in the form of an image when the mouse pointer hovers over the error icon.
To show an image when the error icon is hovered, follow these steps:
1. Add a C1SuperErrorProvider control to your form. A C1SuperTooltip is automatically added to the form and connected with the C1SuperErrorProvider control.
2. Select **Code** in the Visual Studio **View** menu.
3. Add the following code to the **Form\_Load** event:
DOC-DETAILS-TAG-OPEN
DOC-SUMMARY-TAG-OPEN
To write code in Visual Basic
DOC-SUMMARY-TAG-CLOSE
```vbnet
C1SuperErrorProvider1.ImageHot = System.Drawing.Image.FromFile("c:\\MyFiles\\Level1Warning.bmp")
```
DOC-DETAILS-TAG-CLOSE
DOC-DETAILS-TAG-OPEN
DOC-SUMMARY-TAG-OPEN
To write code in C#
DOC-SUMMARY-TAG-CLOSE
```csharp
c1SuperErrorProvider1.ImageHot = System.Drawing.Image.FromFile("c:\\MyFiles\\Level1Warning.bmp");
```
DOC-DETAILS-TAG-CLOSE
### Using C1SuperErrorProvider with DataSources
Use the **C1SuperErrorProvider** control with a data source to indicate an error to users. The C1SuperErrorProvider must be associated with a **C1SuperTooltip** in order to appear, although the tooltip can be blank. When you add a C1SuperErrorProvider control to your form, a C1SuperTooltip is automatically added and connected with it.
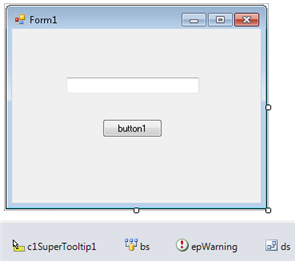
This topic assumes you have a button, text box, and data source on your form, similar to the following image:
1. Add a C1SuperErrorProvider control to your form.
2. Click the C1SuperErrorProvider smart tag to open the **Tasks** menu.
3. Click the drop-down arrow next to **Choose DataSource** and select the data source on your form.
4. Use the **DataRow.SetColumnError** method to associate an error message with the given data field:
DOC-DETAILS-TAG-OPEN
DOC-SUMMARY-TAG-OPEN
To write code in Visual Basic
DOC-SUMMARY-TAG-CLOSE
```vbnet
Private Sub Button1_Click(ByVal sender As System.Object, ByVal e As System.EventArgs) Handles Button1.Click
DirectCast(bs.Current, DataRowView).Row.SetColumnError("LastName", "Here is the warning message!")
End Sub
```
DOC-DETAILS-TAG-CLOSE
DOC-DETAILS-TAG-OPEN
DOC-SUMMARY-TAG-OPEN
To write code in C#
DOC-SUMMARY-TAG-CLOSE
```csharp
private void button1_Click(object sender, EventArgs e)
{
((DataRowView)bs.Current).Row.SetColumnError("LastName",
"Here is the warning message!");
}
```
DOC-DETAILS-TAG-CLOSE
5. Add the necessary code to the **Form\_Load** event to bind the text box to the data source. In this example, the text box is bound to an .xml file.
DOC-DETAILS-TAG-OPEN
DOC-SUMMARY-TAG-OPEN
To write code in Visual Basic
DOC-SUMMARY-TAG-CLOSE
```vbnet
Private Sub Form1_Load(ByVal sender As System.Object, ByVal e As System.EventArgs) Handles MyBase.Load
ds.DataSetName = "AuthorsDataSet"
ds.ReadXml("..\..\authors.xml", System.Data.XmlReadMode.Auto)
bs.DataMember = "authors"
TextBox1.DataBindings.Add(New Binding("Text", bs, "LastName"))
End Sub
```
DOC-DETAILS-TAG-CLOSE
DOC-DETAILS-TAG-OPEN
DOC-SUMMARY-TAG-OPEN
To write code in C#
DOC-SUMMARY-TAG-CLOSE
```csharp
private void Form1_Load(object sender, EventArgs e)
{
ds.DataSetName = "AuthorsDataSet";
ds.ReadXml(@"..\..\authors.xml", System.Data.XmlReadMode.Auto);
bs.DataMember = "authors";
textBox1.DataBindings.Add(new Binding("Text", bs, "LastName"));
}
```
DOC-DETAILS-TAG-CLOSE
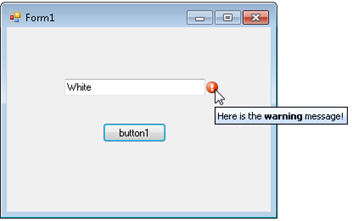
6. Press F5 to run the project and then click the button. The warning icon appears, and if you mouse over it, the message appears.
### .NET
To create a simple WinForms application in .NET to work with SuperLabel, complete the following steps:
1\. Add two text boxes and a button\. Change the Text property of the button to 'Show Error'\.
2\. Declare C1SuperErrorProvider and C1SuperTooltip objects\.
```csharp
// Declare SuperErrorProvider and Supertooltip objects
C1SuperErrorProvider superErrorProvider1;
C1SuperErrorProvider superErrorProvider2;
C1SuperTooltip supertooltip1;
C1SuperTooltip supertooltip2;
```
3\. Add the following code to the form constructor to create an error message\, change error icon\, change blink style and show image when you hover over the error icon\.
```csharp
// Creating an error message.
superErrorProvider1 = new C1SuperErrorProvider();
supertooltip1 = new C1SuperTooltip();
superErrorProvider1.SetError(txtbtn_Show, "Invalid Country
" +
"The Country field is required. We need it in order to ship the product.
");
// Changing error icon.
superErrorProvider1.Icon = SuperLabelResource.ErrorIcon;
superErrorProvider1.ToolTip = supertooltip1;
// Changing Blink style
superErrorProvider1.BlinkStyle = ErrorBlinkStyle.NeverBlink;
// Showing image when error icon is hovered;
superErrorProvider1.ImageHot = SuperLabelResource.ErrorHotImage;
```
4\. Add the following code to use SuperLabel with datasource\.
```csharp
// Working with DataSource
DataSet dataSet = new DataSet();
dataSet.DataSetName = "AuthorsDataSet";
dataSet.ReadXml(@"../../../authors.xml", XmlReadMode.Auto);
bs.DataSource = dataSet;
bs.DataMember = "authors";
txtbox_Data.DataBindings.Add(new Binding("Text", bs, "LastName"));
superErrorProvider2 = new C1SuperErrorProvider();
supertooltip2 = new C1SuperTooltip();
superErrorProvider2.ToolTip = supertooltip2;
superErrorProvider2.DataSource = bs;
// For C1SuperErrorProvider to work, you have to set the "ContainerControl" property.
this.superErrorProvider1.ContainerControl = this;
this.superErrorProvider2.ContainerControl = this;
```
5\. Subscribe to the button click event\.
```csharp
// Subscribe to the button click event
btn_showError.Click += btn_showError_Click;
```
6\. Add the following code to the button click event:
```csharp
// Add the button click event
private void btn_showError_Click(object sender, EventArgs e)
{
((DataRowView)bs.Current).Row.SetColumnError("LastName",
"Here is the warning message!");
}
```
Run the code and observe the output: