Step 1 of 4: Adding a C1SuperLabel to a Project
In This Topic
Start by adding a C1SuperLabel control to your project and adding some HTML code for it.
To add a C1SuperLabel to a project, complete the following steps:
- Create a new .NET project and add two button controls to the form.

- Right-click the Button1 control and select Properties to view the Properties window.
- Enter "View C1SuperLabel" next to the Text property and resize the button so the text is visible.
- Select Button2 and enter "Hide C1SuperLabel" next to its Text property. Resize the button so the text is visible.
- Add the SuperTooltip for WinForms components to the Toolbox.
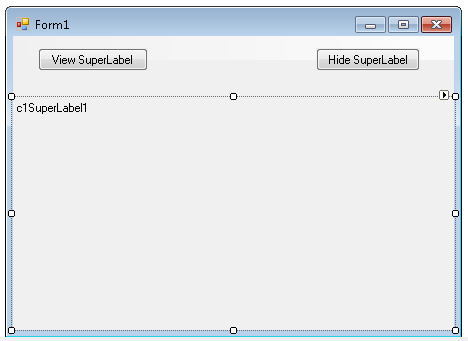
- Double-click the C1SuperLabel control in the Toolbox to add it to your form so it looks like the following:

- Click the ellipsis button next to C1SuperLabel's Text property in the Properties window. The C1SuperLabel Editor appears.
-
Click here for the HTML code to add in the text box.
These are just some of the things you can show using <b>C1SuperTooltip</b>:
<ol>
<li>Lists:</li>
<ul>
<li>Nested lists</li>
<li>Numbered and bulleted lists</li>
</ul>
<li>Tables:<p>Here's a table with some sales numbers:</p>
<table border='1' bordercolor='black' cellpadding='2' cellspacing='0' style='border:solid 1 black;'>
<tr bgcolor='LightSteelBlue'>
<th style="width:150px; text-align: center;" rowspan='3'>
<p>This cell spans<br />three rows.</p></th>
<th align='center' colspan='6'>Semester 1</th>
</tr>
<tr bgcolor='LightSteelBlue'>
<th align='center' colspan='3'>Quarter 1</th>
<th align='center' colspan='3'>Quarter 2</th>
</tr>
<tr bgcolor='LightSteelBlue'>
<td align='center'>Jan</td>
<td align='center'>Feb</td>
<td align='center'>Mar</td>
<td align='center'>Apr</td>
<td align='center'>May</td>
<td align='center'>Jun</td>
</tr>
<tr>
<td align='right' style='width: 150px'><strong>Widgets</strong></td>
<td>12</td>
<td>23</td>
<td>23</td>
<td>43</td>
<td>23</td>
<td>34</td>
</tr>
<tr>
<td align='right' style='width: 150px'><strong>Sprockets</strong></td>
<td>45</td>
<td>32</td>
<td>23</td>
<td>23</td>
<td>34</td>
<td>43</td>
</tr>
</table>
</li>
<li>Images: The background of this C1SuperLabel is an image. </li>
<li>Borders:<p style='border: #336633 thick'>Here's a thick border.</p>
</li>
<li>Preformatted Text:
<pre style="background-color:#dddddd; margin:0 20pt 0 20pt;">
string tipText = "Hello <b>World</b>";
<b>C1SuperTooltip</b>.SetToolTip(control, tipText);
</pre>
</li>
<li>Nesting:
<div style="background-color:#ffaaaa;border:solid thin black;margin:10px;padding:4px">
This is a red div.
<div style="background-color:#aaffaa;border:solid thin black;margin:10px;padding:4px">
This is a nested green div.
<div style="background-color:#aaaaff;border:solid thin black;margin:10px;padding:4px">
This is a nested blue div.
</div>
</div>
</div>
</li>
</ol> - In the Properties window, click the drop-down arrow next to the BackColor property, select the Web tab, and select White.
- Add an image to the C1SuperLabel control:
- Click the ellipsis button next to the BackgroundImage property. The Select Resource dialog box appears.
- Select Local resource and click the Import button. The Open dialog box appears.
- Locate and select the TipBackground.png or another graphic of your choice and then click Open. The TipBackground.png image is installed, by default, with the SuperTooltip for WinForms samples and is located in Documents\ComponentOne Samples\WinForms.
- Click OK.
- Click the drop-down arrow next to the BackgroundImageLayout property and select Stretch.
- Set the Visible property to False.