# Backstage View
This topic covers details about the backstage component.
## Content
**Backstage View** is a feature that has been a part of Office applications since the 2007 version. This component replaces the **Application Menu**, conventionally called the **File** tab. In the new Ribbon control, the Backstage appears as the main button at the top-left corner, which when clicked opens a full-size backstage window. It contains the functionality previously found in the File menu, such as Open, Save, Save As, New, Print etc.
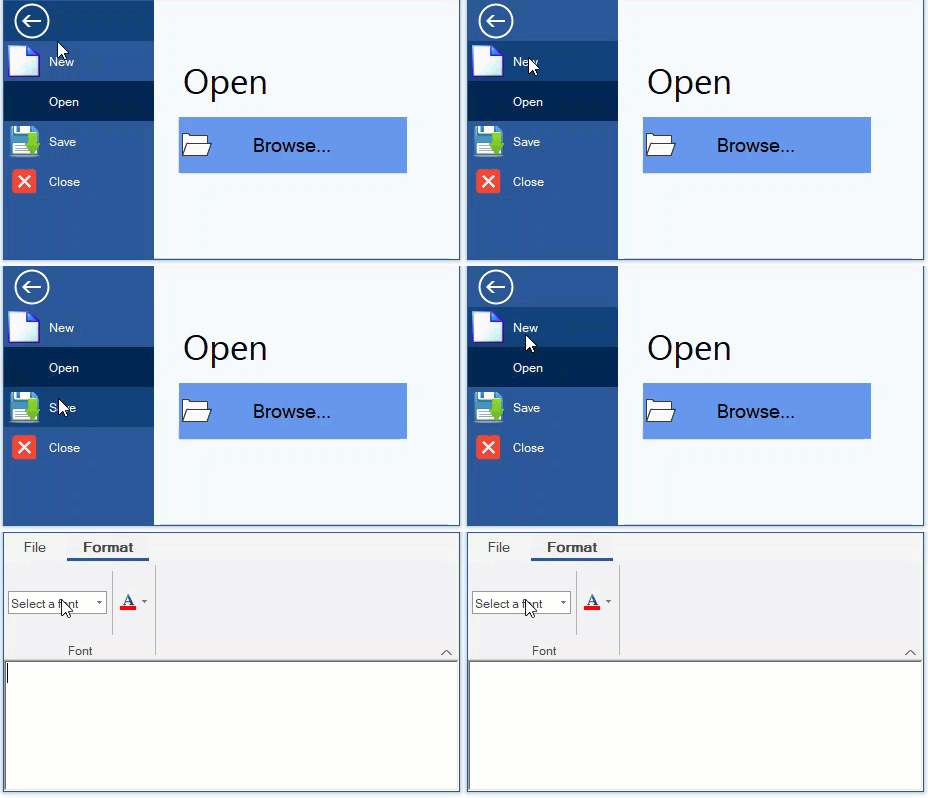
The **C1BackstageView** is a separate component and can be added at design-time from the Toolbox. The **C1Ribbon** control can be integrated with **C1BackstageView** component through the designer as well as code. The Backstage window contains the left and left bottom panes. The user can add items to both the panes in the window.
### Configuring C1Backstage View at Design-Time
Backstage can be configured both via the designer and code. For backstage configuration at design time, follow these steps:
1. Drag and drop C1BackstageView on the Form.You can observe an additional element **BackstageView on C1BackstageView** in the Properties window for **C1Ribbon**.
2. Select the **C1BackstageView1** from the dropdown menu.
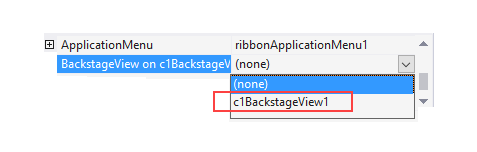
Now, you can observe that the application menu is replaced with the backstage component.
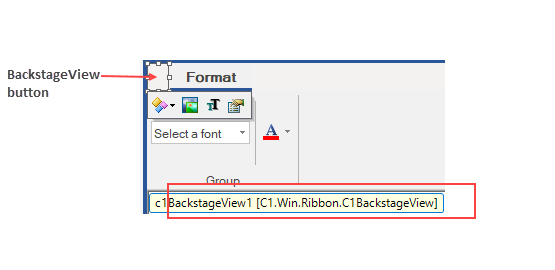
Once the **BackstageView** button has replaced the Application Menu on the Form, you can customize the appearance of the BackstageView using the [Floating ToolBar](/componentone/docs/win/online-ribbon/concepts/designtimesupport/floatingtoolbar). You can add items to the Backstage View at design-time using the Collection Editor. Refer this [topic](/componentone/docs/win/online-ribbon/concepts/designtimesupport/collectioneditors) for more information.
### Configuring Backstage View By Code
The Backstage View can also be configured through code. The user can create an instance of C1BackstageView class. The Ribbon Buttons can be created using the RibbonButton class. Further, the backstage tab can be created using the BackstageViewTab class, which can be bound to the User Control using the Control property. The buttons and tabs can be added to the BackstageView with the LeftPaneItems property of C1BackstageView class. In order to integrate **C1BackstageView** with the **C1Ribbon** control, you can use the Owner property of **C1BackstageView** class.
```vbnet
Public Sub New()
InitializeComponent()
ApplyBackstageView(Me)
End Sub
Public Sub ApplyBackstageView(form1 As Form1)
' Create BackstageView
Dim backstageView As New C1.Win.Ribbon.C1BackstageView()
backstageView.Text = "File"
' Create a new tab
Dim tab = New BackstageViewTab()
' Create an instance of BackstageView User Control
Dim view As New BackstageView()
view.Owner = backstageView
tab.Control = view
tab.Text = "Open"
' Add items to BackStageView
Dim newButton As New RibbonButton("New", Image.FromFile("images\New.png"))
Dim saveButton As New RibbonButton("Save", Image.FromFile("images\save-file-icon.png"))
Dim closeButton As New RibbonButton("Close", Image.FromFile("images\close.jpg"))
' Add Ribbon Items to the BackstageView
backstageView.LeftPaneItems.Add(newButton)
' Add tab to the BackstageView
backstageView.LeftPaneItems.Add(tab)
backstageView.LeftPaneItems.Add(saveButton)
backstageView.LeftPaneItems.Add(closeButton)
' Add Event Handlers for the Buttons
AddHandler newButton.Click, AddressOf NewButton_Click
AddHandler saveButton.Click, AddressOf SaveButton_Click
AddHandler closeButton.Click, AddressOf CloseButton_Click
' Set the BackstageView to the Ribbon control
backstageView.Owner = C1Ribbon1
Me.Controls.Add(C1Ribbon1)
End Sub
Private Sub NewButton_Click(sender As Object, e As System.EventArgs)
Me.RichTextBox1.Clear()
End Sub
Private Sub SaveButton_Click(sender As Object, e As System.EventArgs)
Dim saveDialog As New SaveFileDialog()
saveDialog.Title = "Save rich text file"
saveDialog.Filter = "Rich Text Files (*.rtf)|*.RTF"
saveDialog.InitialDirectory = "C:\Users\GPCTAdmin\Desktop"
If saveDialog.ShowDialog() = DialogResult.OK Then
RichTextBox1.SaveFile(saveDialog.FileName)
End If
End Sub
Private Sub CloseButton_Click(sender As Object, e As System.EventArgs)
Me.Close()
End Sub
'Implement RibbonFontComboBox SelectedIndexChanged event
Private Sub RibbonFontComboBox1_SelectedIndexChanged(sender As Object, e As EventArgs) Handles RibbonFontComboBox1.SelectedIndexChanged
RichTextBox1.Font = New Font(RibbonFontComboBox1.Text, RichTextBox1.Font.Size)
End Sub
'Implement ColorPicker SelectedColorChanged event
Private Sub RibbonColorPicker1_SelectedColorChanged_1(sender As Object, e As EventArgs) Handles RibbonColorPicker1.SelectedColorChanged
RichTextBox1.SelectionColor = RibbonColorPicker1.Color
End Sub
```
```csharp
// Create BackstageView
C1.Win.Ribbon.C1BackstageView backstageView = new C1.Win.Ribbon.C1BackstageView();
public Form1()
{
InitializeComponent();
ApplyBackstageView(this);
}
public void ApplyBackstageView(Form1 form1)
{
//Set text value to backstageview
backstageView.Text = "File";
// Create an instance of BackstageView User Control
BackstageOpenView openView = new BackstageOpenView();
openView.Owner = backstageView;
// Create a new tab for the BackStageView and bind it to its view
BackstageViewTab openTab = new BackstageViewTab();
openTab.Control = openView;
openTab.Text = "Open";
// Create buttons for BackStageView and define the event Handlers for the Buttons
RibbonButton newButton = new RibbonButton("New", Image.FromFile(@"images\New.png"));
newButton.Click += NewButton_Click;
RibbonButton saveButton = new RibbonButton("Save", Image.FromFile(@"images\save-file-icon.png"));
saveButton.Click += SaveButton_Click;
RibbonButton closeButton = new RibbonButton("Close", Image.FromFile(@"images\close.jpg"));
closeButton.Click += CloseButton_Click;
// Add Ribbon Items/Tab to the BackstageView
backstageView.LeftPaneItems.Add(newButton);
backstageView.LeftPaneItems.Add(openTab);
backstageView.LeftPaneItems.Add(saveButton);
backstageView.LeftPaneItems.Add(closeButton);
// Set the BackstageView to the Ribbon control
backstageView.Owner = customRibbon;
// Add the ribbon control to the form
this.Controls.Add(customRibbon);
}
private void NewButton_Click(object sender, System.EventArgs e)
{
this.richTextBox1.Clear();
}
private void SaveButton_Click(object sender, System.EventArgs e)
{
SaveFileDialog saveDialog = new SaveFileDialog();
saveDialog.Title = "Save rich text file";
saveDialog.Filter = "Rich Text Files (*.rtf)|*.RTF";
saveDialog.InitialDirectory = @"C:\Users\GPCTAdmin\Desktop";
if (saveDialog.ShowDialog() == DialogResult.OK)
{
richTextBox1.SaveFile(saveDialog.FileName);
}
}
private void CloseButton_Click(object sender, System.EventArgs e)
{
this.Close();
}
// Implement RibbonFontComboBox SelectedIndexChanged event
private void ribbonFontComboBox1_SelectedIndexChanged(object sender, System.EventArgs e)
{
richTextBox1.Font = new Font(ribbonFontComboBox1.Text, richTextBox1.Font.Size);
}
// Implement ColorPicker SelectedColorChanged event
private void ribbonColorPicker1_SelectedColorChanged(object sender, System.EventArgs e)
{
richTextBox1.SelectionColor = ribbonColorPicker1.Color;
}
```
### Configuring Backstage User-Controls through Code
The **BackstageView** Tab when clicked should open a collection of User Controls at runtime. This can be configured only through the code by creating instances of User Controls and assigning them to the Control property of the BackstageViewTab class. This is depicted in the code below.
```vbnet
Public Class BackstageView
Public Property Owner() As C1BackstageView
Get
Return m_Owner
End Get
Friend Set
m_Owner = Value
End Set
End Property
Private m_Owner As C1BackstageView
Private Sub browseCaption_Click_1(sender As Object, e As EventArgs) Handles browseCaption.Click
Dim openDialog As OpenFileDialog
openDialog = New OpenFileDialog()
openDialog.Title = "Browse .rtf file"
openDialog.Filter = "Rich Text Files (*.rtf)|*.RTF"
If openDialog.ShowDialog() = DialogResult.OK Then
Dim rct As RichTextBox = DirectCast(DirectCast(sender, Control).TopLevelControl.Controls(1), RichTextBox)
rct.LoadFile(openDialog.FileName)
Owner.DroppedDown = False
End If
End Sub
Private Sub browseCaption_MouseHover(sender As Object, e As EventArgs) Handles browseCaption.MouseHover
browseCaption.Font = New Font(browseCaption.Font.Name, browseCaption.Font.SizeInPoints, FontStyle.Underline)
browseCaption.BackColor = Color.AliceBlue
End Sub
Private Sub browseCaption_MouseLeave(sender As Object, e As EventArgs) Handles browseCaption.MouseLeave
browseCaption.BackColor = Color.CornflowerBlue
browseCaption.Font = New Font(browseCaption.Font.Name, browseCaption.Font.SizeInPoints, FontStyle.Regular)
End Sub
End Class
```
```csharp
public BackstageOpenView()
{
InitializeComponent();
}
public C1BackstageView Owner { get; internal set; }
private void browseCaption_Click(object sender, EventArgs e)
{
OpenFileDialog openDialog;
openDialog = new OpenFileDialog();
openDialog.Title = "Browse .rtf file";
openDialog.Filter = "Rich Text Files (*.rtf)|*.RTF";
if (openDialog.ShowDialog() == DialogResult.OK)
{
RichTextBox rct = (RichTextBox)((Control)sender).TopLevelControl.Controls[1];
rct.LoadFile(openDialog.FileName);
Owner.DroppedDown = false;
}
}
private void browseCaption_MouseHover(object sender, EventArgs e)
{
browseCaption.Font = new Font(browseCaption.Font.Name, browseCaption.Font.SizeInPoints, FontStyle.Underline);
browseCaption.BackColor = Color.AliceBlue;
}
private void browseCaption_MouseLeave(object sender, EventArgs e)
{
browseCaption.BackColor = Color.CornflowerBlue;
browseCaption.Font = new Font(browseCaption.Font.Name, browseCaption.Font.SizeInPoints, FontStyle.Regular);
}
```
### Configure Back button
Back button in the BackstageView control allows the user to navigate to the previous screen. However, there are instances where you may want to retain users engaged within the BackstageView to perform specific actions, like opening a file or creating a new one, instead of simply reverting to the previous screen using the back button. In such cases, you can disable the back button in BackstageView by setting [BackButton.Enabled](/componentone/docs/win/online-ribbon/) property of [C1BackstageView](/componentone/docs/win/online-ribbon/) class to **False**. By default, back button in BackstageView is enabled.
The below image shows the disabled Back button in the BackstageView.
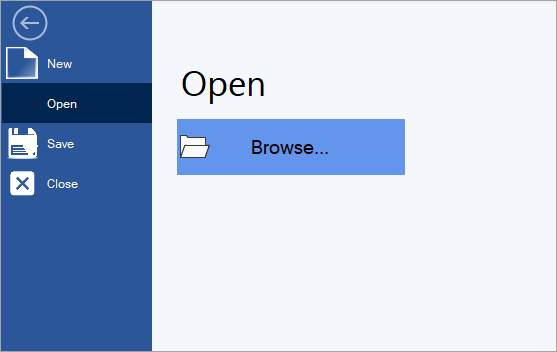
The below code disables the Back button in the BackstageView control.
```csharp
backstageView.BackButton.Enabled = false;
```