# Quick Start
Get started with MultiSelect, the WinForms control that provides the ease of selecting multiple objects from a list/collection. See more in documentation here.
## Content
This quick start will guide you through the steps of adding C1MultiSelect to a project and binding the control to a data source.
Complete the steps given below to see how the MultiSelect control appears after data binding.
1. [Adding MultiSelect control to the Application](/componentone/docs/win/online-multiselect/quickstart#step-1-adding-multiselect-control-to-the-application)
2. [Binding MultiSelect to a DataSet](/componentone/docs/win/online-multiselect/quickstart#step-2-binding-multiselect-to-a-dataset)
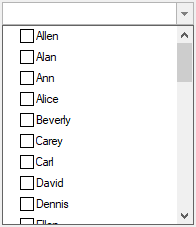
The following image shows how the MultiSelect control appears after data binding.
### Step 1: Adding MultiSelect control to the Application
1. Create a new **Windows Forms App** in **Visual Studio**.
2. Drag and Drop the **C1MultiSelect** control from the toolbox onto the form. The C1MultiSelect control is added to the form.
### Step 2: Binding MultiSelect to a DataSet
1. In **Properties** window, navigate to the **DataSource** attribute in the **BindingInfo** property.
2. Click **Add Project Data Source** to open the **Data Source Configuration Wizard**. The Data Source Configuration Wizard appears with a database selected as a data source.
3. Click **Next** to select a database model.
4. Click the **New Connection** button to locate and connect to a database. The **Add Connection** dialog box opens.
5. Click the **Browse** button and locate the **C1NWind.mdb** file. Select it and click **Open**.
6. Click the **Test Connection** button to make sure that you have successfully connected to the database or server and click **OK** in the dialog window confirming the connection succeeded.
7. Click **OK** to close the **Add Connection** dialog box and return to the **Data Source Configuration Wizard**. The new string appears in the data connection drop-down box.
8. Click the **Next** button to continue. A dialog box appears asking if you would like to add the data file to your project and modify the connection string. Click **No**.
9. In the **Choose Your Database Objects** window, you can select the tables and fields that you would like in your dataset. We have selected the Customer table, the fields within the Customer table should all be selected as well.
10. Click **Finish** to exit the wizard. The dataset, binding source and table adapter now appear on your form.
11. Switch to the code view to see that the following code is added to the **Form\_Load** event:
`this.customerTableAdapter.Fill(this.c1NWindDataSet.Customer);`
12. Switch back to the design view and navigate to the **Properties** window.
13. In **BindingInfo** property, set **DisplayMemberPath** attribute to **FirstName**. Observe that the **DataSource** attribute is set to **customerBindingSource**.
14. Run the application to display all customer names from Customer table in **C1MultiSelect** control list.
## See Also
[Use MultiSelect Control](/componentone/docs/win/online-multiselect/usingmultiselectcontrol)
[Key Features](/componentone/docs/win/online-multiselect/keyfeatures)