# Quick Start
## Content
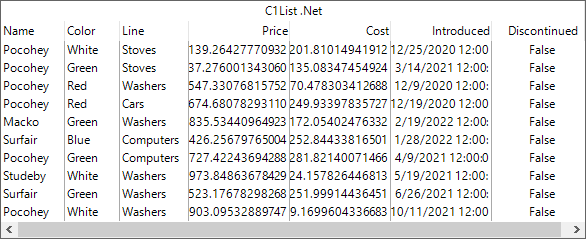
This quick start guides you through the steps of creating a simple List application. You begin by creating a **Windows Forms App** in Visual Studio, adding he List control to the Form and binding it to a data source.
### .NET
Follow the given steps to create a simple List application in .NET Edition.
## Set Up the Application
1. Create a new **Windows Forms App** and set the project framework to **.NET 6.0** using **Configure your new project** window.
2. Install **C1.Win.List** package using **NuGet Package Manager**. The C1List control gets added to the Toolbox once the package gets installed.
3. Drag and drop the List control from **Toolbox** onto the Form.
## Bind List to a Data Source
1. Create a class named **Product** to be used as a data source.
```csharp
public class Product
{
// Create a custom class Product
static Random _rnd = new Random();
static string[] _names = "Macko|Surfair|Pocohey|Studeby".Split('|');
static string[] _lines = "Computers|Washers|Stoves|Cars".Split('|');
static string[] _colors = "Red|Green|Blue|White".Split('|');
public Product()
{
Name = _names[_rnd.Next() % _names.Length];
Line = _lines[_rnd.Next() % _lines.Length];
Color = _colors[_rnd.Next() % _colors.Length];
Price = 30 + _rnd.NextDouble() * 1000;
Cost = 3 + _rnd.NextDouble() * 300;
Discontinued = _rnd.NextDouble() < .2;
Introduced = DateTime.Today.AddDays(_rnd.Next(-600, 0));
}
public string Name { get; set; }
public string Color { get; set; }
public string Line { get; set; }
public double Price { get; set; }
public double Cost { get; set; }
public DateTime Introduced { get; set; }
public bool Discontinued { get; set; }
}
```
2. Initialize a list of type Product.
```csharp
// Initialises a List of type Product, where Product is a class type
List _products = new List();
```
3. Initialize a **for** loop to add products using the **Add** method as shown in the following code.
```csharp
// Initialize for loop and add products to the list
for (int i = 0; i < 10; i++)
{
_products.Add(new Product());
}
```
4. Bind the List control to a data source by using DataSource property of the C1List class.
```csharp
// Bind list with data
c1List1.DataSource = _products;
```
## Configure the List control
Add the following code to initialize and add the List control to the Form at runtime.
```csharp
// Initialize the control
C1List c1list1 = new C1List();
// Add the control to form
this.Controls.Add(c1list1);
```
### .NET Framework
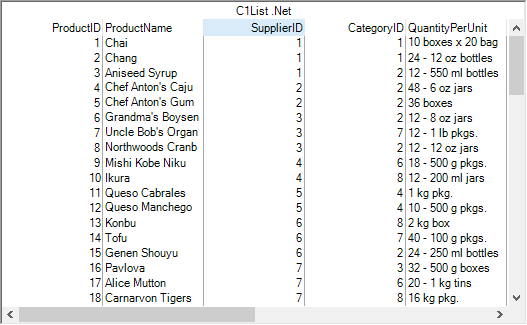
Follow the given steps to create a simple List application in .NET Framework.
## Set Up the Application
1. Create a new **Windows Forms App**(.NET Framework) and set the project framework to **.NET Framework 4.5.2** using **Configure your new project** window.
2. Add the reference to **C1.Win.List** in your project.
3. Drag and drop the List control from the **Toolbox** onto the form.
Observe: The List control gets added to the Form.
## Bind List to a Data Source
There are two ways to bind data with the List control, either choose to bind at design time or through code at run time.
### Binding at Design-time
1. Select the List control and click the smart tag icon() to open the **C1List Tasks** smart tag panel in the design view.
2. From the **C1List Tasks** smart tag panel, click the drop-down menu appearing against the **Choose Data Source** option.
3. Click the **Add Project Data Source** link to open the **Data Source Configuration Wizard** window.
4. Select **Database** and click the **Next** button on **Choose a Data Source Type** page.
5. Select **Dataset** and click the **Next** button on the **Choose a Database Model** page.
6. Click **New Connection** to open the **Add Connection** dialog from the **Choose Your Data Connection** page.
7. Click the **Change**... button against the **DataSource** field to open the **Change Data Source** dialog.
8. Select **Microsoft Access Database File** and click **OK** to return to the **Add Connection** dialog.
9. Click the **Browse** button against the **Database file name** field and navigate to the database file. Provide the **User name** and **Password**, if required to connect to the database file. This example uses the **C1NWind.mdb** file located at the following location, by default, on your system: **\\Documents\\ComponentOne Samples\\Common**.
10. Click **Test Connection** to make sure that you have successfully connected to the database or server and click **OK**.
11. Click **OK** again to close the **Add Connection** dialog box.
12. Click **Next** to continue. A dialog box will appear asking if you would like to add the data file to your project and modify the connection string. Choose the appropriate option as per your requirement.
13. Save the connection string in the application configuration file by checking the **Yes, save the connection as box**, and enter a name.
14. Click **Next** to switch to the **Choose Your Database Objects** page.
15. Choose database objects from the **Data Source Configuration Wizard** window that you want in your dataset. In this example, we are selecting the **Products** table for data binding.
16. Click **Finish** to complete the data binding.
The above steps add a dataset, and a connection string to your project. With this, the following code gets generated automatically to fill the dataset:
```csharp
// TODO: This line of code loads data into the 'c1NWindDataSet1.Products' table. You can move, or remove it, as needed.
this.productsTableAdapter.Fill(this.c1NWindDataSet1.Products);
```
### Binding through Code
To bind the List control through code, follow the given steps.
1. Create a method named **GetConnectionString** to return the connection string.
```csharp
static string GetConnectionString()
{
string path = Environment.GetFolderPath(Environment.SpecialFolder.Personal) + @"\ComponentOne Samples\Common";
string conn = @"provider=microsoft.jet.oledb.4.0;data source={0}\c1nwind.mdb;";
return string.Format(conn, path);
}
```
2. Subscribe to the **Form\_Load** event and add the following code to the **Form1\_Load** event handler. In this code, we create a string type object to fetch the connection string by calling the GetConnectionString() method and then populate the List control using DataSource property of the C1List class.
```csharp
// bind list to a data source
string conn = GetConnectionString();
OleDbDataAdapter da = new OleDbDataAdapter("select * from products", conn);
DataTable dt = new DataTable("Products");
//fills the data table
da.Fill(dt);
//populate list control using DataSource property
c1List1.DataSource = dt;
```
## Configure the List control
Add the following code to initialize and add the List control to the Form at runtime.
```csharp
// Initialize the control
C1List c1list1 = new C1List();
// Add the control to form
this.Controls.Add(c1list1);
```