# Data Binding
## Content
### .NET
This section walks you through the process for achieving data binding in GanttView for .NET framework.
1. Add Task to the GanttView control and set its properties.
```csharp
//Add tasks and set the properties
var task1 = c1GanttView1.Tasks[1];
task1.ConstraintDate = new System.DateTime(2012, 6, 22, 0, 0, 0, 0);
task1.ConstraintType = C1.Win.GanttView.ConstraintType.StartNoEarlierThan;
task1.Duration = 3;
task1.ID = 656460240;
task1.Mode = C1.Win.GanttView.TaskMode.Automatic;
task1.Name = "Pursue a hare";
task1.Start = new System.DateTime(2015, 4, 1, 0, 0, 0, 0);
var task2 = c1GanttView1.Tasks[2];
task2.ConstraintDate = new System.DateTime(2012, 6, 26, 0, 0, 0, 0);
task2.ConstraintType = C1.Win.GanttView.ConstraintType.StartNoEarlierThan;
task2.Duration = 12;
task2.DurationUnits = C1.Win.GanttView.DurationUnits.Minutes;
task2.ID = 132267904;
task2.Mode = C1.Win.GanttView.TaskMode.Automatic;
task2.Name = "Hit the hare";
task2.Start = new System.DateTime(2015, 4, 4, 0, 0, 0, 0);
var task3 = c1GanttView1.Tasks[4];
task3.ConstraintDate = new System.DateTime(2012, 6, 28, 0, 0, 0, 0);
task3.ConstraintType = C1.Win.GanttView.ConstraintType.StartNoEarlierThan;
task3.Duration = 2;
task3.ID = 1639616200;
task3.Mode = C1.Win.GanttView.TaskMode.Automatic;
task3.Name = "Skin that hare";
task3.Start = new System.DateTime(2015, 4, 6, 9, 12, 0, 0);
var task4 = c1GanttView1.Tasks[6];
task4.ConstraintDate = new System.DateTime(2012, 6, 29, 0, 0, 0, 0);
task4.ConstraintType = C1.Win.GanttView.ConstraintType.StartNoEarlierThan;
task4.Duration = 3;
task4.ID = 1784420689;
task4.Mode = C1.Win.GanttView.TaskMode.Automatic;
task4.Name = "Cook the hare";
task4.Start = new System.DateTime(2015, 4, 8, 9, 12, 0, 0);
var task5 = c1GanttView1.Tasks[7];
task5.ConstraintDate = new System.DateTime(2012, 6, 30, 0, 0, 0, 0);
task5.ConstraintType = C1.Win.GanttView.ConstraintType.StartNoEarlierThan;
task5.Duration = 1;
task5.ID = 1296539678;
task5.Mode = C1.Win.GanttView.TaskMode.Automatic;
task5.Name = "Eat the hare";
task5.Start = new System.DateTime(2015, 4, 13, 9, 12, 0, 0);
```
2. Add Resources to the C1GanttView.
```csharp
//Add Resources
Resource resource1 = new C1.Win.GanttView.Resource();
Resource resource2 = new C1.Win.GanttView.Resource();
Resource resource3 = new C1.Win.GanttView.Resource();
Resource resource4 = new C1.Win.GanttView.Resource();
resource1.Cost = new decimal(new int[] {
20000,
0,
0,
131072});
resource1.ID = 457479171;
resource1.Name = "Adam Miller";
resource2.Cost = new decimal(new int[] {
50000,
0,
0,
131072});
resource2.ID = 574928631;
resource2.Name = "Ruth Radelet";
resource3.Cost = new decimal(new int[] {
25000,
0,
0,
131072});
resource3.ID = 1258408175;
resource3.Name = "Johnny Jewel";
resource4.Cost = new decimal(new int[] {
40000,
0,
0,
131072});
resource4.ID = 187715318;
resource4.Name = "Nat Walker";
this.c1GanttView1.Resources.Add(resource1);
this.c1GanttView1.Resources.Add(resource2);
this.c1GanttView1.Resources.Add(resource3);
this.c1GanttView1.Resources.Add(resource4);
```
3. Assign resources to the specific task. The added resources can be assigned to a specific task by creating a resource reference.
```csharp
//Add Resource Reference
ResourceRef resourceRef1 = new C1.Win.GanttView.ResourceRef();
ResourceRef resourceRef2 = new C1.Win.GanttView.ResourceRef();
ResourceRef resourceRef3 = new C1.Win.GanttView.ResourceRef();
ResourceRef resourceRef4 = new C1.Win.GanttView.ResourceRef();
ResourceRef resourceRef5 = new C1.Win.GanttView.ResourceRef();
ResourceRef resourceRef6 = new C1.Win.GanttView.ResourceRef();
ResourceRef resourceRef7 = new C1.Win.GanttView.ResourceRef();
resourceRef1.Amount = 1;
resourceRef1.ResourceID = 457479171;
resourceRef2.ResourceID = 1258408175;
task1.ResourceRefs.Add(resourceRef1);
task1.ResourceRefs.Add(resourceRef2);
resourceRef3.Amount = 1;
resourceRef3.ResourceID = 187715318;
task2.ResourceRefs.Add(resourceRef3);
resourceRef4.Amount = 1;
resourceRef4.ResourceID = 187715318;
resourceRef5.Amount = 1;
resourceRef5.ResourceID = 1258408175;
task3.ResourceRefs.Add(resourceRef4);
task3.ResourceRefs.Add(resourceRef5);
resourceRef6.Amount = 1;
resourceRef6.ResourceID = 574928631;
task4.ResourceRefs.Add(resourceRef6);
resourceRef7.Amount = 1;
resourceRef7.ResourceID = 457479171;
task5.ResourceRefs.Add(resourceRef7);
```
4. Add Predecessors to the tasks.
```csharp
//Add predecessors
Predecessor predecessor1 = new C1.Win.GanttView.Predecessor();
Predecessor predecessor2 = new C1.Win.GanttView.Predecessor();
Predecessor predecessor3 = new C1.Win.GanttView.Predecessor();
Predecessor predecessor4 = new C1.Win.GanttView.Predecessor();
predecessor1.PredecessorTaskID = 656460240;
task2.Predecessors.Add(predecessor1);
predecessor2.PredecessorTaskID = 132267904;
task3.Predecessors.Add(predecessor2);
predecessor3.PredecessorTaskID = 1639616200;
task4.Predecessors.Add(predecessor3);
predecessor4.PredecessorTaskID = 1784420689;
task5.Predecessors.Add(predecessor4);
```
5. Configure the GanttView Control. Add the following code to configure the grid.
```csharp
gv.Dock = DockStyle.Fill;
gv.BackColor = Color.LavenderBlush;
gv.FixedFont = new Font("Microsoft Sans serif", 9, FontStyle.Bold);
```
### .NET Framework
This section walks you through step-by-step instructions for achieving data binding in GanttView for .NET Framework.
GanttView, when bound to a data source, fetches the required data from the underlying data source. Data binding additionally lets multiple data consumers to be connected to a single data provider in a synchronized manner. GanttView supports data binding to most of the commonly used data sources such as BindingSource, ADO.NET objects such as DataSet, DataTable etc.
### Binding at design time
### Step1: Configure the Data Source
.gif)
1. Click **View** \| **Other Windows** \| **Data Sources**.
2. In Data Sources window, click **Add New Data Sourc**e link to open **Data Source Configuration Wizard** window. Select Database as the Data Source Type and then click Next.
3. After clicking Next, select **Dataset** as the database model in **Data Source Configuration Wizard** window and click Next.
4. Select Data Connection by browsing **C1NWind.mdb** database file in your system. Test the connection and click Next. Save the connection string to add the database file to your project and click Next.
5. Choose **Tables** as Database Object Model in **Data Source Configuration Wizard** window.
6. Select **Calendars**, **Properties**, **Resources** and **Tasks** tables as object models from the drop-down list appearing under Tables and click Finish.
7. Navigate to the Toolbox again and locate the **BindingSource** icon in Data. Double-click the BindingSource icon to add it to the Design View.
8. Click the BindingSource once and set the DataSource property to **c1NWindDataSet** and DataMember as **Tasks** using the drop-down arrow in the Properties window. Delete the BindingSource from the design view after setting these properties.
9. Repeat **Step 8** for Calendars, Resources and Properties tables to set their DataSource as c1NWindDataSet and DataMember as **Calendars**, **Resources** and **Properties**, respectively.
This creates adapters for the added datasets in your project.
10. The above steps adds the required datasets to your project. Also, the Visual studio automatically creates the following code to fill the dataset:
```csharp
// TODO: This line of code loads data into the 'c1NWindDataSet1.Resources' table. You can move, or remove it, as needed.
this.resourcesTableAdapter.Fill(this.c1NWindDataSet.Resources);
// TODO: This line of code loads data into the 'c1NWindDataSet1.Properties' table. You can move, or remove it, as needed.
this.propertiesTableAdapter.Fill(this.c1NWindDataSet.Properties);
// TODO: This line of code loads data into the 'c1NWindDataSet1.Calendars' table. You can move, or remove it, as needed.
this.calendarsTableAdapter.Fill(this.c1NWindDataSet.Calendars);
// TODO: This line of code loads data into the 'c1NWindDataSet1.Tasks' table. You can move, or remove it, as needed.
this.tasksTableAdapter.Fill(this.c1NWindDataSet.Tasks);
```
### Step2: Bind GanttView to the Data Source
To bind the GanttView control to the data source at the design time, follow the given steps:
1. Select the GanttView control and navigate to the **Properties window** to make the following settings under **DataStorage** component.
* **CalendarStorage**:
* DataMember - Calendars
* DataSource - c1NWindDataSet
* **PropertyStorage**:
* DataMember - Properties
* DataSource - c1NWindDataSet
* **ResourceStorage**:
* DataMember - Resources
* DataSource - c1NWindDataSet
* **TaskStorage**:
* DataMember - Tasks
* DataSource - c1NWindDataSet
2. In **DefaultWorkingTimes** component in Properties window, make the following settings.
* **Interval\_1**:
* Empty - False
* From - 9:00 AM.
* To - 1:00 PM
* **Interval\_2**:
* Empty - False
* From - 2:00PM.
* To - 6:00 AM
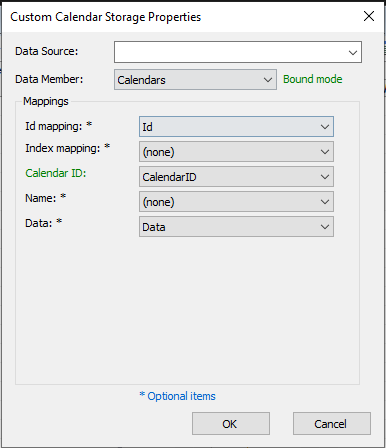
3. Click the ellipsis appearing in the **CalendarStorage** property to set the following mappings and click **OK**.
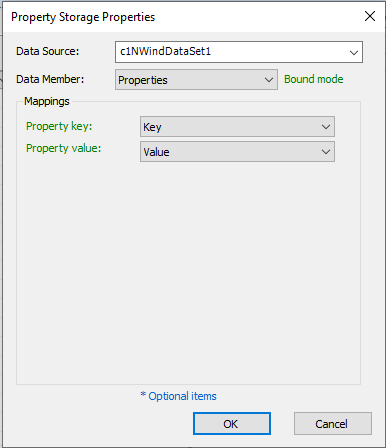
4. Click the ellipsis appearing in the **PropertyStorage** property to set the following mappings and click OK.
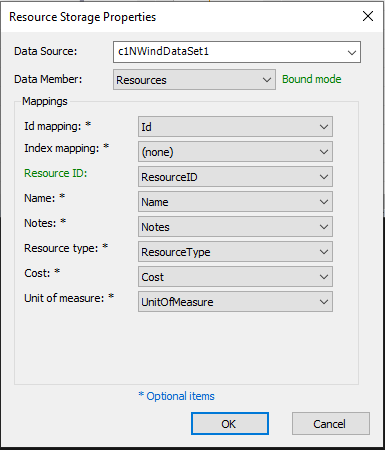
5. Click the ellipsis appearing in the **ResourceStorage** property to set the following mappings and click OK.
6. Click the ellipsis appearing in the **TasksStorage** property to set the following mappings and click OK.
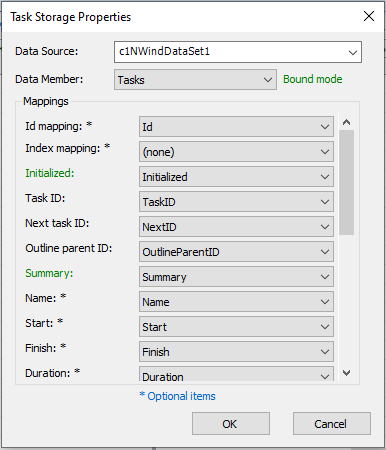
Refer to the following table to see all the mappings required for **TasksStorage** property.
| Id Mapping | Id |
| ---------- | --- |
| Initialized | Initialized |
| Task ID | TaskID |
| Next task ID | NextID |
| Outline parent ID | OutlineParentID |
| Summary | Summary |
| Name | Name |
| Start | Start |
| Finish | Finish |
| Duration | Duration |
| Mode | Mode |
| Calendar ID | CalendarID |
| Duration units | DurationUnits |
| Percent complete | PercentComplete |
| Deadline | Deadline |
| Constraint type | ConstraintType |
| Hide bar | HideBar |
| Predecessors | Predecessors |
| Resources | Resources |
| Custom fields | CustomFields |
| Notes | Notes |
7. In the Resources property, add four resources through **Resource Collection Editor**. Name these resources as Resource 1, Resource 2 and so on.
8. Locate the **TimeScale** component in Properties window to make the following timescale settings.
* **MiddleTier**:
* Units - Weeks
* Count - 1
* Format - nnn d
* Visible - True
* **BottomTier**:
* Units - Days
* Count - 1
* Format - w
* Align - Center
* Visible - True
* UseFiscalYear - True