# Styling the Reports
Get started with, FlexReport comprehensive reporting tool that provides complete reporting solution - from building complex reports to previewing, exporting, and printing.
## Content
A report generally requires some part of it to stand out from the rest. FlexReport provides many styling capabilities such as the [Background](/componentone/docs/win/online-flexreport/) and [Border](/componentone/docs/win/online-flexreport/) properties to transform the look of your report. Explore these features in detail in the following sections.
## Set Background
Setting a Background color using FlexReportDesigner is quiet easy. A background color in FlexReport can be set for Fields, Sections, and Sub-sections. The background colors can be Solid or Gradient.
The following image shows a Report header without any background:

To set a background to the Report Header:
1. In the Design mode, select the **Header** section of the report.
2. From the Properties window, click the drop-down next to **Background** property. The color palette opens.
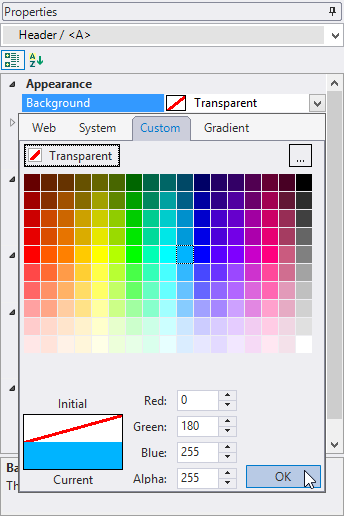
3. Select a color for the background. You can choose color from the tabs - Web, System, Custom, and Gradient.
4. Preview the report.

5. You can also set Gradient - Linear or Radial - for the background. For obtaining a Gradient, switch to Design mode.
6. Select the **Header** section of the report.
7. From the Properties window, click the drop-down next to **Background** property. Go to Gradient tab and edit the settings from the options available as shown:
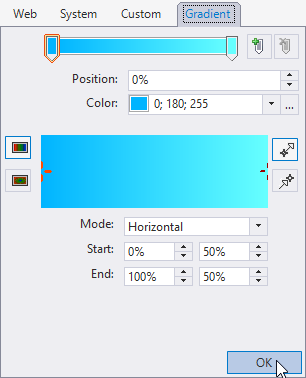
8. Specify the gradient as Linear. You can also drag the slider to change the start and stop for the gradient.
9. Preview the report. The Report Header now looks as follows:

## Set Border
In FlexReportDesigner, you can easily set Borders for Fields, Sections, and Sub-sections.
To set Border around the Fields or Sections:
1. Select the **Field** around which you want borders to appear.
2. From the Properties window, select ellipsis next to Borders property. The **Borders Properties** dialog box opens.
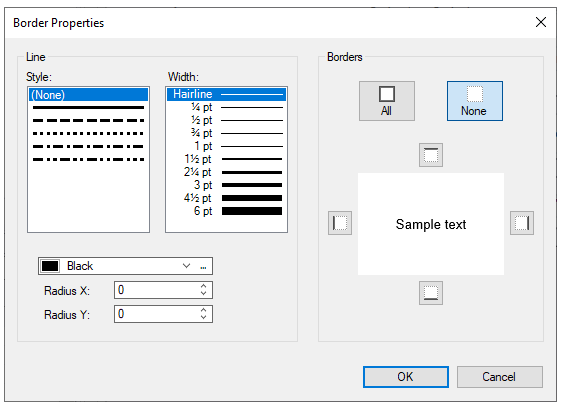
3. Select the Line **Style** and Line **Width**; select **Borders** to show - All or - any one or the combination of Left, Top, Right, or Bottom borders. Select the color and click **OK**.
4. Lets insert borders with rounded corners in the Report Header. Select the **Report Header**.
5. Set the Line Style, Line Width, Borders, and color as before.
6. Set the **Radius X** and **Radius Y** for the corners.
7. Preview the report.
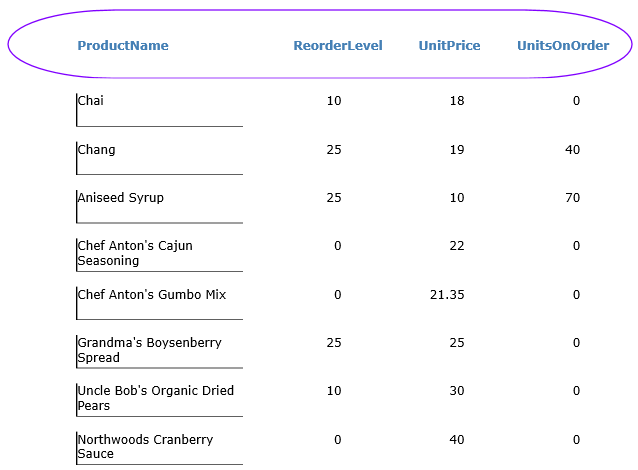
For inserting rounded corners note that:
* Range of Radius X is from 0 to field's width.
* Range of Radius Y is from 0 to field's height.
## Add alternating background
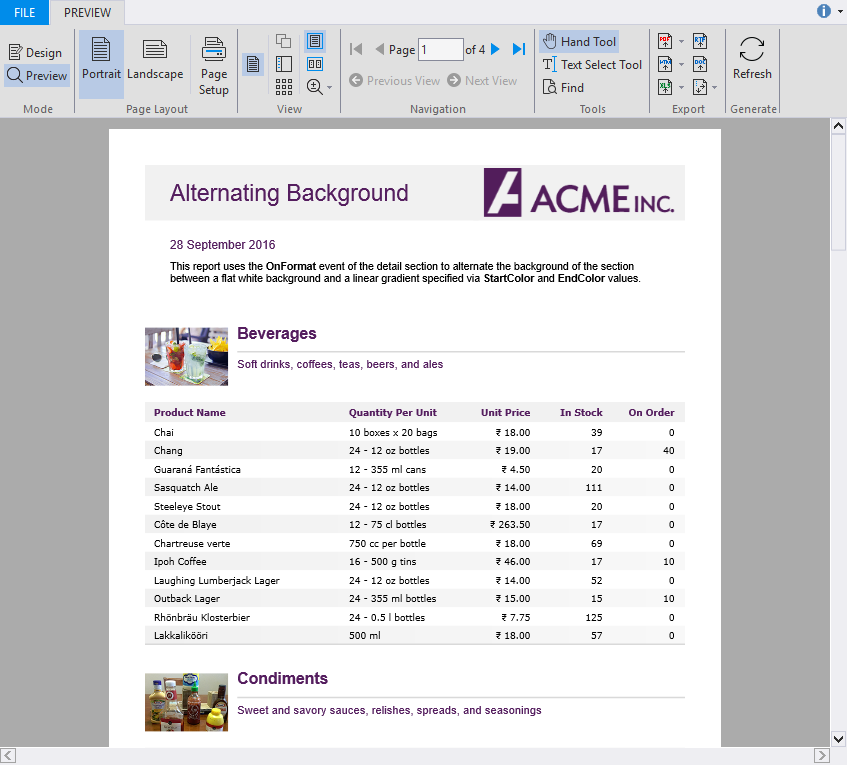
The "Alternating background" feature of FlexReport lets you demonstrate how to change the background color of alternate rows in a section of report.
By default, rows in the details section of a report have the same background color. However, the background color of the alternate rows can be set to enhance the readability of the records in a report. You can set the background color of the alternating rows in the detail section using its **OnFormat** event.
In this report, the background color is applied to the alternate rows of **Detail** section on the basis of the script added to it's **OnFormat** property. The background color of the odd numbered rows is set to white and the even numbered rows is set to a linear gradient using **StartColor** and **EndColor** values.
To create a report with alternating background, perform the steps below:
### Step 1: Create a report
1. Open the **FlexReportDesigner** and go to **FILE \| New**.
2. Click **New Report** drop down from the **Reports** tab and select **Empty Report** to create a report.
### Step 2: Connect the report to a data source
1. Switch to the **Data** tab, right-click the **Main** data source and choose **Edit** to open and the **Data Sources Wizard** and start editing.
2. Select **OLEDB Data Provider** from the **Data provider** drop-down and click the ellipsis button next to the **Connection string** textbox to select the **C1NWind.mdb** file.
3. Specify the following Sql statement in the **Sql statement** tab:
```auto
SELECT Categories.*, Products.*
FROM Categories INNER JOIN Products
ON Categories.CategoryID = Products.CategoryID
```
### Step 3: Add background color to alternate rows
1. Click **Groups** in **Home** tab and add a group named **CategoryName**.
2. In the **Groups** wizard, set the following properties for the CategoryName group:
| **Property** | **Value** |
| -------- | ----- |
| GroupBy | CategoryName |
| Keep Together | KeepFirstDetail |
| Sort | Ascending |
| ShowGroupFooter | True |
| ShowGroupHeader | True |
| OutlineLabel | =CategoryName |
3. Click **OK** to close the **Groups** wizard.
4. Right-click **CategoryName\_Header** group and select **Add SubSection** from the context menu.
5. Add two SubSections to the group header.
6. In **CategoryName\_Header/\** subsection, add one ImageField and two TextFields and set the following properties:
| **Property** | **Value** |
| -------- | ----- |
| Image.Picture | Picture |
| Image.PictureAlign | Scale |
| Image.PictureScale | Scale |
| TextField1.Text | =CategoryName |
| TextField2.Text | =Description |
7. In **CategoryName\_Header/\** subsection, add five TextFields, Product Name, Quantity Per Unit, Unit Price, In Stock, On Order.
8. In the **Details** section, add five TextFields corresponding to the TextFields in **CategoryName\_Header/\**, and set the following properties:
| **Property** | **Value** |
| -------- | ----- |
| TextField8.Text | =ProductName |
| TextField9.Text | =QuantityPerUnit |
| TextField10.Text | =UnitPrice |
| TextField11.Text | =UnitsInStock |
| TextField12.Text | =UnitsOnOrder |
9. Select the report from the drop-down list on the top of the **Properties** window.
10. Go to the **OnOpen** property of the report and enter **cnt = 0**. This initializes the 'cnt' variable.
11. Select **Detail** section from the drop-down list above the **Properties** window or from the design area.
12. Go to the **OnFormat** property and then click the ellipsis button. In the **VBScript Editor**, enter the following expression in the editor and click **Done**. Here, "cnt" checks if the row is even or odd.
```
cnt = cnt + 1
if cnt mod 2 = 0 then
Detail.Background.StartColor = Rgb(238, 214, 200)
Detail.Background.EndColor = Rgb(238, 200, 177)
else
Detail.Background.StartColor = vbWhite
Detail.Background.EndColor = vbWhite
endif
```
### Step 4: View the report
Preview the report with alternating background.
>type=note
> **Note**: For the complete report, see report 'Alternating Background' in the **FlexCommonTasks.flxr** report definition file, which is available in the **ComponentOne Samples\\Winforms\\C1FlexReport\\CS\\FlexCommonTasks** folder. The data base used is **C1NWind.mdb** which is also available in the **ComponentOne Samples** folder.