# Quick Start
Get started with, FlexReport comprehensive reporting tool that provides complete reporting solution - from building complex reports to previewing, exporting, and printing.
## Content
Learn how to create a simple report application using the WinForms FlexReport control. Follow the steps below to get started:
## Create a Report Definition
You can create report definitions using the FlexReport Designer application (with zero code) as well as programmatically. The easiest way to create a report definition using the [FlexReportDesigner app](/componentone/docs/win/online-flexreport/flexreport-designer), which is a stand-alone application similar to the report designer in Microsoft Access and Crystal Reports.
> type=note
> **Note**: The **C1FlexReportDesigner.exe** for 64-bit platform and **C1FlexReportDesigner32.4.exe** for 32-bit platform are located at **C:\\Program Files (x86)\\ComponentOne\\Apps\\v4.5.2** on your computer.
### Using FlexReportDesigner
FlexReportDesigner provides the **FlexReport Wizard,** a report engine to create reports. With this wizard, you can choose a suitable data source, select fields, layouts and style etc.
To begin, complete the following steps:
1. Run the **C1FlexReportDesigner.exe** file.
2. Go to **File** menu in the menu bar and select the **New** command to create a new empty report definition file.
3. Click **New Report** dropdown from the **Reports** tab located on the extreme left of designer and select **Report Wizard**.
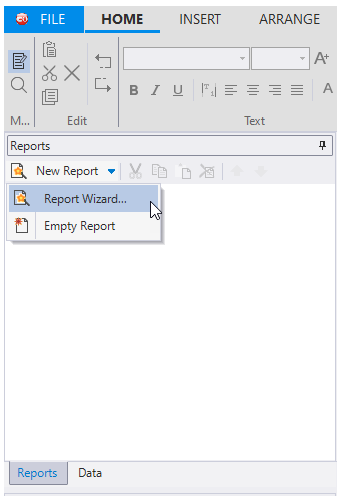
The **FlexReport Wizard** opens.
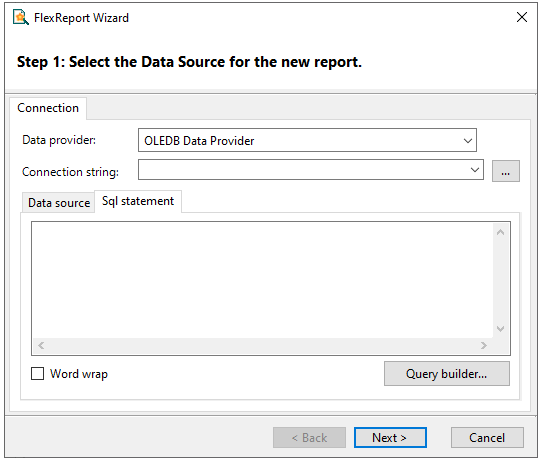
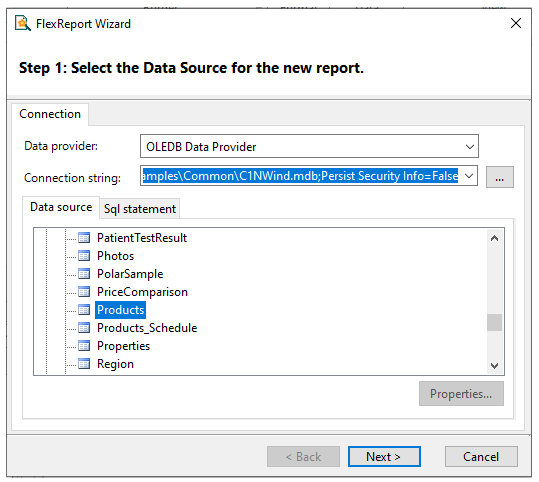
Here, we have used 'OLEDB Data Provider' as the data provider. You can also choose any other data provider from the drop-down button.
**Add a DataSource to Report**
Using the **FlexReport Wizard**, complete the following steps to add a data source in the new report:
1. Click the ellipsis button to bring up the standard connection string builder. The **Data Link Properties** dialog box opens.
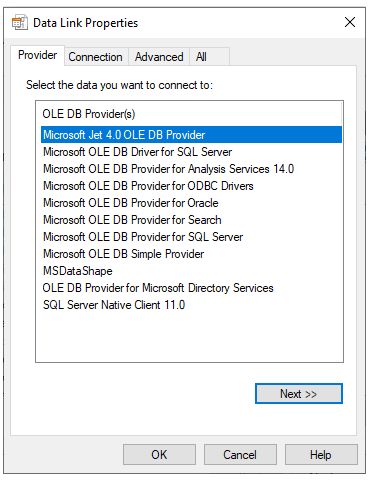
2. Select the **Provider** tab and select a data provider from the list. For this example, select **Microsoft Jet 4.0 OLE DB Provider**.
3. Click the **Next** button or select the **Connection** tab. Now, you must choose a data source.
4. Click the **ellipsis** button to select a database. The **Select Access Database** dialog box appears. For this example, select the **C1NWind.mdb** located in the **Common** folder in the **ComponentOne Samples** directory (by default installed in the **Documents** folder). Note that this directory reflects the default installation path and its path may be different if you made changes to the installation path.
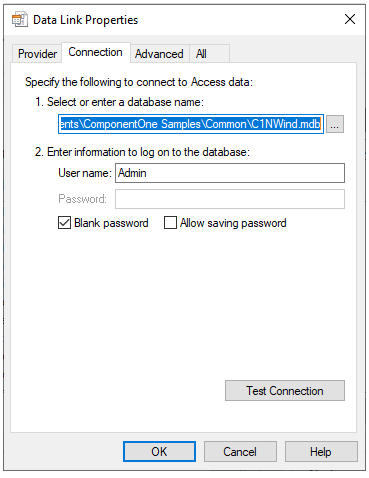
You can test the connection and click **OK**.
5. Click **OK** to close the **Data Link Properties** dialog box.
6. Once you have selected your data source, you can select a table, view, or stored procedure to provide the actual data.Click **Next**.
7. Select the **Data source** tab and select the **Products** table from the **Tables** list.
**Select Data Fields**
1. Select the fields you want to include in the report using the FlexReport Wizard.
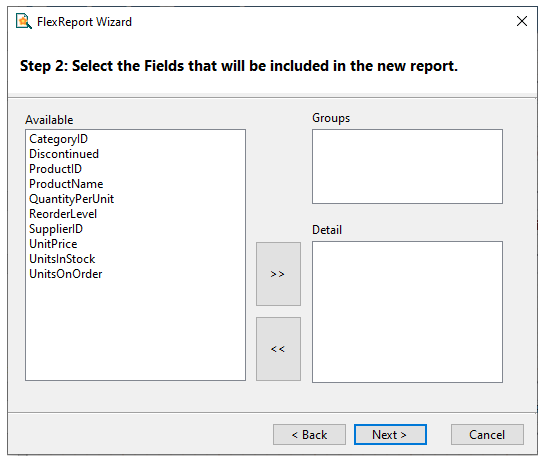This page in the Wizard contains a list of fields available from the recordset you selected, and the two lists that define the group and detail fields for the report. **Group** fields define how the data will be sorted and summarized, and **Detail** fields define what information you want to appear in the report.
You can move fields from one list to another by dragging them with your mouse pointer. Drag fields into the **Detail** list to include them in the report, or drag within the list to change their order. Drag fields back into the **Available** list to remove them from the report. With your mouse pointer, select the **CategoryID** field and drag it into the **Groups** list.
2. Press the >> button to move the remaining fields into the **Detail** list.
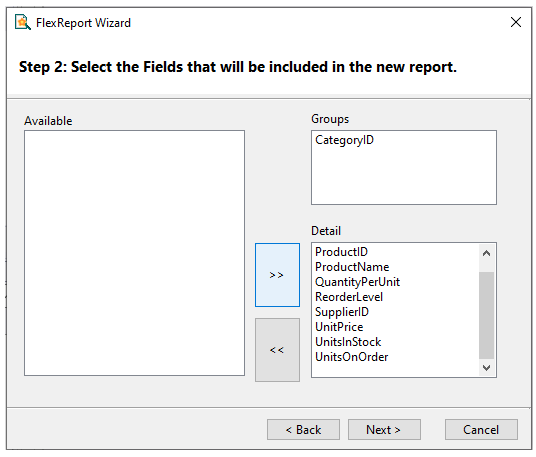Click **Next**.
**Select Layout and Style**
1. Select the layout for the new report. FlexReport Wizard lets you select data layouts, page orientation and choose to adjust fields to fit the page. Keep the **Outline** layout.
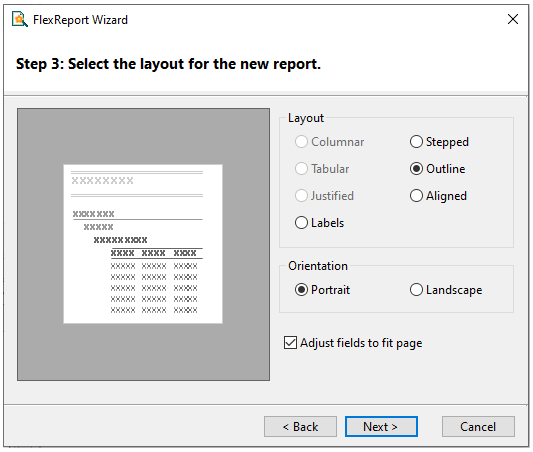
2. Click **Next**.
3. Select the style for the new report. The FlexReport Wizard lets you to select the fonts and colors that will be used in the new report.
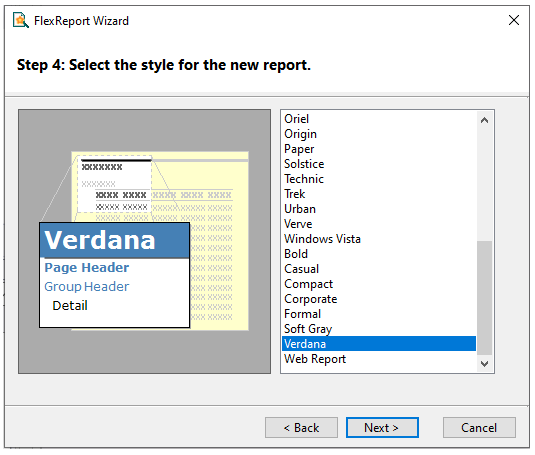
4. Click **Next**.
**Add Title and Preview the Report**
1. Select a title for the new report.
Enter a title for the new report, **Products Report**, for example.
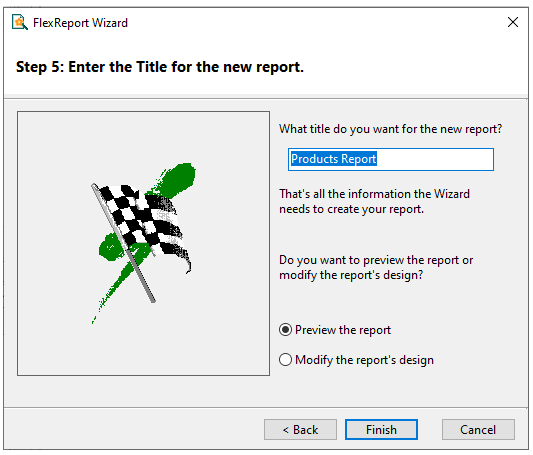
2. Choose **Preview the report** option and click **Finish**. You will immediately see the report in the preview pane of the **Designer**.
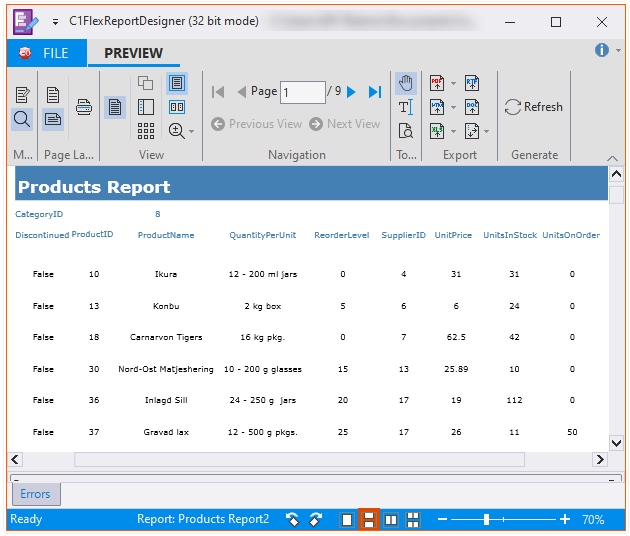
> type=note
> **Note**: You can invoke the **FlexReportDesigner** from Visual Studio as well. To do so, complete the following steps:
>
> 1. Create a .NET project and add the **FlexReport** component to your Toolbox.
> 2. From the Toolbox, double-click the **FlexReport** icon to add the component to your project. Note that the component will appear below the form in the Component Tray.
> 3. Click the **FlexReport** component's smart tag and select **Edit Report** from its **Tasks** menu.
The **FlexReportDesigner** opens and the **C1FlexReport Wizard** is ready to guide you through the five easy steps discussed above.
### Using Code
The following steps show how to create a simple tabular report definition based on the C1NWind database using code.
1. **Add controls**
First, add a button control, FlexReport component, and FlexViewer control to your form from the Toolbox. Set the following properties:
| **Control/Component** | **Name** |
| --- | --- |
| Button | btnEmployees |
| FlexReport | flexReport |
| FlexViewer | flexViewer |
2. **Set up DataSource**
Set up the **DataSource** object to retrieve the data from the C1NWind.mdb database. This is done using the **ConnectionString** and **RecordSource** properties:
```csharp
// initialize DataSource
DataSource ds = flexReport.DataSource;
ds.ConnectionString = @"Provider=Microsoft.ACE.OLEDB.12.0;Data Source=C:\Users\GPCTAdmin\Documents\ComponentOne Samples\Common\C1NWind.mdb";
ds.RecordSource = "Employees";
```
3. Call a utility function **RenderEmployees()** and add the code lines within the function as given below:
```csharp
private void RenderEmployees()
{
flexReport.DataSource.RecordSourceType = RecordSourceType.Auto;
// clear any existing fields
// flexReport.Clear();
// set default font for all controls
flexReport.Font.Name = "Tahoma";
flexReport.Font.Size = 8;
}
```
The code lines depict how to set a default font for the FlexReport component using the **Font** property. Further, the **DataSource** property in **C1FlexReport** class accesses the **RecordSourceType** enumeration to set the data source type. Setting the enumeration to Auto automatically determines the data source type based on the syntax used by the **RecordSource** property.
4. **Add Layout**
Next, initialize the Layout object that defines how the report will be laid out on the page. In this case, render the report in Portrait mode and set its Width to 6.5 inches (8.5 page width minus one inch for margins on either side):
```csharp
//initialize Layout
Layout l = flexReport.Layout;
l.Orientation = OrientationEnum.Portrait;
l.Width = 6.5 * 1440;
```
5. Now comes the interesting part. Every report has five basic sections: **Detail**, **Report Header**, **Report Footer**, **Page Header**, and **Page Footer**. Use the following code to set up the report header by setting a couple of properties and adding a title field to it:
```csharp
// create a report header
Section s = flexReport.Sections[SectionTypeEnum.Header];
s.Height = 1440;
s.Visible = true;
s.BackColor = Color.FromArgb(200, 200, 200);
TextField textFld1 = new TextField();
textFld1.Name = "FldTitle";
textFld1.Text = "Employees Report";
textFld1.Left = 0;
textFld1.Top = 0;
textFld1.Width = 8000;
textFld1.Height = 1440;
textFld1.Font.Size = 24;
textFld1.Font.Bold = true;
textFld1.ForeColor = Color.FromArgb(0, 0, 100);
flexReport.Sections.Header.Fields.Add(textFld1);
```
The section object has a Fields collection. The collection's **Add** method creates a new field and assigns it to the Section. The parameters specify the new field's Name, Text, Left, Top, Width, and Height properties. By default, the field has the same font as the control. Since this is a title, it makes sense to change the font and make it larger. Note that the field should be tall enough to accommodate the font size, or nothing will appear in it.
6. **Add Page Footer**
Next, set up the Page Footer Section. This section is more interesting because it contains expressions in the text fields. To evaluate the expressions in the text field, simply set the expression in the **TextField.Text.Expression** property. The expression in the text field is evaluated when the report is rendered. In C1Report, same is achieved by setting the field's Calculated property to **True**. To create a page footer, add the following code:
```csharp
// create a page footer
s = flexReport.Sections[SectionTypeEnum.PageFooter];
s.Height = 500;
s.Visible = true;
TextField textFld2 = new TextField();
textFld2.Name = "FldFtrLeft";
textFld2.Text.Expression = @"""Employees: Printed on "" & Now";
textFld2.Left = 0;
textFld2.Top = 0;
textFld2.Width = 4000;
textFld2.Height = 300;
textFld2.Font.Size = 8;
textFld2.Font.Bold = false;
flexReport.Sections.PageFooter.Fields.Add(textFld2);
TextField textFld3 = new TextField();
textFld3.Name = "FldFtrRight";
textFld3.Text.Expression = @"""Page "" + Page + "" of "" & Pages";
textFld3.Left = 4000;
textFld3.Top = 0;
textFld3.Width = 4000;
textFld3.Height = 300;
textFld3.Align = FieldAlignEnum.RightTop;
textFld3.Width = flexReport.Layout.Width - textFld3.Left;
flexReport.Sections.PageFooter.Fields.Add(textFld3);
//add a line before page footer
ShapeField shpfld = new ShapeField();
shpfld.Name = "FldLine";
shpfld.ShapeType = ShapeType.Line;
shpfld.Left = 0;
shpfld.Top = 0;
shpfld.Width = flexReport.Layout.Width;
shpfld.Height = 20;
flexReport.Sections.PageFooter.Fields.Add(shpfld);
```
The Page Footer section uses expressions with variables that are not intrinsic to VBScript, but are defined by C1FlexReport.Page and **Pages** are variables that contain the current page number and the total page count. The section also uses a field configured to look like a line.
7. **Add Page Header**
Next, set up the Page Header Section. This section gets rendered at the top of every page and will display the field labels. Using a Page Header section to display field labels is a common technique in tabular reports. The code is simple, but looks a bit messy because of all the field measurements. In a real application, these values would not be hard-wired into the program. To create a page header with field labels, add the following code:
```csharp
//create a page header with field labels
s = flexReport.Sections[SectionTypeEnum.PageHeader];
s.Height = 500;
s.Visible = true;
flexReport.Font.Bold = true;
TextField textFld4 = new TextField();
textFld4.Name = "LblID";
textFld4.Text = "ID";
textFld4.Left = 0;
textFld4.Top = 50;
textFld4.Width = 400;
textFld4.Height = 300;
textFld4.Align = FieldAlignEnum.RightTop;
flexReport.Sections.PageHeader.Fields.Add(textFld4);
TextField textFld5 = new TextField();
textFld5.Name = "LblFirstName";
textFld5.Text = "First";
textFld5.Left = 500;
textFld5.Top = 50;
textFld5.Width = 900;
textFld5.Height = 300;
flexReport.Sections.PageHeader.Fields.Add(textFld5);
TextField textFld6 = new TextField();
textFld6.Name = "LblLastName";
textFld6.Text = "Last";
textFld6.Left = 1500;
textFld6.Top = 50;
textFld6.Width = 900;
textFld6.Height = 300;
flexReport.Sections.PageHeader.Fields.Add(textFld6);
TextField textFld7 = new TextField();
textFld7.Name = "LblTitle";
textFld7.Text = "Title";
textFld7.Left = 2500;
textFld7.Top = 50;
textFld7.Width = 2400;
textFld7.Height = 300;
flexReport.Sections.PageHeader.Fields.Add(textFld7);
TextField textFld8 = new TextField();
textFld8.Name = "LblTitle";
textFld8.Text = "Notes";
textFld8.Left = 5000;
textFld8.Top = 50;
textFld8.Width = 8000;
textFld8.Height = 300;
flexReport.Sections.PageHeader.Fields.Add(textFld8);
flexReport.Font.Bold = false;
ShapeField shpfld2 = new ShapeField();
shpfld2.Name = "FldLine";
shpfld2.ShapeType = ShapeType.Line;
shpfld2.Left = 0;
shpfld2.Top = 400;
shpfld2.Width = flexReport.Layout.Width;
shpfld2.Height = 20;
flexReport.Sections.PageHeader.Fields.Add(shpfld2);
```
This code illustrates a powerful technique for handling fonts. Since every field inherits the control font when it is created, set the control's **Font.Bold** property to **True** before creating the fields, and set it back to **False** afterwards. As a result, all controls in the Page Header section have a bold font.
8. **Add Detail Section**
To finalize the report, add the Detail Section. This is the section that shows the actual data. It contains expressions in the text fields below each label in the Page Header Section. To create the Detail section, add the following code:
```csharp
// create the Detail section
s = flexReport.Sections[SectionTypeEnum.Detail];
s.Height = 330;
s.Visible = true;
TextField textField = new TextField();
textField.Name = "FldID";
textField.Text.Expression = "EmployeeID";
textField.Left = 0;
textField.Top = 0;
textField.Width = 400;
textField.Height = 300;
flexReport.Sections.Detail.Fields.Add(textField);
TextField textField1 = new TextField();
textField1.Name = "FldFirstName";
textField1.Text.Expression = "FirstName";
textField1.Left = 500;
textField1.Top = 0;
textField1.Width = 900;
textField1.Height = 300;
flexReport.Sections.Detail.Fields.Add(textField1);
TextField textField2 = new TextField();
textField2.Name = "FldLastName";
textField2.Text.Expression = "LastName";
textField2.Left = 1500;
textField2.Top = 0;
textField2.Width = 900;
textField2.Height = 300;
flexReport.Sections.Detail.Fields.Add(textField2);
TextField textField3 = new TextField();
textField3.Name = "FldTitle";
textField3.Text.Expression = "Title";
textField3.Left = 2500;
textField3.Top = 0;
textField3.Width = 2400;
textField3.Height = 300;
flexReport.Sections.Detail.Fields.Add(textField3);
TextField textField4 = new TextField();
textField4.Name = "FldNotes";
textField4.Text.Expression = "Notes";
textField4.Left = 5000;
textField4.Top = 0;
textField4.Width = 8000;
textField4.Height = 300;
flexReport.Sections.Detail.Fields.Add(textField4);
textField4.Width = flexReport.Layout.Width - textField4.Left;
textField4.AutoHeight = AutoSizeBehavior.CanGrow;
textField4.Font.Size = 6;
textField4.Align = FieldAlignEnum.JustTop;
//add a line after each field in detail section
ShapeField shpfld3 = new ShapeField();
shpfld3.Name = "FldLine";
shpfld3.ShapeType = ShapeType.Line;
shpfld3.Left = 0;
shpfld3.Top = 310;
shpfld3.Width = flexReport.Layout.Width;
shpfld3.Height = 20;
flexReport.Sections.Detail.Fields.Add(shpfld3);
```
Note that all text fields contain expressions and each text field corresponds to the names of fields in the source record source. Setting the expressions in the **TextField.Text.Expression** property ensures that the Text property is interpreted as a database field name, as opposed to being rendered literally. It is important to adopt a naming convention for report fields that makes them unique, different from recordset field names. If you had two fields named "LastName", an expression such as "Left(LastName,1)" would be ambiguous. This example has adopted the convention of beginning all report field names with "Fld".
Note that the "FldNotes" field has its AutoHeight property set to **CanGrow**, and a smaller font than the others. This was done to make sure that the "Notes" field in the database, which contains a lot of text, will appear in the report. Rather than make the field very tall and waste space, setting the **AutoHeight** property to CanGrow tells the control to expand the field as needed to fit its contents; it also sets the containing section's **AutoHeight** property to True, so the field doesn't spill off the Section.
9. The report definition is done. To render the report into the **FlexViewer** control, double-click the **Employees** button to add an event handler for the **btnEmployees\_Click** event. The Code Editor will open with the insertion point placed within the event handler. Enter the following code:
```csharp
private void btnEmployees_Click(object sender, EventArgs e)
{
RenderEmployees();
flexViewer.DocumentSource = flexReport;
}
```
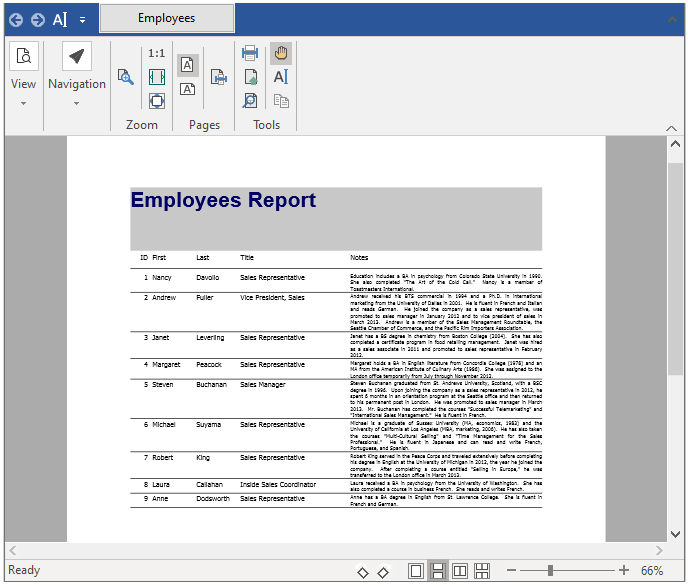
Here's what the basic report looks like:
## Modify the report
With the **FlexReportDesigner** in preview mode, you cannot make any adjustments to the report. Click the **Design** button to switch to Design mode and begin making modifications. The right pane of the main window switches from Preview mode to Design mode, and it shows the controls and fields that make up the report.
For this example, we will resize the Group Header section and fields as well as format a field value. To do this, complete the following steps:
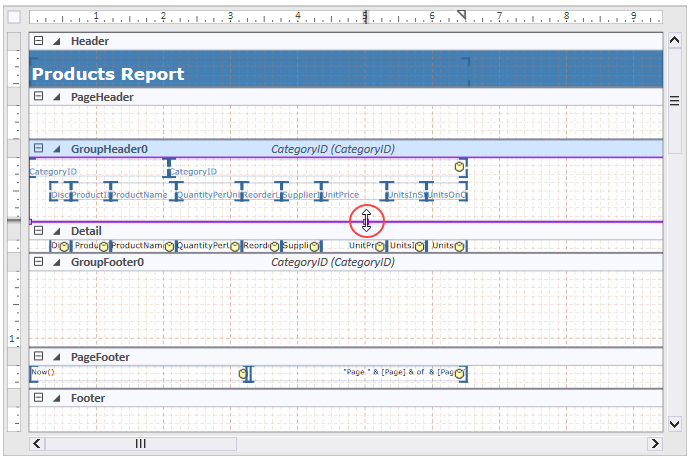
1. To resize the Group Header section, select its border and with your mouse pointer drag to the position where you want it.
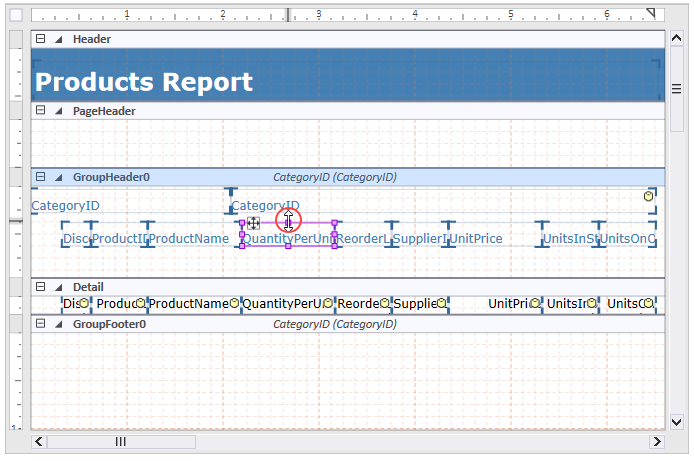
2. With your mouse pointer, drag the handles in the field corners to resize fields.
> type=info
> **Tip**: If the text is not fitting in the field, set the **Appearance.WordWrap** property for the field to True in the Properties window.
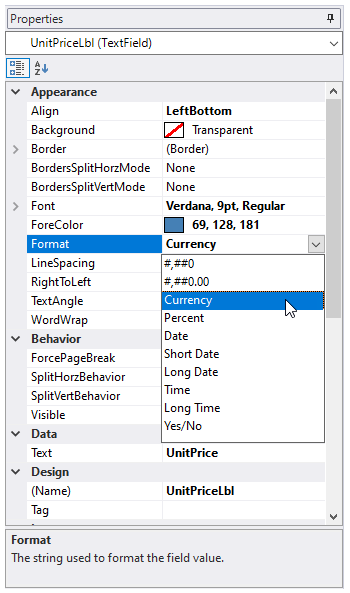
3. In the Properties window, select the **UnitPriceLbl** field in Detail section under the _Unit Price_ column.
4. Set the **Appearance.Format** property for the field to **Currency**.
5. Click the **Preview** button to switch to Preview mode and see your modifications.
6. Click **Design** button to switch from Preview mode to Design mode.
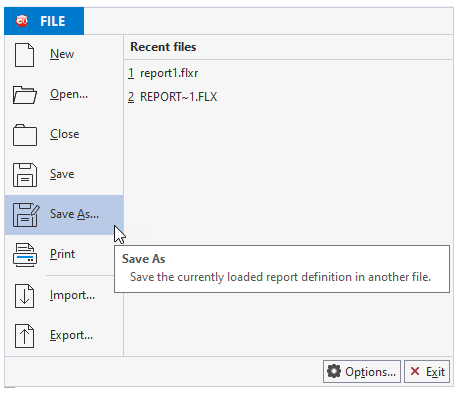
7. Click the **File** menu and select **Save As** from the menu that appears.
8. In the **Save Report Definition File** dialog box, enter **ProductsReport.flxr** in the **File name** box. Save the file to a location that you will remember for later use.
9. Close the **Designer** and return to your Visual Studio project.
You have successfully created a report definition file; in the next step you will load the report in the **C1FlexReport** component.
## Load and render the report
To load a report definition from a file at design time, complete one of the following tasks:
* Right-click the C1FlexReport component and select the **Load Report** menu option.
OR
* Click the smart tag () above the **C1FlexReport** component and select **Load Report** from the **C1FlexReport Tasks** menu.
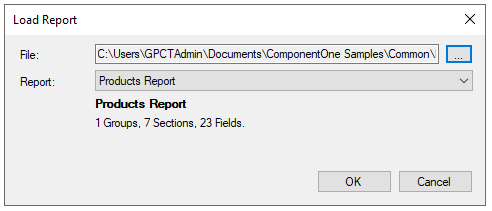
Using the **Load Report** dialog box, select the report you want and complete the following tasks:
1. Click the **ellipsis** button. The **Open** dialog box appears.
2. Browse to the location that you just saved your **Products Report.flxr** file, select it, and click **Open**.
3. The available report definitions are listed in the **Report** drop-down box. Select the **Products Report** definition to load.
4. Click **Load** and **OK** to close the dialog box.
You can also load a report definition from a file via code. For this purpose, double-click the form and enter the following code in the Form1\_Load event handler:
```csharp
private void Form1_Load(object sender, EventArgs e)
{ // Creates a resource manager.
ComponentResourceManager resources = new ComponentResourceManager(typeof(Form1));
// Get the resource string that stores the report definition.
c1FlexReport1.ReportDefinition = resources.GetString("c1FlexReport1.ReportDefinition");
// Sets the report name.
c1FlexReport1.ReportName = "Products Report";
}
```
In the next step you will render the report into a preview control.
Once the report definition has been created, the data source defined and loaded into the FlexReport component, you can render the report to the printer to the preview control 'FlexViewer', or export to different file formats.
To preview the report in the FlexViewer control, the steps are as follows:
1. From the **Toolbox**, double-click the **FlexViewer** control to add it to your project.
2. From the Properties window, set the **FlexViewer.Dock** property to Fill.
3. Select the Windows Form with your mouse and drag the corners to resize it.
4. Double-click the form and enter the following code in the Form1\_Load event handler:
```csharp
private void Form1_Load(object sender, EventArgs e)
{
//load report definition
c1FlexReport1.Load(@"..\..\Products Report.flxr", "Products Report");
//preview the report
c1FlexViewer1.DocumentSource = c1FlexReport1;
}
```
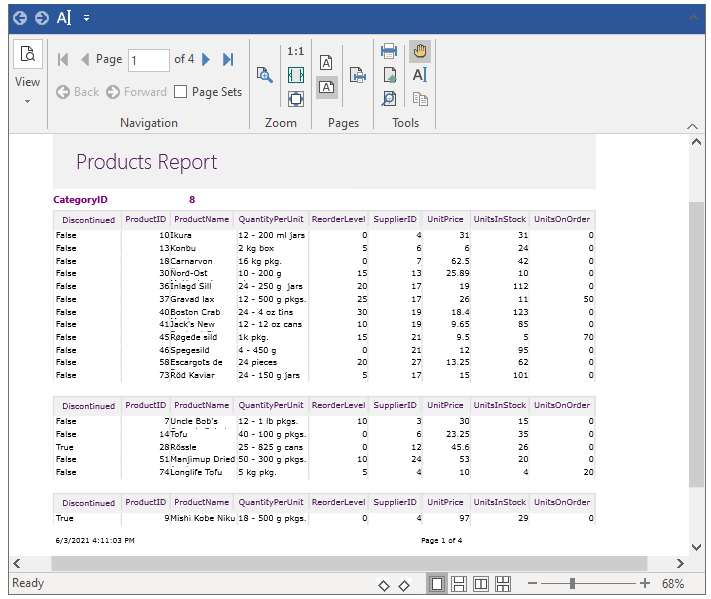
5. Press F5 to run the code. Observe the output. It looks as shown below:
> type=note
> **Note**: WinForms .NET 6 Edition does not include rich design-time support yet. We will enhance it in the future releases.