# Custom Paper Size
Learn how to specify a custom paper size for a report. See more demos, documentation, and samples here.
## Content
This topic uses "Custom Paper Size" report to demonstrate how you can specify custom size of paper for a report.
[C1FlexReport](/componentone/docs/win/online-flexreport/) allows you to specify the paper size using [PaperSize](/componentone/docs/win/online-flexreport/) property and orientation using the [Orientation](/componentone/docs/win/online-flexreport/) property. When you specify these properties, C1FlexReport checks if the selected paper size is available on the current printer before rendering, and changes to the default paper size if the selected setting is not available.
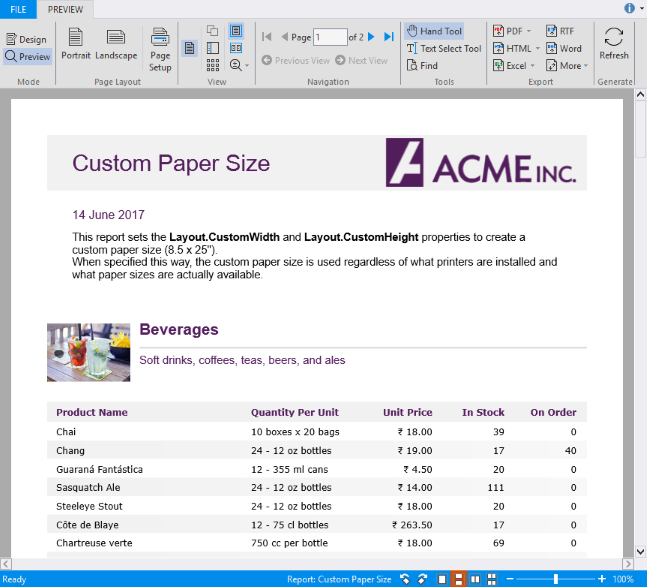
If you want to specify a certain paper size and use it regardless of the printers available, set the [PaperSize](/componentone/docs/win/online-flexreport/) property to **Custom**, and set the [Layout.CustomWidth](/componentone/docs/win/online-flexreport/) and [Layout.CustomHeight](/componentone/docs/win/online-flexreport/) properties to the page dimensions (in twips). In this report, the **CustomWidth** is set to 12240 and **CustomHeight** to 36000 to create a custom paper size (8.5 x 25 inches). Perform the following steps to see how this can be done.
### To create a report with custom paper size
* [Step 1: Create a report](/componentone/docs/win/online-flexreport/customize-reports/SpecifyingCustomPaperSize#step-1-create-a-report)
* [Step 2: Connect the report to a data source](/componentone/docs/win/online-flexreport/customize-reports/SpecifyingCustomPaperSize#step-2-connect-the-report-to-a-data-source)
* [Step 3: Specify custom paper size](/componentone/docs/win/online-flexreport/customize-reports/SpecifyingCustomPaperSize#step-3-specify-custom-paper-size)
* [Step 4: View the report](/componentone/docs/win/online-flexreport/customize-reports/SpecifyingCustomPaperSize#step-4-view-the-report)
#### Step 1: Create a report
1. Open the **C1FlexReportDesigner** and go to **FILE|New**.
2. Click **New Report** drop down from the **Reports** tab and select **Empty Report** to create a report.
#### Step 2: Connect the report to a data source
1. Switch to the **Data** tab, right-click the **Main** data source and choose **Edit** to open and the **Data Sources Wizard** and start editing.
2. Select **OLEDB Data Provider** from the **Data provider** drop-down and click the ellipsis button next to the **Connection string** textbox to select the **C1NWind.mdb** file.
3. Specify the following Sql statement in the **Sql statement** tab:
```
SELECT Categories.*, Products.*
FROM Categories INNER JOIN Products
ON Categories.CategoryID = Products.CategoryID
```
#### Step 3: Specify custom paper size
1. Click **Groups** in **Home** tab and add a group named **CategoryName**.
2. In the **Groups** wizard, set the following properties for the **CategoryName** group:
| **Property** | **Value** |
| --- | --- |
| **GroupBy** | CategoryName |
| **Keep Together** | KeepWholeGroup |
| **Sort** | Ascending |
| **ShowGroupFooter** | True |
| **ShowGroupHeader** | True |
| **OutlineLabel** | =CategoryName |
3. Click **OK** to close the **Groups** wizard.
4. Right-click **CategoryName\_Header** group and select **Add SubSection** from the context menu.
5. Add two SubSections to the group header.
6. In **CategoryName\_Header/\** subsection, add one ImageField and two TextFields and set the following properties:
| **Property** | **Value** |
| --- | --- |
| **Image.Picture** | Picture |
| **Image.PictureAlign** | Scale |
| **Image.PictureScale** | Scale |
| **TextField1.Text** | =CategoryName |
| **TextField2.Text** | =Description |
7. In **CategoryName\_Header/\** subsection, add five TextFields, Product Name, Quantity Per Unit, Unit Price, In Stock, On Order.
8. In the **Details** section, add five TextFields corresponding to the TextFields in **CategoryName\_Header/\**, and set the following properties:
| **Property** | **Value** |
| --- | --- |
| **TextField8.Text** | =ProductName |
| **TextField9.Text** | =QuantityPerUnit |
| **TextField10.Text** | =UnitPrice |
| **TextField11.Text** | =UnitsInStock |
| **TextField12.Text** | =UnitsOnOrder |
9. Select the report from the drop-down list above the **Properties** window.
10. Go to **Layout** and expand the property node to view all available properties.
11. Set the following properties to set the custom paper size to 8.5 x 25inches.
| **Property** | **Value** |
| --- | --- |
| **CustomHeight** | 36000 |
| **CustomWidth** | 12240 |
| **Width** | 10800 |
| **MarginBottom** | 720 |
| **MarginLeft** | 720 |
| **MarginRight** | 720 |
| **MarginTop** | 720 |
When specified this way, the custom paper size is used regardless of what printers are installed and what paper sizes are actually available.
#### Step 4: View the report
Preview the report with according to the set custom paper size.
> type=note
> **Note**: For the complete report, see report 'Custom Paper Size' in the **FlexCommonTasks.flxr** report definition file, which is available in the **ComponentOne Samples\\Winforms\\C1FlexReport\\CS\\FlexCommonTasks** folder. The data base used is **C1NWind.mdb** which is also available in the **ComponentOne Samples** folder.