# Dynamic Page Header
Generating dynamic page header in FlexReport allows you to add different page headers on different pages of a report, depending on a condition. See more demos, documentation, and samples here.
## Content
This topic uses "Dynamic Page Header" report to demonstrate how to generate page header dynamically.
Generating dynamic page header allows you to add different page headers on different pages of a report, depending on a condition. This can be done in FlexReport using **OnFormat** property of page header.
For example, if you want to display different page headers on even and odd pages of a report. This can be done with script that shows or hides sections depending on the page being rendered. In this report, the page header contains two sub-sections, one is used on odd pages and the other on even and their visibility is toggled using a script in the **OnFormat** property of **PageHeader**. Therefore, the page header section changes according to the current page number. The report also suppresses the page header on the first page by setting the [Layout.PageHeader](/componentone/docs/win/online-flexreport/) property to **NotWithReportHdr**. Perform the following steps to see how this can be done.
### To create a report with dynamic page header
* [Step 1: Create a report](/componentone/docs/win/online-flexreport/customize-reports/AddingDynamicPageHeader#step-1-create-a-report)
* [Step 2: Connect the report to a data source](/componentone/docs/win/online-flexreport/customize-reports/AddingDynamicPageHeader#step-2-connect-the-report-to-a-data-source)
* [Step 3: Change page header dynamically](/componentone/docs/win/online-flexreport/customize-reports/AddingDynamicPageHeader#step-3-change-page-header-dynamically)
* [Step 4: View the report](/componentone/docs/win/online-flexreport/customize-reports/AddingDynamicPageHeader#step-4-view-the-report)
#### Step 1: Create a report
1. Open the **C1FlexReportDesigner** and go to **FILE|New**.
2. Click **New Report** drop down from the **Reports** tab and select **Empty Report** to create a report.
#### Step 2: Connect the report to a data source
1. Switch to the **Data** tab, right-click the **Main** data source and choose **Edit** to open and the **Data Sources Wizard** and start editing.
2. Select **OLEDB Data Provider** from the **Data provider** drop-down and click the ellipsis button next to the **Connection string** textbox to select the **C1NWind.mdb** file.
3. Specify the following Sql statement in the **Sql statement** tab:
```
SELECT Categories.*, Products.*
FROM Categories INNER JOIN Products
ON Categories.CategoryID = Products.CategoryID
```
#### Step 3: Change page header dynamically
1. Right-click the **PageHeader** section and select **Add SubSection** so that you have **PageHeader/\** and **PageHeader/\**, one for odd pages and the other for even pages.
2. In the subsections, add two text fields each and set their Text properties as shown in the tables below. The values set in the text property are the expressions for displaying the headers on odd and even pages.
| **PageHeader/\ properties** | **Values** |
| --- | --- |
| **TextField1.Text** | ="Page " & [Page\] & " (ODD)" |
| **TextField2.Text** | =Now() |
| **PageHeader/\ properties** | **Values** |
| --- | --- |
| **TextField3.Text** | =Now() |
| **TextField4.Text** | ="Page " & [Page\] & " (EVEN)" |
3. Go to the **OnFormat** property of **PageHeader** and click the ellipsis next to it. The **VBScript Editor** appears.
4. Enter the following VBScript expression in the editor:
```
odd = (page mod 2 <> 0)
PageHeader.SubSections(0).Visible = odd
PageHeader.SubSections(1).Visible = not odd
```
5. Click **Groups** in **Home** tab and add a group named **CategoryName**.
6. In the **Groups** wizard, set the following properties for the **CategoryName** group:
| **Property** | **Value** |
| --- | --- |
| **GroupBy** | CategoryName |
| **Keep Together** | KeepFirstDetail |
| **Sort** | Ascending |
| **ShowGroupFooter** | False |
| **ShowGroupHeader** | True |
| **OutlineLabel** | =CategoryName |
7. Click **OK** to close the **Groups** wizard.
8. Right-click **CategoryName\_Header** group and select **Add SubSection** from the context menu.
9. Add two SubSections to the group header.
10. In **CategoryName\_Header/\** subsection, add a TextField and set its **Text** property to **=CategoryName**.
11. In **CategoryName\_Header/\** subsection, add four TextFields and set the following properties.
| **Property** | **Value** |
| --- | --- |
| **TextField6.Text** | Product Name |
| **TextField7.Text** | Quantity Per Unit |
| **TextField8.Text** | Unit Price |
| **TextField9.Text** | In Stock |
12. In the **Details** section, add five TextFields corresponding to the TextFields in **CategoryName\_Header/\**, and set the following properties:
| **Property** | **Value** |
| --- | --- |
| **TextField10.Text** | =left(ProductName, 30) |
| **TextField11.Text** | =QuantityPerUnit |
| **TextField12.Text** | =UnitPrice |
| **TextField13.Text** | =UnitsInStock |
13. Select the report from the drop-down list on the top of the **Properties** window.
14. Set the **Layout.PageHeader** property of the report to **NotWithReportHdr** to suppress the page header on first page of a report.
#### Step 4: View the report
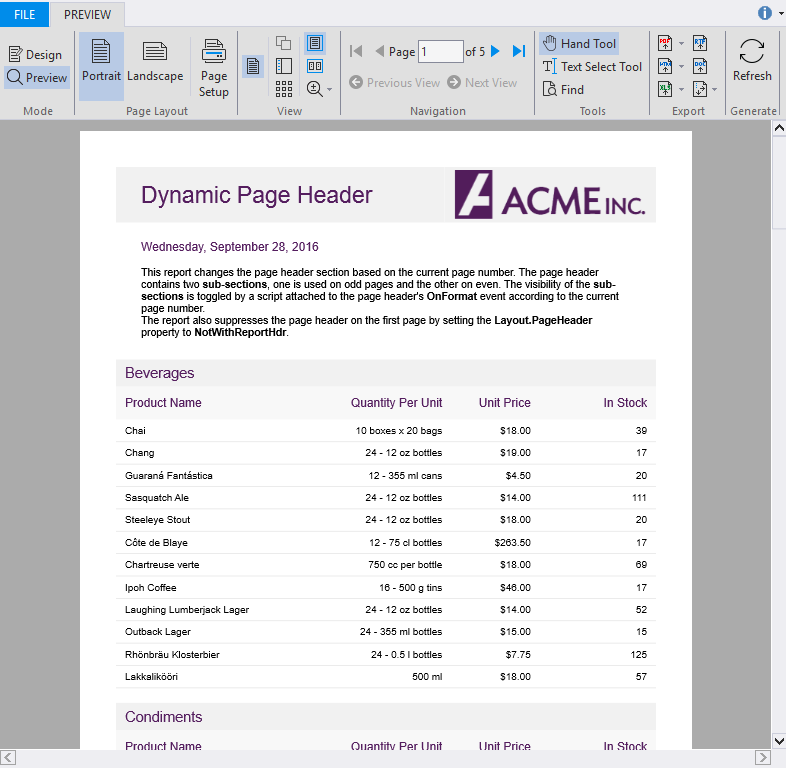
Preview the report with dynamic page header.
> type=note
> **Note**: For the complete report, see report 'Dynamic Page Header' in the **FlexCommonTasks.flxr** report definition file, which is available in the **ComponentOne Samples\\Winforms\\C1FlexReport\\CS\\FlexCommonTasks** folder. The data base used is **C1NWind.mdb** which is also available in the **ComponentOne Samples** folder.