# Quick Start
Get started with the FlexGrid for WinForms, the fastest and most flexible .NET data grid control. Learn simple steps to create your first FlexGrid application.
## Content
This quick start will guide you through the steps of creating a simple grid application using the FlexGrid control. Follow the steps below to get started:
### .NET framework
This section demonstrates how to create a FlexGrid application in .NET Framework by binding it to an external datasource. You can also create a class to supply data to the grid as shown in the .NET 6 tab. Similarly, you can use below steps to bind FlexGrid to a datasource in .NET 6. However, note that some design-time steps may vary in case of .NET 6.
## Set Up the Application
1. Create a new Windows Forms app(.NET Framework).
2. Configure your project and set the Framework property.
3. Drag and drop the FlexGrid control from the Visual Studio toolbox onto the form.
Observe: An empty grid is added to the form at design time.
## Bind FlexGrid to a Data Source
There are two ways to bind data with the FlexGrid control, either choose to bind at design time or through code at run time.
### Binding at Design Time
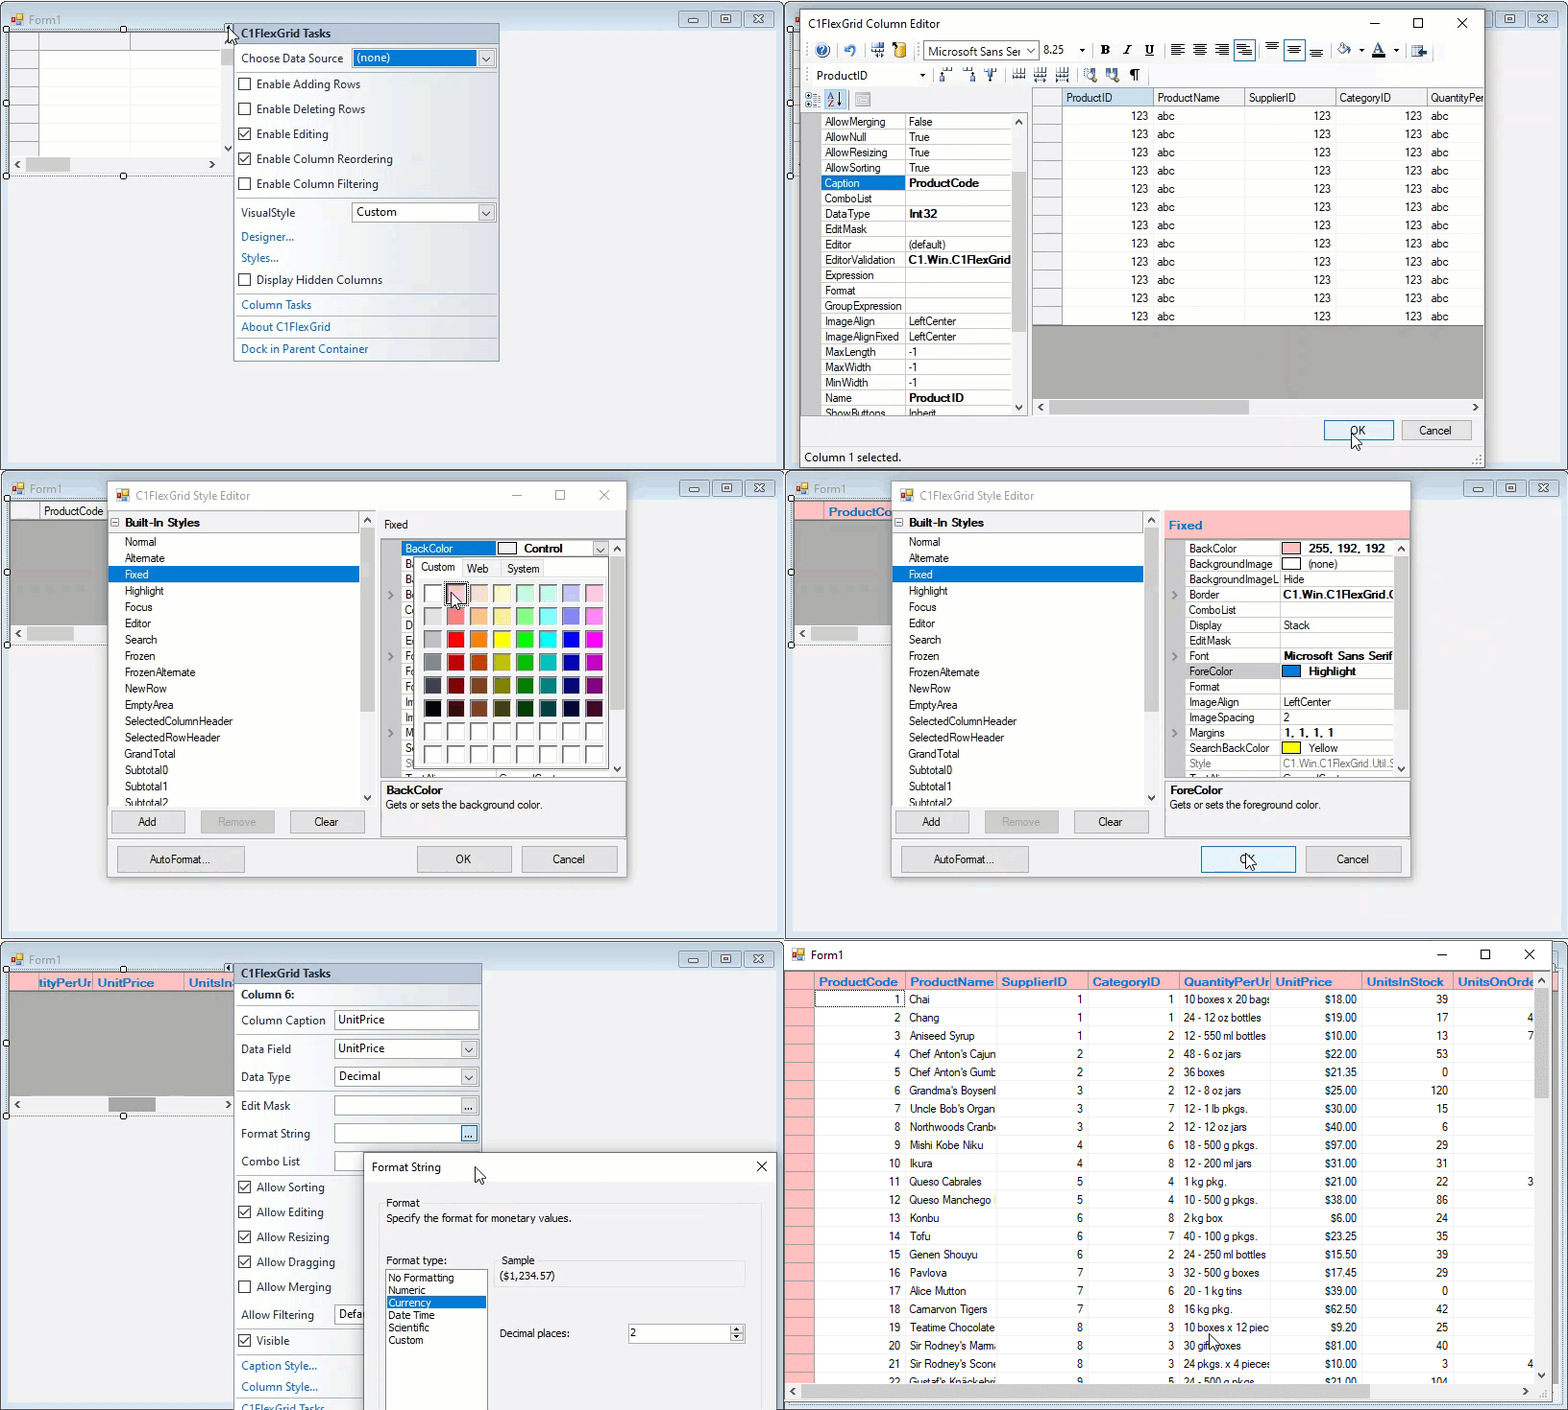
1. In the design view, select the FlexGrid control and click smart tag to open the **C1FlexGrid Tasks** menu.
2. Click the **Choose Data Source** drop down button and select **Add Project Data Source...** option to open the **Data Source Configuration Wizard**.
3. On **Choose a Data Source Type** page, select **Database** and click **Next**.
4. On **Choose a Database Model** page, select **Dataset** and click **Next**.
5. On **Choose Your Data Connection** page, click **New Connection** to open the **Add Connection** dialog.
6. Against the **DataSource** field, click **Change...** button to open the **Change Data Source** dialog.
7. Select **Microsoft Access Database File** and click **OK** to return to the Add Connection dialog.
8. Against the **Database file name** field, click **Browse** and navigate to the database file. Provide the **User name** and **Password**, if required to connect to the database file. This example uses **C1NWind.mdb** file located at the following location by default:
**\\Documents\\ComponentOne Samples\\Common**
9. Click **Test Connection** to make sure that you have successfully connected to the database or server and click **OK**.
10. Click **OK** again to close the Add Connection dialog box.
11. Click **Next** to continue. A dialog box will appear asking if you would like to add the data file to your project and modify the connection string. Choose the appropriate option as per your requirement.
12. Save the connection string in the application configuration file by checking the **Yes, save the connection as** box and entering a name.
13. Click **Next** to switch to the **Choose Your Database Objects** page.
14. Choose a table, say **Products** from the **Tables** node and click **Finish**.
15. The above steps add a dataset and connection string to your project. Also, Visual Studio automatically creates the following code to fill the dataset:
```csharp
// TODO: This line of code loads data into the 'c1NWindDataSet.Products' table. You can move, or remove it, as needed.
this.productsTableAdapter.Fill(this.c1NWindDataSet.Products);
```
```vbnet
' TODO: This line of code loads data into the 'c1NWindDataSet.Products' table. You can move, or remove it, as needed.
Me.ProductsTableAdapter.Fill(Me.c1NWindDataSet.Products)
```
### Binding at Run Time
To bind the grid through code, first, we need to create a database connection string. Then, use an object of data adapter (in this case, OleDbDataAdapter) to create a query to fetch products from the data table and fill it in the data table which is assigned to the DataSource property of C1FlexGrid class.
```csharp
// bind grid to a data source
string conn = GetConnectionString();
OleDbDataAdapter da = new OleDbDataAdapter("select * from products", conn);
DataTable dt = new DataTable("Products");
da.Fill(dt);
c1FlexGrid1.DataSource = dt;
```
```vbnet
' bind grid to a data source
Dim conn As String = GetConnectionString()
Dim da As OleDbDataAdapter = New OleDbDataAdapter("select * from products", conn)
Dim dt As DataTable = New DataTable("Products")
da.Fill(dt)
c1FlexGrid1.DataSource = dt
```
Note that the above sample code uses a custom method named **GetConnectionString** to create a connection string with database.
```csharp
static string GetConnectionString()
{
string path = Environment.GetFolderPath(Environment.SpecialFolder.Personal) + @"\ComponentOne Samples\Common";
string conn = @"provider=microsoft.jet.oledb.4.0;data source={0}\c1nwind.mdb;";
return string.Format(conn, path);
}
```
```vbnet
Private Shared Function GetConnectionString() As String
Dim path = Environment.GetFolderPath(Environment.SpecialFolder.Personal) & "\ComponentOne Samples\Common"
Dim conn = "provider=microsoft.jet.oledb.4.0;data source={0}\c1nwind.mdb;"
Return String.Format(conn, path)
End Function
```
## Configure the FlexGrid control
This section walks you through the design-time and run-time steps to configure the grid with some basic settings. These settings and features are explained in detail in the topics below.
### Configuring Grid at Design Time
* Click smart tag to open the **C1FlexGrid Tasks Menu**.
* Click the **Styles** option to open **C1FlexGrid Styles Editor**.
* Select **Fixed** from **Built-in Styles** pane, customize some settings such as **Backcolor**, **Font**, and **ForeColor** and click **OK**.
* To fit the grid to the form, click the **Dock in Parent Container** option.
* For customizing a column, click the column (say, **Unit Price** column) to open **C1FlexGrid Column Tasks Menu**.
* Click the ellipsis alongside **Format** field to open the **Format String** dialog.
* Select **Currency** as **Format Type** and click **OK**.
### Configuring Grid at Run Time
Add following code to configure the grid and its columns at run time.
```csharp
c1FlexGrid1.Styles.Fixed.ForeColor = Color.Blue;
c1FlexGrid1.Styles.Fixed.Font = new Font("Microsoft Sans serif", 9, FontStyle.Bold);
c1FlexGrid1.Dock = DockStyle.Fill;
c1FlexGrid1.Cols[6].Format = "c";
```
```vbnet
c1FlexGrid1.Styles.Fixed.ForeColor = Color.Blue
c1FlexGrid1.Styles.Fixed.Font = New Font("Microsoft Sans serif", 9, FontStyle.Bold)
c1FlexGrid1.Dock = DockStyle.Fill
c1FlexGrid1.Cols(6).Format = "c"
```
### .NET
This section demonstrates how to create a FlexGrid application in .NET 6 by populating its data from a custom class. You can also use an external data source to supply data to the grid as shown in .NET Framework tab. However, note that some design-time steps given in the aforementioned tab may vary in case of .NET 6. Similarly, you can use below steps to bind FlexGrid to an internal datasource in .NET Framework.
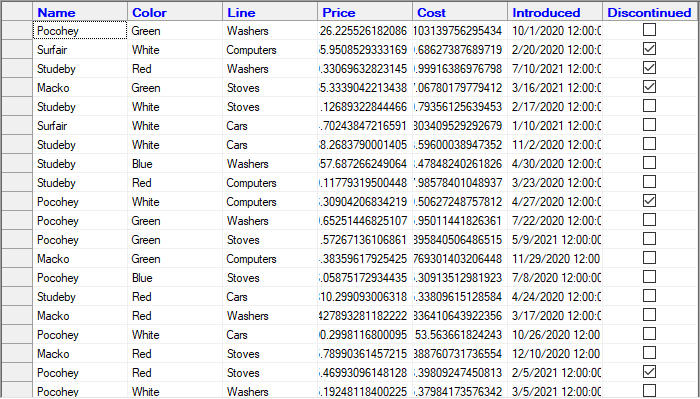
## Set Up the Application
1. Create a new **Windows Forms app** an set the project framework to .NET 6.0 using project properties window.
2. Install **C1.Win.FlexGrid** package using **NuGet Package Manager**. The C1FlexGrid control will be added to the Toolbox once the package gets installed.
3. Drag drop the FlexGrid control from toolbox to Windows Form App or Initialize the FlexGrid control and add it to the form using following code.
```csharp
// Initialize the control
C1FlexGrid flexGrid = new C1FlexGrid();
// Add the control to form
this.Controls.Add(flexGrid);
```
```vbnet
' Initialize the control
Dim flexGrid As C1FlexGrid = New C1FlexGrid()
' Add the control to form
Me.Controls.Add(flexGrid)
```
>type=note
> Note: WinForms Edition supports WinForms designer in Visual Studio 2019 version 16.11.0 and higher.
## Bind FlexGrid to a Data Source
1. Create a custom class "Product" to be used as a data source.
```csharp
// Create a custom class Product
public class Product
{
static Random _rnd = new Random();
static string[] _names = "Macko|Surfair|Pocohey|Studeby".Split('|');
static string[] _lines = "Computers|Washers|Stoves|Cars".Split('|');
static string[] _colors = "Red|Green|Blue|White".Split('|');
public Product()
{
Name = _names[_rnd.Next() % _names.Length];
Line = _lines[_rnd.Next() % _lines.Length];
Color = _colors[_rnd.Next() % _colors.Length];
Price = 30 + _rnd.NextDouble() * 1000;
Cost = 3 + _rnd.NextDouble() * 300;
Discontinued = _rnd.NextDouble() < .2;
Introduced = DateTime.Today.AddDays(_rnd.Next(-600, 0));
}
public string Name { get; set; }
public string Color { get; set; }
public string Line { get; set; }
public double Price { get; set; }
public double Cost { get; set; }
public DateTime Introduced { get; set; }
public bool Discontinued { get; set; }
}
```
```vbnet
' Create a custom class Product
Public Class Product
Private Shared _rnd As Random = New Random()
Private Shared _names As String() = "Macko|Surfair|Pocohey|Studeby".Split("|"c)
Private Shared _lines As String() = "Computers|Washers|Stoves|Cars".Split("|"c)
Private Shared _colors As String() = "Red|Green|Blue|White".Split("|"c)
Public Sub New()
Name = _names(_rnd.[Next](/componentone/docs/win/online-flexgrid/quick-start) Mod _names.Length)
Line = _lines(_rnd.[Next](/componentone/docs/win/online-flexgrid/quick-start) Mod _lines.Length)
Color = _colors(_rnd.[Next](/componentone/docs/win/online-flexgrid/quick-start) Mod _colors.Length)
Price = 30 + _rnd.NextDouble() * 1000
Cost = 3 + _rnd.NextDouble() * 300
Discontinued = _rnd.NextDouble() < .2
Introduced = Date.Today.AddDays(_rnd.[Next](-600, 0))
End Sub
Public Property Name As String
Public Property Color As String
Public Property Line As String
Public Property Price As Double
Public Property Cost As Double
Public Property Introduced As Date
Public Property Discontinued As Boolean
End Class
```
2. Initialize a list of type Product.
```csharp
// Initialises a List of type Product, where Product is a class type
List _products = new List();
```
```vbnet
' Initialises a List of type Product, where Product is a class type
Dim _products As List(Of Product) = New List(Of Product)()
```
3. Initialize a `For` loop and add products to the list.
```csharp
// Initialize for loop and add products to the list
for (int i = 0; i <100; i++)
{
_products.Add(new Product());
}
```
```vbnet
' Initialize for loop and add products to the list
For i As Integer = 0 To 100 - 1
_products.Add(New Product())
Next
```
4. Bind FlexGrid to the created data source.
```csharp
// Bind FlexGrid with data
flexGrid.DataSource = _products;
```
```vbnet
' Bind FlexGrid with data
flexGrid.DataSource = _products
```
## Configure the FlexGrid control
Add following code to configure the grid and its columns at run time.
```csharp
c1FlexGrid1.Styles.Fixed.ForeColor = Color.Blue;
c1FlexGrid1.Styles.Fixed.Font = new Font("Microsoft Sans serif", 9, FontStyle.Bold);
c1FlexGrid1.Dock = DockStyle.Fill;
c1FlexGrid1.Cols[6].Format = "c";
```
```vbnet
c1FlexGrid1.Styles.Fixed.ForeColor = Color.Blue
c1FlexGrid1.Styles.Fixed.Font = New Font("Microsoft Sans serif", 9, FontStyle.Bold)
c1FlexGrid1.Dock = DockStyle.Fill
c1FlexGrid1.Cols(6).Format = "c"
```
## See Also
**Documentation**
[Data](/componentone/docs/win/online-flexgrid/concepts/data)