# Cell Button
FlexGrid provides built-in cell button editor usually required to perform an operation on button click. Learn more about implementing cell button in FlexGrid.
## Content
Cell button editor refers to a cell with an ellipsis button. This editor comes to use when you need to get an operation done or open a dialog on a button click. Such dialogs generally contain multiple different options or settings for a user to choose from.
| Default Cell Button | Cell Button with Text | Cell Button with Custom Image |
| ------------------- | --------------------- | ----------------------------- |
|  |  |  |
## Display Cell Button
In FlexGrid, you can display a cell button by setting the ComboList property to an ellipsis character "**...**". You can also use a pipe character before ellipsis button to display an ellipsis with text box to let user enter his input. The **CellButtonClick** event is fired when user clicks the cell button. You can capture this event to implement the desired operation or display a dialog of your choice.
By default, the cell button gets displayed when cell enters the edit mode. However, you can set the ShowButtons property to **Always** to display the cell button even in non-edit mode.
Use the code below to display cell button in a WinForms FlexGrid column.
```csharp
// Sets ComboList property of the Mark column to make it show cell button
c1flexGrid1.Cols["Mark"].ComboList = "...";
// Enables showing the cell button always
c1flexGrid1.Cols["Mark"].ShowButtons = ShowButtonsEnum.Always;
// Handle when the end user clicks Cell Button
c1flexGrid1.CellButtonClick += C1flexGrid1_CellButtonClick;
```
```vbnet
' Sets ComboList property of the Mark column to make it show cell button
c1flexGrid1.Cols("Mark").ComboList = "..."
' Enables showing the cell button always
c1flexGrid1.Cols("Mark").ShowButtons = ShowButtonsEnum.Always
' Handle when the end user clicks Cell Button
c1flexGrid1.CellButtonClick += C1flexGrid1_CellButtonClick
```
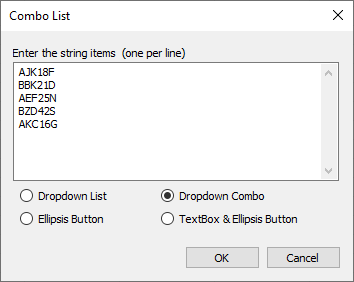
The ComboList property can also be set using the **Combo List** dialog at design time. To access the Combo List dialog:
1. Open the **Column Tasks** menu for column for which editor is to be set.
2. Go to the **Combo List** option and click the ellipsis button on the right hand side of the field.
3. Combo List dialog opens where you can specify the option values, each in a new line.
4. You can also choose whether you want to display these values as an **Ellipsis Button** or **Textbox & Ellipsis Button**. Note that it also gives you options to create **Dropdown List** and **Dropdown Combo**.
The example below demonstrates change in back color and fore color of the current row on click of the cell button. Similarly, you can perform the desired operation in the **CellButtonClick** event.

```csharp
private void C1flexGrid1_CellButtonClick(object sender, RowColEventArgs e)
{
// Perform any operation like the following code marks the current row by changing its color
if (c1flexGrid1.Rows[e.Row].StyleDisplay.BackColor == Color.FromName("Window"))
{
c1flexGrid1.Rows[e.Row].StyleNew.BackColor = Color.Green;
c1flexGrid1.Rows[e.Row].StyleNew.ForeColor = Color.White;
} else
{
c1flexGrid1.Rows[e.Row].StyleNew.BackColor = Color.FromName("Window");
c1flexGrid1.Rows[e.Row].StyleNew.ForeColor = Color.FromName("WindowText");
}
}
```
```vbnet
Private Sub C1flexGrid1_CellButtonClick(ByVal sender As Object, ByVal e As RowColEventArgs)
' Perform any operation like the following code marks the current row by changing its color
If c1flexGrid1.Rows(e.Row).StyleDisplay.BackColor Is Color.FromName("Window") Then
c1flexGrid1.Rows(e.Row).StyleNew.BackColor = Color.Green
c1flexGrid1.Rows(e.Row).StyleNew.ForeColor = Color.White
Else
c1flexGrid1.Rows(e.Row).StyleNew.BackColor = Color.FromName("Window")
c1flexGrid1.Rows(e.Row).StyleNew.ForeColor = Color.FromName("WindowText")
End If
End Sub
```
## Change Image of Cell Button
By default, cell button displays an ellipsis. However, you can change the image of cell button using the CellButtonImage property.
Set the image of cell button in the WinForms FlexGrid as shown in the code below.
```csharp
// Sets CellButtonImage property to define the Image of the cell button
Image imgCellBtn = new Bitmap("../../Resources/Images/button.png");
c1flexGrid1.CellButtonImage = imgCellBtn;
```
```vbnet
' Sets CellButtonImage property to define the Image of the cell button
Dim imgCellBtn As Image = New Bitmap("../../Resources/Images/button.png")
c1flexGrid1.CellButtonImage = imgCellBtn
```