# Quick Start
Learn how to easily add and work with the Expression Editor control in your Windows Form application. See more demos, documentation, and samples here.
## Content
This quick start topic guides you through a step-by-step process of creating Expression Editor control, and binding it to an object to demonstrate creating expressions and performing operations on its fields.
### .NET Framework
The steps to create an application with Expression Editor control are as follows:
* [Step 1: Add Expression Editor components to application](/componentone/docs/win/online-expressioneditor/Quick-Start#step1)
* [Step 2: Bind the components](/componentone/docs/win/online-expressioneditor/Quick-Start#step2)
* [Step 3: Add Result panel](/componentone/docs/win/online-expressioneditor/Quick-Start#step3)
* [Step 4: Subscribe to and handle the ExpressionChanged event](/componentone/docs/win/online-expressioneditor/Quick-Start#step4)
* [Step 5: Build and Run the Project](/componentone/docs/win/online-expressioneditor/Quick-Start#step5)
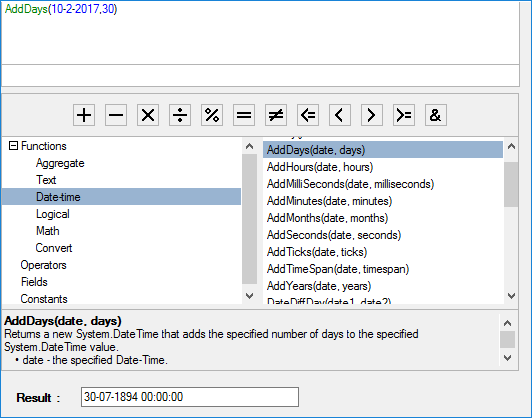
The following image exhibits Expression Editor control.
**Step 1: Add Expression Editor components to application**
1. Create a Windows Forms application, and open Form1.cs.
2. Add C1ExpressionEditor and C1ExpressionEditorPanel components to your form.
**Step 2: Bind the components**
Bind the C1ExpressionEditor and C1ExpressionEditorPanel components using [ExpressionEditor](/componentone/docs/win/online-expressioneditor/) property exposed by **C1ExpressionEditorPanel** class, as shown in the following code snippet.
```csharp
InitializeComponent();
c1ExpressionEditorPanel1.ExpressionEditor = c1ExpressionEditor1;
```
**Step 3: Add Result panel**
1. To create result panel, add a label and a text box control.
2. Set the text property of label to **Result**:, and name the text box **txtResult**.
**Step 4: Subscribe to and handle the ExpressionChanged event**
Subscribe to the ExpressionChanged event of C1ExpressionEditor, and handle the ExpressionChanged event to show result of the entered expressions, as shown in the following code snippet.
```csharp
//...
c1ExpressionEditor1.ExpressionChanged += c1ExpressionEditor1_ExpressionChanged;
}
private void c1ExpressionEditor1_ExpressionChanged(object sender, EventArgs e)
{
if (!c1ExpressionEditor1.IsValid)
{
txtResult.Text = "";
}
else
{
txtResult.Text = c1ExpressionEditor1.Evaluate()?.ToString();
}
}
```
**Step 5: Build and Run the Project**
1. Click **Build \| Build Solution** to build the project.
2. Press **F5** to run the project.
You have successfully created a Windows forms application with Expression Editor control. Enter a valid expression and see the results.
### .NET
To create a simple WinForms application in .NET for ExpressionEditor control, complete the following steps:
1. Initialize ExpressionEditor object.
```csharp
C1ExpressionEditor c1ExpressionEditor1;
```
2\. Initialize a custom DataItem class for data source\.
```csharp
DataItem dt = new DataItem();
```
3\. Add the ExpressionEditor and ExpressionEditorPanel controls to the form\.
```csharp
// Initialize Expression Editor class
c1ExpressionEditor1 = new C1.Win.ExpressionEditor.C1ExpressionEditor();
// Add Expression Editor to the form
this.Controls.Add(c1ExpressionEditor1);
// Initialize Expression Editor Panel class
C1ExpressionEditorPanel c1ExpressionEditorPanel1 = new C1.Win.ExpressionEditor.C1ExpressionEditorPanel();
// Add Expression Editor Panel to the form
this.Controls.Add(c1ExpressionEditorPanel1);
```
4\. Bind the C1ExpressionEditor and C1ExpressionEditorPanel components using ExpressionEditor property exposed by C1ExpressionEditorPanel class, as shown in the following code snippet.
```csharp
// Binding ExpressionEditor and ExpressionEditorPanel
c1ExpressionEditorPanel1.ExpressionEditor = c1ExpressionEditor1;
```
5\. Add the appearance settings to the ExpressionEditor and ExpressionEditorPanel:
```csharp
// Add appearance settings
c1ExpressionEditorPanel1.BackColor = Color.LightGoldenrodYellow;
c1ExpressionEditorPanel1.ForeColor = Color.BlueViolet;
c1ExpressionEditorPanel1.Font = new Font("GenericMonoSerif", 10);
c1ExpressionEditor1.BackColor = Color.Beige;
c1ExpressionEditor1.ForeColor = Color.Firebrick;
c1ExpressionEditor1.Font = new Font("GenericMonoSerif", 10);
```
6\. Bind the ExpressionEditor control to a data source\.
```csharp
c1ExpressionEditor1.DataSource = DataItem.CreateData();
```
7\. To create result panel\, add a label and a text box control\.Set the text property of label to Result\, and name the text box txtResult\.
8\. Subscribe to the ExpressionChanged event of C1ExpressionEditor\, and handle the ExpressionChanged event to show result of the entered expressions\, as shown in the following code snippet\.
```csharp
c1ExpressionEditor1.ExpressionChanged += c1ExpressionEditor1_ExpressionChanged;
}
private void c1ExpressionEditor1_ExpressionChanged(object sender, EventArgs e)
{
if (!c1ExpressionEditor1.IsValid)
{
txtResult.Text = "";
}
else
{
txtResult.Text = c1ExpressionEditor1.Evaluate()?.ToString();
}
}
```
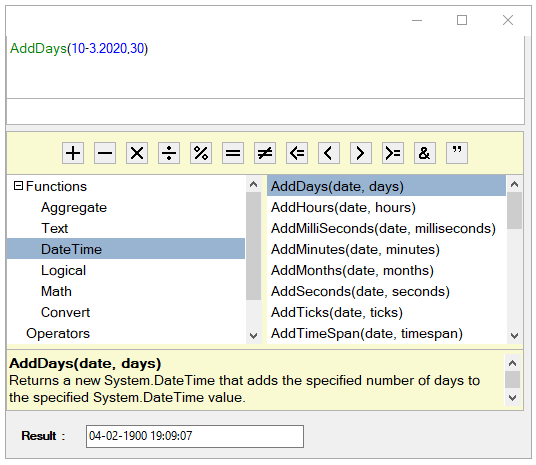
9\. Build and Run the Project\. Observe the output\. Add the date and days in AddDays formula in the top textbox after adding the formula\.
>type=note
> Note: WinForms .NET Edition does not include rich design-time support yet. We will enhance it in future releases.