# Traditional WinForms Implementation
## Content
Our sample application will consist of the following elements:
* A **ComboBox** listing the NorthWind product categories.
* A **DataGridView** showing all products for the currently selected category.
* Some **TextBox** controls bound to properties of the currently selected product.
This is what the final application will look like:
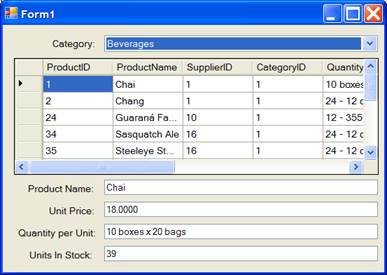
The basic implementation is simple, since Visual Studio handles most of the data binding related tasks automatically. In fact, the entire application can be written without a single line of code.
Here are the steps:
1. Create a new WinForms application
2. Use the **Data | Add New DataSource** menu and add a reference to the **NORTHWND.MDF** database. Accept all the default options offered by the wizard, and pick all the tables in the database.
3. Add the controls to the form as shown on the image above: one **ComboBox**, one **DataGridView**, four **TextBox** controls, and a few **Label** controls.
At this point, the application has access to the data and it has controls to show and edit the data. To connect the controls to the data, follow these steps:
1. Add a new **BindingSource** component to the form
2. Select the new **BindingSource** component, select its DataSource property in the property window, and use the drop-down editor to select the **NORTHWINDDataSet** data set.
3. Still with the **BindingSource** component selected, use the drop-down editor set the **DataMember** property to “Categories”.
The final step is to select each data bound control and bind it to the **BindingSource** component:
For the **ComboBox**, set the following properties:
[C1DataSource](/componentone/api/win/online-datasource/dotnet-framework-api/C1.Win.Data.Entity.4.8/C1.Win.Data.Entities.C1DataSource.html) bindingSource1
**DisplayMember** CategoryName
**ValueMember** CategoryID
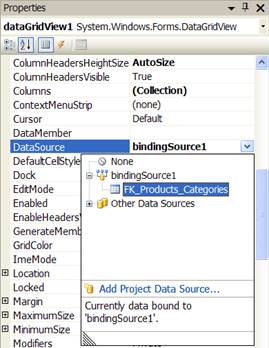
For the **DataGridView**, use the drop-down editor in the property grid to set the DataSource property to **FK\_Products\_Categories**, the item that appears under bindingSource1 and represents the products under the currently selected category. The image below shows what the drop-down editor looks like just before the selection is made:
Finally, select each of the TextBox controls and use the drop-down editor in the property window to bind the Text property to the corresponding element in the currently selected product. For example:
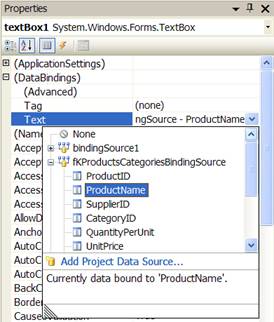
Repeat this step to bind the other **TextBox** controls to the **UnitPrice**, **QuantityPerUnit**, and **UnitsInStock** fields.
The application is now ready. Run it and notice the following:
* When you select a category from the **ComboBox**, the corresponding products are displayed on the grid below, and the product details appear in the **TextBox** controls.
* When you select a product on the grid, the product details are automatically updated.
* The values shown on the grid and in the text boxes are synchronized. If you change the values in one place, they also change in the other.
* If you change the value of a product’s **CategoryID** in the grid, the product no longer belongs to the currently selected category and is automatically removed from the grid.
This is the traditional way of doing data binding in **WinForms**. Visual Studio provides rich design-time support and tools that make it easy to get applications started. Of course, real applications typically require you to add some code to implement specific logic.