# Data Engine WebApi using Visual Studio Template
## Content
To use DataEngine WebApi using Visual Studio, complete the following steps:
### Step 1: Create a new WebApi Application
1. In Visual Studio, Select **File \| New \| Project\.**
2. Under installed templates, select **Visual C\# \| Web \| ASP\.NET Web Application \(\.NET Framework\)**. Make sure your application **.NET Framework version is 4.5** or above.
3. Set a **Name** and **Location** for your application. Click **OK** to open New ASP.NET Web Application (.NET Framework) dialog.
4. In the **New ASP.NET Project (.NET Framework)** dialog, select the **Empty** template and check the **Web API** option.
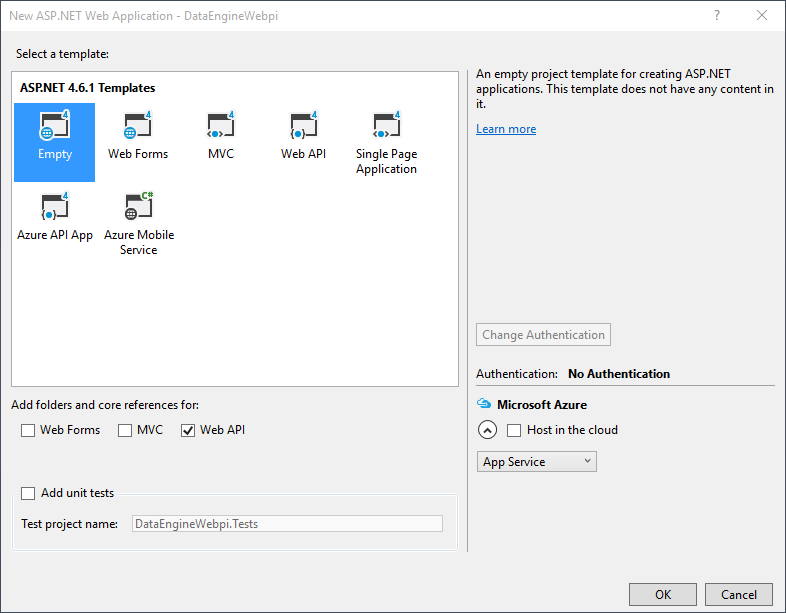
5. Click **OK** to create WebApi Application.
### Step 2: Install C1.Web.Api.DataEngine Nuget package
1. Add the C1.Web.Api.DataEngine reference to the project.
2. In the **Solution Explorer**, right click **References** and select **Manage NuGet Packages**.
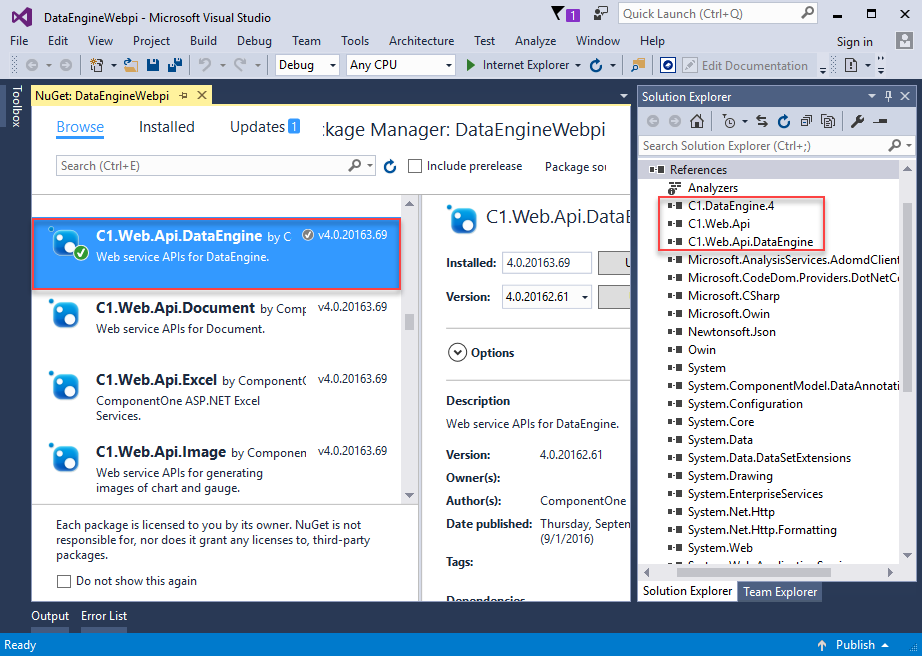
3. In **NuGet Package Manager**, select the Package source. Search for **C1.Web.Api.DataEngine** package, and click **Install**.
> **Note:**
> * To execute **Startup1.cs** class alongwith your application, install **“Microsoft.Owin.Host.SystemWeb"** Nuget package in your Visual Studio application.
> * `"`**`C1.Web.Api.DataEngine`**`"` gets added under the "dependencies" within project.json file of your project once you restore the packages.
### Step 3: Create ProductData.cs Model
Create a new class inside the Models folder to create data source for the Olap control.
1. Add a new class to the folder **Models** (for example: `ProductData.cs`). For more information about how to add a new model, see [Adding controls](http://helpcentral.componentone.com/nethelp/c1mvchelpers/AddingControlsinRazor.html).
2. Add the following code to the model to define the data for Olap.
```csharp
using System;
using System.Collections.Generic;
using System.Data;
using System.Linq;
using System.Web;
namespace DataEngineWebpi.Models
{
public class ProductData
{
private static Random r = new Random();
public int ID { get; set; }
public string Product { get; set; }
public string Country { get; set; }
public DateTime Date { get; set; }
public int Sales { get; set; }
public int Downloads { get; set; }
public bool Active { get; set; }
public double Discount { get; set; }
private static int randomInt(int max)
{
return (int)Math.Floor(r.NextDouble() * (max + 1));
}
public static IEnumerable GetData(int cnt)
{
string[] countries = "China,India,Russia,US,Germany,UK,Japan,Italy,Greece,Spain,Portugal".Split(',');
string[] products = "Wijmo,Aoba,Xuni,Olap".Split(',');
List result = new List();
for (var i = 0; i < cnt; i++)
{
result.Add(new ProductData
{
ID = i,
Product = products[randomInt(products.Length - 1)],
Country = countries[randomInt(countries.Length - 1)],
Date = new DateTime(2015, randomInt(5) + 1, randomInt(27) + 1),
Sales = randomInt(10000),
Downloads = randomInt(10000),
Active = randomInt(1) == 1 ? true : false,
Discount = r.NextDouble()
});
}
return result;
}
}
}
```
### Step 4: Add Startup.cs for your application
1. In **Solution Explorer**, select a target project.
2. On the Project menu, click **Add New Item** option.
3. In the Add New Item dialog, select **Web** and then select **OWIN Startup class** template from the list on right.
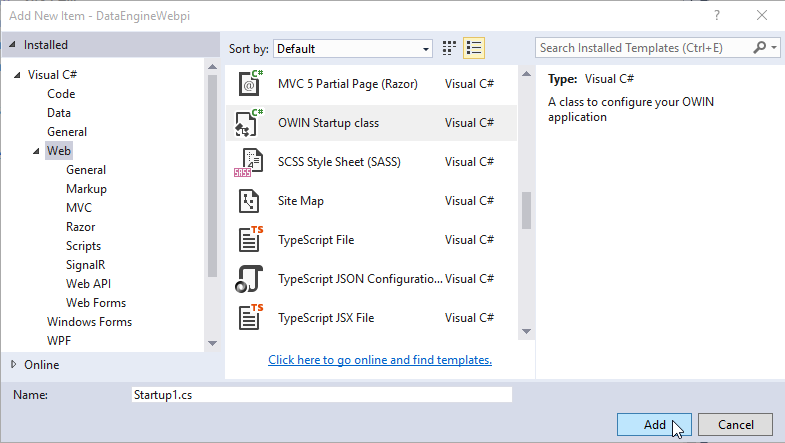
4. Click **Add**. Startup1.cs file is added to the application.
### Step 5: Register data source in Startup1.cs
1. Select and Open **Startup1.cs** file from Solution Explorer.
2. Replace the code inside Startup1 class.
```csharp
using System;
using System.Threading.Tasks;
using Microsoft.Owin;
using Owin;
using System.IO;
using C1.DataEngine;
using C1.Web.Api;
using DataEngineWebpi.Models;
[assembly: OwinStartup(typeof(DataEngineWebpi.Startup1))]
namespace DataEngineWebpi
{
public class Startup1
{
private static string DATAPATH = Path.Combine(System.Web.HttpRuntime.AppDomainAppPath, "Data");
public void Configuration(IAppBuilder app)
{
app.UseDataEngineProviders()
.AddDataEngine("complex10", () =>
{
return ProductData.GetData(100000);
})
.AddDataEngine("complex50", () =>
{
return ProductData.GetData(500000);
})
.AddDataEngine("complex100", () =>
{
return ProductData.GetData(1000000);
})
.AddDataSource("dataset10", () => ProductData.GetData(100000).ToList())
.AddDataSource("dataset50", () => ProductData.GetData(500000).ToList())
.AddDataSource("dataset100", () => ProductData.GetData(1000000).ToList())
.AddCube("cube",
@"Data Source=http://ssrs.componentone.com/OLAP/msmdpump.dll;Provider=msolap;Initial Catalog=AdventureWorksDW2012Multidimensional",
"Adventure Works");
}
}
}
```
Once you have added the above code in Startup1.cs, you can register the DataEngine data and the memory data by the extended methods RegisterDataEngine and RegisterDataSet.
> **Note:** If you want your WebAPI server to **support cross domain requests**, you can add the following code in the **Configuration** method of Startup1.cs file.
>
> *`app.UseCors(CorsOptions.AllowAll);`*
### Step 6: Configure Web.config
Open the **Web.config** file and ensure that the **WebDAVModule** and the **WebDAV** handler are removed from \ as shown below:
```xml
.........
```
### Step 7: Build and Run the Project
1. Click **Build \| Build Solution** to build the project.
2. Press **F5** to run the project.
> Append the URL path (for example: http://localhost:1234/api/dataengine/complex/fields) in the address bar of the browser to see the output.