# Data Engine Service
Develop powerful and lightweight web applications using ASP.NET MVC controls. Learn more about the ComponentOne MVC controls in ASP.NET MVC documentation.
## Content
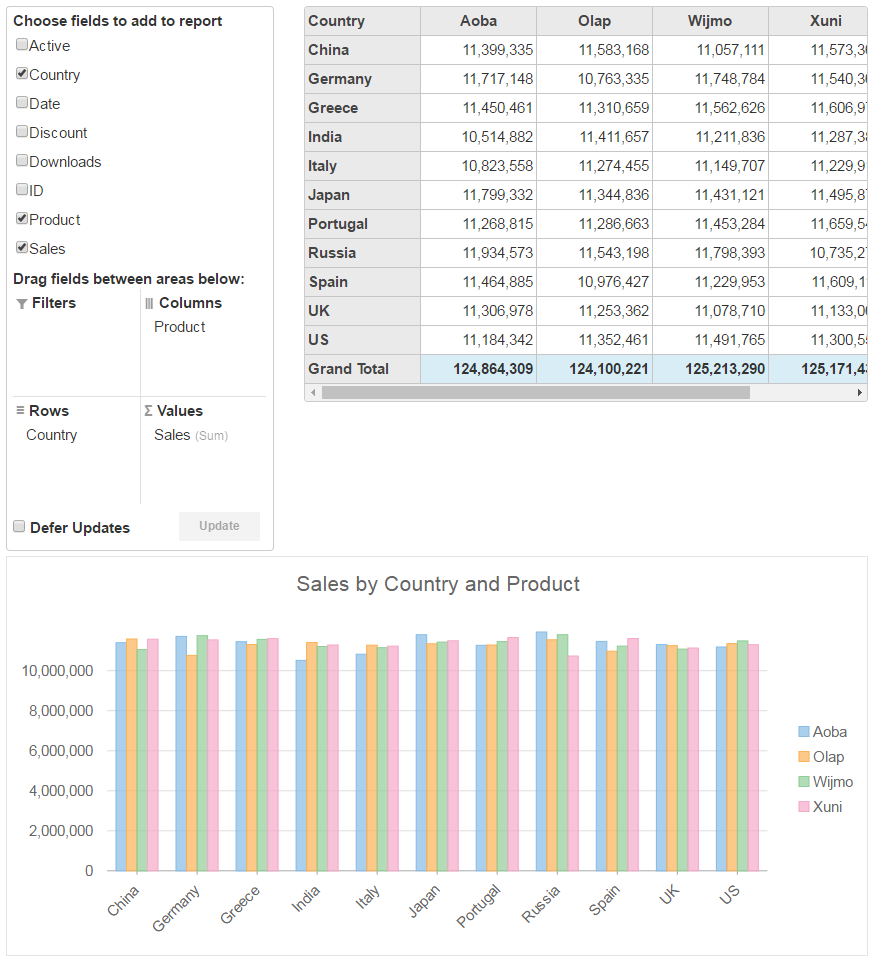
This topic describes the steps required to use the Data Engine service for data aggregation in OLAP. In the example below, the **PivotEngine** component connects the DataEngine data using the Data Engine Service. The **PivotPanel** control and **PivotGrid** control binds to the **PivotEngine**. You can change the view definition in the **PivotPanel** control. The aggregated data will be obtained from the service. In the example below, the **PivotGrid** control shows the aggregated data. You can find the detail raw data shown in a grid by double-clicking some cell in the PivotGrid control.
To accomplish this, follow these steps:
### Create an MVC Application using Visual Studio template
Create an ASP.NET MVC Application using Visual Studio template to enable WebAPI configuration.
1. Select **File \| New \| Project**.
2. Under installed templates, select **Visual C\# \| Web \| ASP\.NET Web Application \(\.NET Framework\)**.
3. In the **New ASP.NET Web Application** dialog, select the **MVC** template.
4. Under "Add folders and core references for", check **Web API**. Click **OK**.
For more information about licensing, resource registration, and assembly references, see [Using Visual Studio Template](/componentone/docs/mvc/online-mvc/CreatingaNewProject/UsingVSTemplate).
### Install the DataEngine Web API
Install the DataEngine Web API and C1.WebApi packages from the NuGet server.
1. Select **MESCIUS** from the **Package source** drop-down, in NuGet Package manager of your application.
2. Browse for the DataEngine Web API packages, and install them.
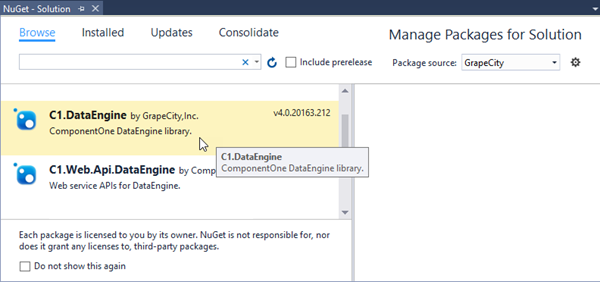
You will see that the following references are added to your Visual Studio project.
* `C1.WebApi.dll`
* `C1.WebApi.DataEngine.dll`
* `C1.DataEngine.4.dll`
* `System.Net.Http.Formatting.dll`
* `System.Web.Http.dll`
* `System.Web.Http.Owin.dll`
* `System.Web.Http.WebHost.dll`
### Create a Datasource for OLAP
Create a new class inside the Models folder to create data source for the OLAP control.
1. Add a new class to the folder **Models** (for example: `ProductData.cs`). See [Adding controls](/componentone/docs/mvc/online-mvc/addingcontrols#step2) to know how to add a new model.
2. Add the following code to the new model to define the classes.
```csharp
using System;
using System.Collections.Generic;
using System.Data;
using System.Linq;
using System.Web;
namespace OlapSample.Models
{
public class ProductData
{
private static Random r = new Random();
public int ID { get; set; }
public string Product { get; set; }
public string Country { get; set; }
public DateTime Date { get; set; }
public int Sales { get; set; }
public int Downloads { get; set; }
public bool Active { get; set; }
public double Discount { get; set; }
private static int randomInt(int max)
{
return (int)Math.Floor(r.NextDouble() * (max + 1));
}
public static IEnumerable GetData(int cnt)
{
string[] countries = "China,India,Russia,US,Germany,UK,Japan,Italy,Greece,Spain,Portugal".Split(',');
string[] products = "Wijmo,Aoba,Xuni,Olap".Split(',');
List result = new List();
for (var i = 0; i < cnt; i++)
{
result.Add(new ProductData
{
ID = i,
Product = products[randomInt(products.Length - 1)],
Country = countries[randomInt(countries.Length - 1)],
Date = new DateTime(2015, randomInt(5) + 1, randomInt(27) + 1),
Sales = randomInt(10000),
Downloads = randomInt(10000),
Active = randomInt(1) == 1 ? true : false,
Discount = r.NextDouble()
});
}
return result;
}
}
}
```
### Configure Startup.cs
After adding the required references, you need to configure the `Startup.cs` to fetch the aggregated data from the data engine service.
1. In **Solution Explorer**, select your target project.
2. On the **Project** menu, click **New Item** option.
3. In the **New Item** dialog, select Web and then select **OWIN Startup class** template from the list on right.
4. In the Startup.cs file, add the following code inside the **Startup** class.
```csharp
using C1.DataEngine;
using Microsoft.Owin;
using Owin;
using System.IO;
using System.Linq;
using System.Web.Http;
using OlapSSAS.Models;
[assembly: OwinStartupAttribute(typeof(OlapSSAS.Startup))]
namespace OlapSSAS
{
public partial class Startup
{
private readonly HttpConfiguration config = GlobalConfiguration.Configuration;
private static string DATAPATH = Path.Combine(System.Web.HttpRuntime.AppDomainAppPath, "Data");
public void Configuration(IAppBuilder app)
{
app.UseDataEngineProviders()
.AddDataEngine("complex10", () =>
{
return ProductData.GetData(100000);
})
}
}
}
```
### Add an OLAP control
Create a controller and view for OLAP control and follow the below steps to initialize an OLAP control.
**Add a new Controller**
1. In the **Solution Explorer**, right click the folder **Controllers.**
2. From the context menu, select **Add \| Controller**. The **Add Scaffold** dialog appears.
3. Complete the following steps in the **Add Scaffold** dialog:
1. Select **MVC 5 Controller - Empty** template.
2. Set name of the controller (for example: `OlapController`).
3. Click **Add**.
4. Replace the method Index() with the following method. **csharp**
```csharp
// GET: SSAS
public ActionResult Index()
{
return View();
}
```
**Add a View for the Controller**
1. From the **Solution Explorer**, expand the folder **Controllers** and double click the `OlapController.`
2. Place the cursor inside the method `Index()`.
3. Right click and select **Add View**. The **Add View** dialog appears.
4. In the **Add View** dialog, verify that the view name is **Index** and View engine is **Razor (CSHTML).**
5. Click **Add** to add a view is for the controller. Copy the following code and paste it inside **Index.cshtml**.
```csharp
@using C1.Web.Mvc
@Html.C1().Scripts().Basic().Olap()
@(Html.C1().PivotEngine().Id("dataEngine")
.BindService("~/api/dataengine/complex10")
.RowFields(pfcb => pfcb.Items("Country"))
.ColumnFields(cfcb => cfcb.Items("Product"))
.ValueFields(vfcb => vfcb.Items("Sales")))
@Html.C1().PivotPanel().ItemsSourceId("dataSourceEngine")
@Html.C1().PivotChart().ItemsSourceId("dataSourceEngine")
@Html.C1().PivotGrid().ItemsSourceId("dataSourceEngine")
```
### Build and Run the Project
1. Click **Build \| Build Solution** to build the project.
2. Press **F5** to run the project.
>type=note
> Append the folder name and view name to the generated URL (for example: http://localhost:1234/**Olap/Index**) in the address bar of the browser to see the view.
The following image shows how OLAP control appears in the browser after completing the above steps:
## See Also
[Data Binding](/componentone/docs/mvc/online-mvc/workwithcontrols/Olap/workwitholap/OlapDataBinding)
[Model Binding](/componentone/docs/mvc/online-mvc/workwithcontrols/Olap/workwitholap/OlapDataBinding/ModelBindingOlap)
[Remote Binding](/componentone/docs/mvc/online-mvc/workwithcontrols/Olap/workwitholap/OlapDataBinding/OlapRemoteBinding)
**Configuring App**
[Using Visual Studio Template](/componentone/docs/mvc/online-mvc/CreatingaNewProject/UsingVSTemplate)