# Quick Start
Develop powerful and lightweight web applications using ASP.NET MVC controls. Learn more about the ComponentOne MVC controls in ASP.NET MVC documentation.
## Content
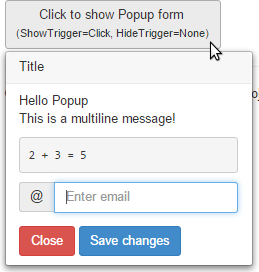
The quick start guides you through the steps of adding a simple popover (**Popup** with owner element) control to your application. Such popup control is similar to a rich tooltip which will show or hide as per the actions specified by [ShowTrigger](/componentone/api/mvc/online-mvc/dotnet-framework-api/C1.Web.Mvc/C1.Web.Mvc.Popup.ShowTrigger.html) and [HideTrigger](/componentone/api/mvc/online-mvc/dotnet-framework-api/C1.Web.Mvc/C1.Web.Mvc.Popup.HideTrigger.html). For information on how to add ASP.NET MVC Edition controls, see [Adding Controls](/componentone/docs/mvc/online-mvc/addingcontrols).
Follow the given steps to get started:
### Create an MVC Application
Create a new MVC application using the ComponentOne or VisualStudio templates. For more information about creating an MVC application, see [Configuring your MVC Application](/componentone/docs/mvc/online-mvc/CreatingaNewProject) topic.
### Add a new Controller and View
**Add a new Controller**:
1. In the **Solution Explorer**, right click the folder **Controllers.**
2. From the context menu, select **Add | Controller**. The **Add Scaffold** dialog appears.
3. Complete the following steps in the **Add Scaffold** dialog:
1. Select **MVC 5 Controller - Empty** template.
2. Set name of the controller (for example: `Default1Controller`).
3. Click **Add**.
4. A new controller is added to the application.
**Add a View for the controller**:
1. From the **Solution Explorer**, expand the folder **Controllers** and double click the controller (for example: `DefaultController`) to open it.
2. Place the cursor inside the method `Index()`.
3. Right click and select **Add View**. The **Add View** dialog appears.
4. In the **Add View** dialog, verify that the View name is **Index** and View engine is **Razor (CSHTML).**
5. Click **Add**. A view is added for the controller.
### Add the Popup Control
1. From the **Solution Explorer**, expand the folder **Views**.
2. Double click `Index.cshtml` to open it.
3. Replace the default code of the `Index.cshtml` file with the code given below to initialize a **Popup** control.
```razor
@using C1.Web.Mvc
@Styles.Render("~/Content/css/bootstrap/css/bootstrap.css")
Title
@* Create popup controls with HtmlHelper *@
@(Html.C1().Popup("#popup").Owner("#btn").ShowTrigger(PopupTrigger.Click).HideTrigger(PopupTrigger.None))
```
### Build and Run the Project
1. Click **Build | Build Solution** to build the project.
2. Press **F5** to run the project.
> type=note
> Append the folder name and view name to the generated URL (for example: http://localhost:1234/**Default/Index**) in the address bar of the browser to see the view. Or link the view to the home page.
## See Also
[Dialog: Popup with No Owner](/componentone/docs/mvc/online-mvc/workwithcontrols/Input/Popup/workwithpopup/Dialog)