# Unobtrusive Validation
Develop powerful and lightweight web applications using ASP.NET MVC controls. Learn more about the ComponentOne MVC controls in ASP.NET MVC documentation.
## Content
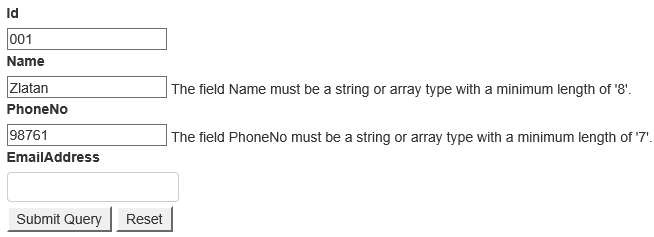
Unobtrusive Validation support for Input controls helps you to validate any C1 input control using client side validation. Unobtrusive validation can implement simple client-side validation without writing a bulk of validation code, and improves the user experience simply by adding the right attributes and including the script files.
In a common validation scenario, when we use a validation to validate any control and use client side validation, JavaScript code is generated and rendered as HTML on the web browser. However, with unobtrusive validation inline JavaScript is not generated for rendering to handle client side validation. Instead, it uses HTML5 data-\* attributes for client side validations.
Unobtrusive Validation support is available in the following Input controls;
* InputColor
* InputDate
* InputDateTime
* InputMask
* InputNumber
* AutoComplete
* ComboBox
* InputTime
* MultiSelect
Before implementing the below steps, you need to create a new MVC application using [ComponentOne template](/componentone/docs/mvc/online-mvc/CreatingaNewProject/UsingC1Template) or [Visual Studio template](/componentone/docs/mvc/online-mvc/CreatingaNewProject/UsingVSTemplate).
### Configure your MVC application
Complete the following steps to add the js file references to your application.
1. From the **Solution Explorer**, open the folders **Views | Shared**.
2. Double click **\_Layout.cshtml** to open it.
3. Add the following code between the \\ tags.
```razor
```
### Create Validations for Input controls
**Model - Form.cs**
```razor
using System.ComponentModel.DataAnnotations;
namespace UnobtrusiveValidationSample.Models
{
public class Form
{
[Required]
public string Id { get; set; }
[Required]
[DataType(DataType.Text)]
[MinLength(8)]
[MaxLength(30)]
public string Name { get; set; }
[Required]
[DataType(DataType.PhoneNumber)]
[Phone]
[Range(0, 10000000000)]
[StringLength(11)]
[MinLength(7)]
[MaxLength(10)]
public string PhoneNo { get; set; }
[Required]
[DataType(DataType.EmailAddress)]
[EmailAddress]
[MinLength(10)]
[MaxLength(50)]
public string EmailAddress { get; set; }
}
}
```
### Add an Input control
**View - Index.cshtml**
```razor
@using UnObtrusiveValidationSample.Models;
@model Form
@using (Html.BeginForm())
{
@Html.LabelFor(m => m.Id)
@Html.EditorFor(m => m.Id)
@Html.ValidationMessageFor(m => m.Id)
@Html.LabelFor(m => m.Name)
@Html.EditorFor(m => m.Name)
@Html.ValidationMessageFor(m => m.Name)
@Html.LabelFor(m => m.PhoneNo)
@Html.EditorFor(m => m.PhoneNo)
@Html.ValidationMessageFor(m => m.PhoneNo)
@Html.LabelFor(m => m.EmailAddress)
@Html.C1().InputMaskFor(m => m.EmailAddress)
@Html.ValidationMessageFor(m => m.EmailAddress)
}
```
### Build and Run the Project
1. Click **Build | Build Solution** to build the project.
2. Press **F5** to run the project.