# Quick Start
Develop powerful and lightweight web applications using ASP.NET MVC controls. Learn more about the ComponentOne MVC controls in ASP.NET MVC documentation.
## Content
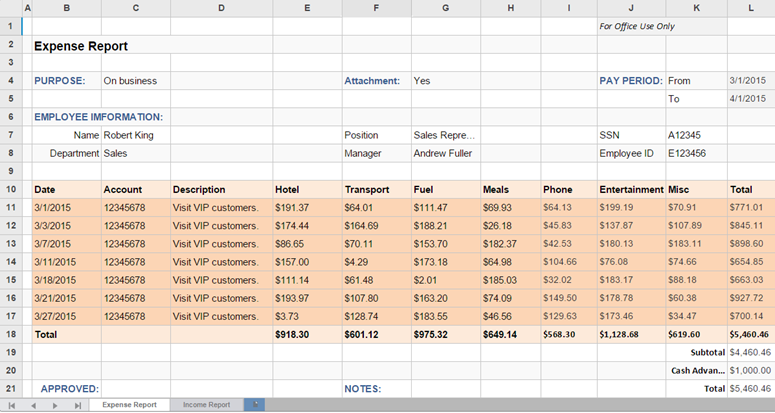
The FlexSheet control in your application can be unbound, bound to a data source, and can even display data loaded from an excel file. It offers you a flexible spreadsheet experience, allowing you to load existing excel file or workbook in FlexSheet, modify its data and even save it as an excel or a workbook file remotely or on the client side.
The quick start guides you through the steps of using the FlexSheet control in your application, and load an excel file or workbook instance in it on the server side.
This can be accomplished in the following steps.
>type=note
> **Note**: The **ComponentOne template** for ASP.NET MVC Edition automatically registers the required resources, and adds the relevant references and packages to your application. Therefore, you need not follow the Steps 1 to 5 above if your application is created using ComponentOne template.
### License your application
Complete the following steps to license your application for using FlexSheet control.
1. In the **Solution Explorer**, double-click the project name (for example, **MVCFlexSheet**) and expand the node **Properties.**
2. Double-click the **licenses.licx** file to open it.
3. In the **licenses.licx** file, add the following:
```LICENSES.LICX
C1.Web.Mvc.LicenseDetector, C1.Web.Mvc
C1.Web.Mvc.Sheet.LicenseDetector, C1.Web.Mvc.FlexSheet
```
For more information on how to add license to your application, refer to [Licensing](/componentone/docs/mvc/online-mvc/GettingStarted/Licensing).
### Add the required references to your application
Complete the following steps to add the ASP.NET MVC Edition references and FlexSheet references to your project.
1. In the **Solution Explorer**, right click **References** and select **Add Reference.**
2. Browse to the location- **C:\\Program Files (x86)\\ComponentOne\\ASP.NET MVC Edition\\bin.**
3. Select **C1.Web.Mvc.dll** and **C1.Web.Mvc.FlexSheet.dll**, and click **Add**.
4. Set the **Copy Local** property of the **C1.Web.Mvc.dll** and **C1.Web.Mvc.FlexSheet.dll** to **True**.
### Configure the application to use FlexSheet control
Complete the following steps to configure your application to use Financial Charts.
1. From the **Solution Explorer**, expand the folder **Views** and double click the `web.config` file to open it.
2. Add the following markups in \\ tags, within the `` tags.
```html
```
### Register Resources
Complete the following steps to register the required resources for using FlexSheet control.
1. From the **Solution Explorer**, open the folders **Views \| Shared**.
2. Double click `_Layout.cshtml` to open it.
3. Add the following code between the `` tags.
```razor
@Html.C1().Styles()
@Html.C1().Scripts().Basic().FlexSheet()
```
For more information on how to register resources, refer to [Registering Resources](/componentone/docs/mvc/online-mvc/CreatingaNewProject/RegisteringResources).
### Add jszip.js library to the application or use its CDN link
Loading Excel files in FlexSheet and saving FlexSheet data to Excel files have dependency on **jszip.min.js** file. Therefore, you need to add it in your application, and provide reference to it in the respective view or in \ section of **\_Layout.cshtml** file. Complete the following steps to add the **jszip.min.js** file to your application.
1. Download the **jszip.min.js** file from the CDN link: [http://cdnjs.cloudflare.com/ajax/libs/jszip/2.2.1/jszip.min.js](http://cdnjs.cloudflare.com/ajax/libs/jszip/2.2.1/jszip.min.js)
2. Place the jszip.min.js file in the **Scripts** folder of your application.
3. Right-click the **Scripts** folder in Solution Explorer, and select **Add \| Existing Item\.\.\.** from the options.
4. In the **Add Existing Item** dialog, browse to the location of **jszip.min.js** in your project.
5. Select the **jszip.min.js** file and click **Add** to include it in your project.
### Add an excel file or a workbook to server
1. Make sure that the desired excel or workbook file to be loaded is placed on server. In this case, we have placed the file in the **Content** folder of our application.
>type=note
> Note that, this example considers Visual Studio IIS (Internet Information Services) of your machine as the Server and browser as the client.
2. Right-click your project name in the Solution Explorer, and select **Add** \| **Add Existing Files** from the options, to add the excel file in your project.
### Add a FlexSheet Control to your Application
Complete the following steps to initialize a FlexSheet control.
**Add a new Controller**
1. In the **Solution Explorer**, right click the folder **Controllers.**
2. From the context menu, select **Add \| Controller**. The **Add Scaffold** dialog appears.
3. Complete the following steps in the **Add Scaffold** dialog:
1. Select **MVC 5 Controller - Empty** template.
2. Set name of the controller (for example: `Default1Controller`).
3. Click **Add**.
4. Include the MVC references as shown below.
```csharp
using System;
using System.Collections.Generic;
using System.Linq;
using System.Web;
using System.Web.Mvc;
```
5. Replace the method **Index()** by the following code.
**ServerLoadController.cs** **csharp**
```csharp
// GET: ServerLoad
public ActionResult Index()
{
return View();
}
```
**VB**
```vbnet
' GET: ServerLoad
Public Function Index() As ActionResult
Return View()
End Function
```
**Add a View for the controller**:
1. Within the Controller, which was added in the above step, place the cursor inside the method `Index()`.
2. Right click and select **Add View**. The **Add View** dialog appears.
3. In the **Add View** dialog, verify that the View name is **Index** and View engine is **Razor (CSHTML).**
4. Click **Add**. A view has been added for the controller.
5. In the Solution Explorer, double click `Index.cshtml` to open it.
6. Replace the default code of the **Views\\Index.cshtml** file with the one given below to initialize the **FlexSheet** control.
```razor
@(Html.C1().FlexSheet().Load("~/Content/ExcelFiles/WorkBook.xlsx").Width(1500).Height(800)
)
```
**INDEX.vbnethtml**
```auto
@Imports C1.Web.Mvc
@Imports C1.Web.Mvc.FlexSheet.Fluent
@Imports C1.Web.Mvc.FlexSheet
@Imports C1.Web.Mvc.Grid
@(Html.C1().FlexSheet() _
.Load("~/Content/ExcelFiles/Product.xlsx") _
.Width("1500px") _
.Height("800px")
)
```
### Build and Run the Project
1. Click **Build \| Build Solution** to build the project.
2. Press **F5** to run the project.