# Scaffolding
## Content
The steps to scaffold **ComponentOne** **FlexGrid** control for ASP.NET MVC are as follows:
1. Configure the datasource. Refer the topic [Data Source Configuration ](/componentone/docs/mvc/online-mvc/workwithcontrols/FlexGrid/workwithflexgrid/scaffolding#data-source-configuration)to see configuring a datasource in an application.
2. In the Solution Explorer, right-click the project name and select **Add\|New Scaffolded Item**. The **Add Scaffold** wizard appears.
3. In the Add Scaffold wizard, select **Common** and then select **C1 Scaffolder** from the right pane. You can also select **Common\|MVC\|Controller** or **Common\|MVC\|View** and then **C1 Scaffolder** to add only a controller or a view.
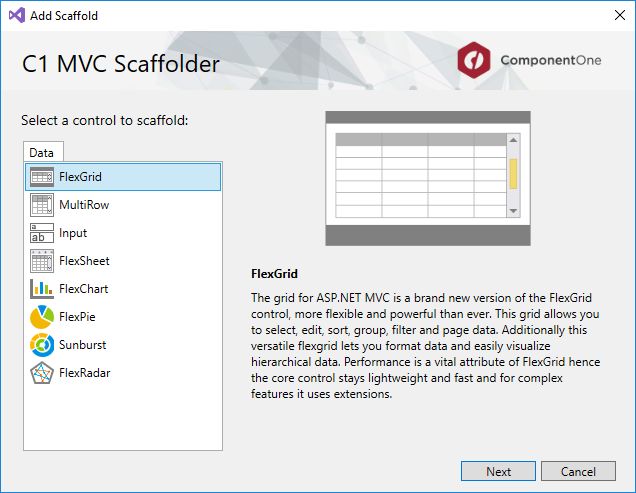
4. Click Add.
5. Select FlexGrid control and click Next.
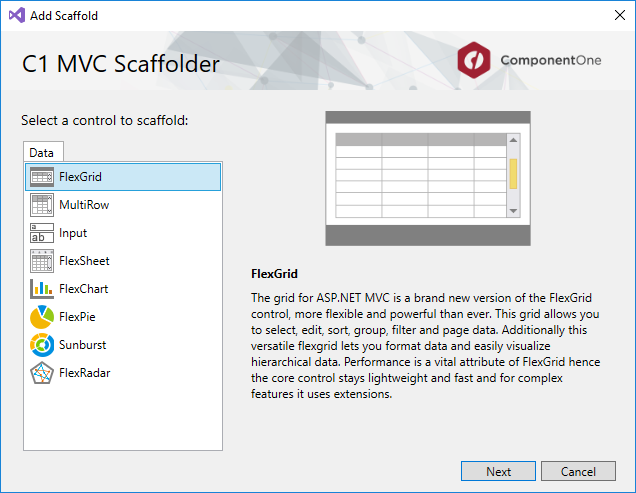
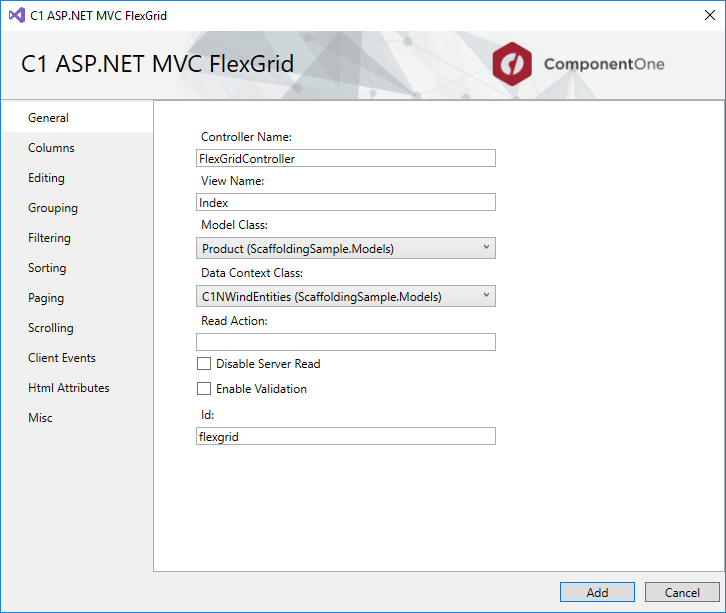
The **C1 ASP.NET MVC FlexGrid** wizard appears with the General tab selected by default.
6. In the **General** tab, specify the model as follows:
1. Fill in the **Controller Name** and **View Name**.
2. Select **Model Class** from the drop-down list. The list shows all the available model types in the application in addition to the C1NWind.edmx model added in Step 1. In our case, we select Product to populate products in the FlexGrid.
3. Select **Data Context Class** from the drop-down list. In our case, we select C1NWindEntities.
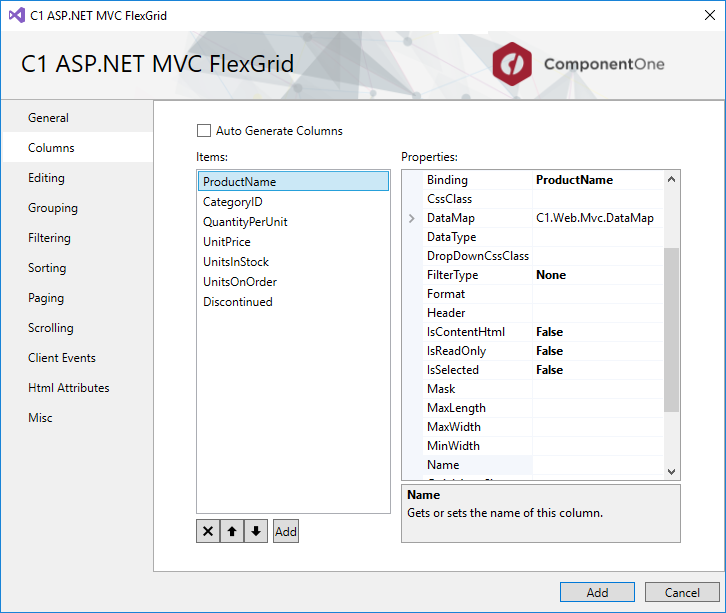
7. Go to **Columns** tab to specify the columns in the FlexGrid control. By default **Auto Generate Columns** is checked; if not, then you can add, delete, or move columns upward or downward in the sequence in which they should appear in the final view. In our case, we have selected columns as shown in the following image:
8. Go to **Editing** tab and check **Allow Edit** and **Allow Delete** check boxes.
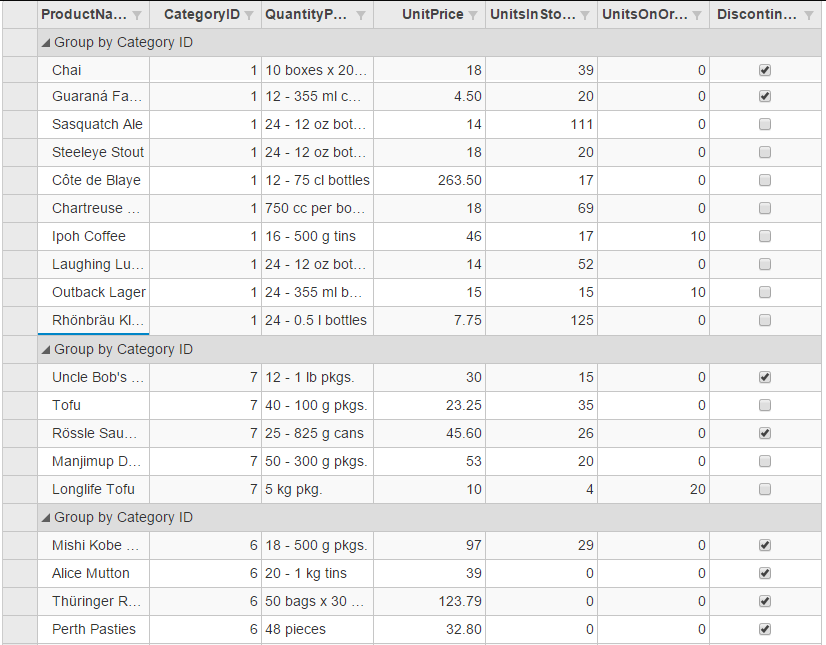
9. Go to **Grouping** tab. In the **Group Settings**, check **Show Groups** and CategoryID check boxes from Group Descriptions, and give Group Header Format a name, say 'Group by Category ID'.
10. Go to **Filtering** tab and check **Allow Filtering** check box. Let the other settings be same as default.
11. Go to **Sorting** tab and let the setting be same as default - both **Allow Sorting** and **Show Sort** check boxes should be checked.
12. Go to **Client Events** and check **BeginningEdit** check box.
13. Click **Add**. You will notice that the Controller and View for the selected model is added to your project. The codes generated for the Controller and View are as follows:
**FlexGrid1Controller.cs**
```csharp
using System;
using System.Collections.Generic;
using System.Linq;
using C1.Web.Mvc;
using C1.Web.Mvc.Serializition;
using System.Data;
using System.Data.Entity;
using System.Data.Entity.Validation;
using System.Web;
using System.Web.Mvc;
// This code was generated by C1 Scaffolder.
namespace C1MvcWebAppScaffolding.Controllers
{
public partial class FlexGridController : Controller
{
private C1MvcWebAppScaffolding.Models.C1NWindEntities db = new C1MvcWebAppScaffolding.Models.C1NWindEntities();
public ActionResult Index()
{
var model = db.Products;
return View(model);
}
public ActionResult FlexGrid_Update([C1JsonRequest]CollectionViewEditRequest requestData)
{
return Update(requestData, db.Products);
}
private ActionResult Update(CollectionViewEditRequest requestData, DbSet data) where T : class
{
return this.C1Json(CollectionViewHelper.Edit(requestData, item =>
{
string error = string.Empty;
bool success = true;
try
{
db.Entry(item as object).State = EntityState.Modified;
db.SaveChanges();
}
catch (DbEntityValidationException e)
{
error = string.Join(",", e.EntityValidationErrors.Select(result =>
{
return string.Join(",", result.ValidationErrors.Select(err => err.ErrorMessage));
}));
success = false;
}
catch (Exception e)
{
error = e.Message;
success = false;
}
return new CollectionViewItemResult
{
Error = error,
Success = success && ModelState.IsValid,
Data = item
};
}, () => data.ToList()));
}
public ActionResult FlexGrid_Delete([C1JsonRequest]CollectionViewEditRequest requestData)
{
return Delete(requestData, db.Products, item => new object[] { item.ProductID });
}
private ActionResult Delete(CollectionViewEditRequest requestData, DbSet data, Func getKeys) where T : class
{
return this.C1Json(CollectionViewHelper.Edit(requestData, item =>
{
string error = string.Empty;
bool success = true;
try
{
var resultItem = data.Find(getKeys(item));
data.Remove(resultItem);
db.SaveChanges();
}
catch (DbEntityValidationException e)
{
error = string.Join(",", e.EntityValidationErrors.Select(result =>
{
return string.Join(",", result.ValidationErrors.Select(err => err.ErrorMessage));
}));
success = false;
}
catch (Exception e)
{
error = e.Message;
success = false;
}
return new CollectionViewItemResult
{
Error = error,
Success = success && ModelState.IsValid,
Data = item
};
}, () => data.ToList()));
}
}
}
```
Index.cshtml
```Razor
@using C1.Web.Mvc
@using C1.Web.Mvc.Fluent
@using C1.Web.Mvc.Grid
@model IEnumerable
@(Html.C1().FlexGrid()
.Id("flexgrid")
.Bind(bl => { bl.Bind(Model)
.Update(Url.Action("FlexGrid_Update"))
.Delete(Url.Action("FlexGrid_Delete"))
.GroupBy("CategoryID")
;})
.AutoGenerateColumns(false)
.Columns(bl =>
{
bl.Add(cb => cb.Binding("ProductName"));
bl.Add(cb => cb.Binding("CategoryID"));
bl.Add(cb => cb.Binding("QuantityPerUnit"));
bl.Add(cb => cb.Binding("UnitPrice"));
bl.Add(cb => cb.Binding("UnitsInStock"));
bl.Add(cb => cb.Binding("UnitsOnOrder"));
bl.Add(cb => cb.Binding("Discontinued"));
})
.AllowDelete(true)
.GroupHeaderFormat("Group by Category ID")
.Filterable(f => { f
.DefaultFilterType(FilterType.Both)
;})
.OnClientBeginningEdit("beginningEdit"))
```
14. Run the project.
# Data Source Configuration
To configure the datasource for the application, let us use **C1NWind** database, the **C1NWind.mdf** file, available on your system in *C:\\Users\\\\\Documents\\ComponentOne Samples\\ASP.NET MVC\\MVC\\CS\\MvcExplorer\\App\_Data.* The steps to generate database for the application are as follows:
1. Add **C1NWind.mdf** file to the App\_Data folder in the Solution Explorer.
2. In the Solution Explorer, right-click **Models\|Add New Item\|Data**, and select **ADO.NET Entity Data Model**.
3. Name the model as **C1NWind**, and click **Add**.
4. In the Entity Data Model Wizard, select **EF Designer from database**, click **Next**.
**C1NWind.mdf** database is added to the data connection dropdown.
5. Click **Next** to choose Entity Framework version, and click **Next**.
6. In the **Choose Your Database Objects and Settings**, select Tables, and click **Finish**.
If you can see **C1NWind.edmx** added to your project under the **Models** folder, you have successfully configured the datasource for your application.