# Quick Start
Develop powerful and lightweight web applications using ASP.NET MVC Excel control. Learn more about creating a basic application using Excel in MVC documentation.
## Content
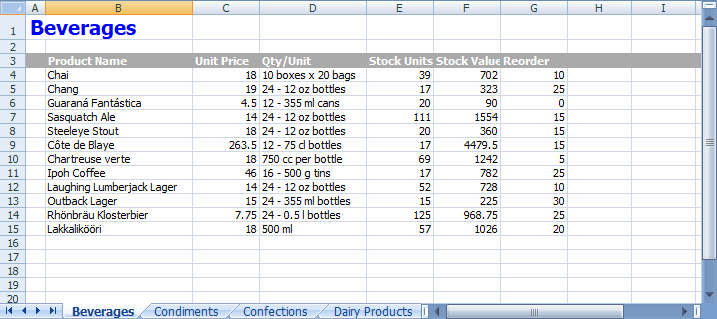
The quick start guides you through the steps of adding C1XLBook control in your MVC web application and adding data to it. Complete the following steps to see how the C1XLBook control appears after data binding:
### Create an MVC Application
Create a new MVC application using the ComponentOne or VisualStudio templates. For more information about creating an MVC application, see [Configuring your MVC Application](/componentone/docs/mvc/online-mvc/CreatingaNewProject) topic.
### Configure the Data Source for Application
> type=note
> The example uses **C1NWind** database. The **C1NWind.mdf** file is available on your system at the following location:
>
> _Documents\\ComponentOne Samples\\ASP.NET MVC\\MVC\\MvcExplorer\\App\_Data_
1. Add **C1NWind.mdf** file to the `AppData` folder in the Solution Explorer.
2. In the Solution Explorer, right-click `Models|Add New Item|Data`, and select **ADO.NET Entity Data Model**.
3. Name the model as **C1NWind**, and click **Add**.
4. In the Entity Data Model Wizard, select **EF Designer from database**, click **Next**. **C1NWind.mdf** database is added to the data connection dropdown.
5. Click **Next** to choose Entity Framework version, and click **Next**.
6. In the **Choose Your Database Objects and Settings**, select `Products` table and click **Finish**.
If you can see **C1NWind.edmx** added to your project under the **Models** folder, you have successfully configured the data source for your application.
### Add a C1XLBook control
Complete the following steps to initialize a FlexGrid control.
**Add a new Controller**
1. In the **Solution Explorer**, right click the folder **Controllers.**
2. From the context menu, select **Add | Controller**. The **Add Scaffold** dialog appears.
3. Complete the following steps in the **Add Scaffold** dialog:
1. Select **MVC 5 Controller - Empty** template.
2. Set name of the controller (for example: `ExcelController`).
3. Click **Add**.
4. Include the MVC references as shown below.
```csharp
using .Models;
```
5. In ExcelController, create an Excel file using CreateExcelFile method as shown in the following code:
```csharp
private string CreateExcelFile()
{
//clear Excel book, remove the single blank sheet
_c1xl.Clear();
_c1xl.Sheets.Clear();
_c1xl.DefaultFont = new Font("Tahoma", 8);
//create Excel styles
_styTitle = new XLStyle(_c1xl);
_styHeader = new XLStyle(_c1xl);
//set up styles
_styTitle.Font = new Font(_c1xl.DefaultFont.Name, 15, FontStyle.Bold);
_styTitle.ForeColor = Color.Blue;
_styHeader.Font = new Font(_c1xl.DefaultFont, FontStyle.Bold);
_styHeader.ForeColor = Color.White;
_styHeader.BackColor = Color.DarkGray;
//create report with one sheet per category
List categories = db.Categories.ToList();
foreach (Category category in categories)
{
CreateSheet(category);
}
//save xls file
string uid = System.Guid.NewGuid().ToString();
string filename = Server.MapPath("~") + uid + ".xlsx";
_c1xl.Save(filename);
return filename;
}
```
6. Add new worksheets to the Excel workbook for each product category using the following code.
```csharp
private void CreateSheet(Category category)
{
//get current category name
string catName = category.CategoryName;
//add a new worksheet to the workbook
//('/' is invalid in sheet names, so replace it with '+')
string sheetName = catName.Replace("/", " + ");
XLSheet sheet = _c1xl.Sheets.Add(sheetName);
//add title to worksheet
sheet[0, 0].Value = catName;
sheet.Rows[0].Style = _styTitle;
// set column widths (in twips)
sheet.Columns[0].Width = 300;
sheet.Columns[1].Width = 2200;
sheet.Columns[2].Width = 1000;
sheet.Columns[3].Width = 1600;
sheet.Columns[4].Width = 1000;
sheet.Columns[5].Width = 1000;
sheet.Columns[6].Width = 1000;
//add column headers
int row = 2;
sheet.Rows[row].Style = _styHeader;
sheet[row, 1].Value = "Product Name";
sheet[row, 2].Value = "Unit Price";
sheet[row, 3].Value = "Qty/Unit";
sheet[row, 4].Value = "Stock Units";
sheet[row, 5].Value = "Stock Value";
sheet[row, 6].Value = "Reorder";
//loop through products in this category
List products = db.Products.Where(pro => pro.CategoryID == category.CategoryID).ToList();
foreach (Product product in products)
{
//move on to next row
row++;
//add row with some data
sheet[row, 1].Value = product.ProductName;
sheet[row, 2].Value = product.UnitPrice;
sheet[row, 3].Value = product.QuantityPerUnit;
sheet[row, 4].Value = product.UnitsInStock;
//calculate value in stock
double valueInStock = Convert.ToDouble(product.UnitPrice) * Convert.ToInt32(product.UnitsInStock);
sheet[row, 5].Value = valueInStock;
sheet[row, 6].Value = product.ReorderLevel;
}
}
```
**Add a View for the controller**:
1. From the **Solution Explorer**, expand the folder **Controllers** and double click the controller (for example: `ExcelController`) to open it.
2. Place the cursor inside the method `Index()`.
3. Right click and select **Add View**. The **Add View** dialog appears.
4. In the **Add View** dialog, verify that the View name is **Index** and View engine is **Razor (CSHTML).**
5. Click **Add**. A view is added for the controller.
6. In the Solution Explorer, double click `Index.cshtml` to open it.
7. Replace the default code in the **Views\\Index.cshtml** file with the following code to display a message about the Excel file being saved to server.
```csharp
@{
Layout = null;
}
@Html.ActionLink("GenerateExcel", "GenerateExcel")
```
### Build and Run the Project
1. Click **Build | Build Solution** to build the project.
2. Press **F5** to run the project.
This creates a workbook with NorthWind product information using the C1XLBook control where each product category is placed on a separate worksheet.