# Using C1 Scaffolding
Develop powerful and lightweight web applications with Touch-first, flexible ASP.NET MVC controls and add these controls in your application using the scaffolding.
## Content
Scaffolding is a code generation technique used by some MVC frameworks, like ASP.NET MVC applications. It is added to an MVC project to quickly add code that interacts with data models. Using scaffolding can reduce the amount of time to develop standard data operations in your project.
This topic helps you understand how to add an ASP.NET MVC control in your application using C1 Scaffolding. The ComponentOne ASP.NET MVC Edition provides scaffolding for **FlexGrid, MultiRow, FlexSheet, FlexChart, FlexPie, Sunburst Chart, FlexRadar and Input** controls.
### Add C1 MVC control to scaffold
To add C1 MVC control in ASP.NET MVC application, follow these steps:
### Configure the Data Source
To configure the data source for an MVC application, you can use the **C1NWind** database. The **C1NWind.mdf** file is available on your system at the following location:
_Documents\\ComponentOne Samples\\ASP.NET MVC\\v4.5.2\\MVC\\CS\\MvcExplorer\\App\_Data_
The steps to generate database for the application are as follows:
1. Add **C1NWind.mdf** file to the App\_Data folder in the Solution Explorer.
2. In the Solution Explorer, right-click **Models | Add | New Item | Data**, and select **ADO.NET Entity Data Model**.
3. Name the model as **C1NWind**, and click **Add**.
4. In the **Entity Data Model Wizard**, select **EF Designer from database**, click **Next**.
**C1NWind.mdf** database is added to the data connection dropdown.
5. Click **Next** to choose Entity Framework version, and click **Next**.
6. In the **Choose Your Database Objects and Settings**, select Tables, and click **Finish**.
The **C1NWind.edmx** file gets added to your project under the **Models** folder on successfully configuring the data source for your application.
### Add Scaffolder
1. In the **Solution Explorer**, right-click the project name and select **Add | New Scaffolded Item**. The **Add Scaffold** wizard appears.
2. In the **Add Scaffold** wizard, select **Common** and then select **C1 Scaffolder** from the right pane. You can also select **Common | MVC | Controller** or **Common | MVC | View** and then **C1 Scaffolder** to add only a controller or a view.
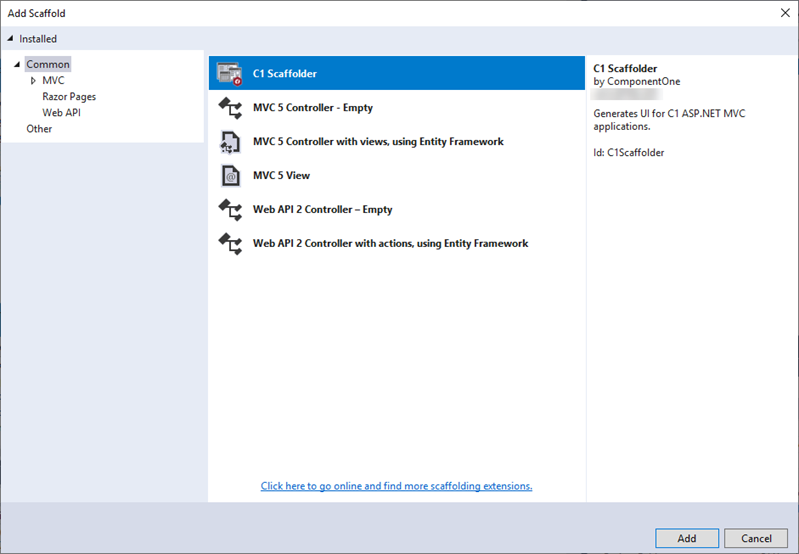
3. Click **Add**. The Add Scaffolder wizard appears.
### Add Control
1. Select a control as per your requirements, and then click **Next**. For example, we selected the **FlexGrid** control.
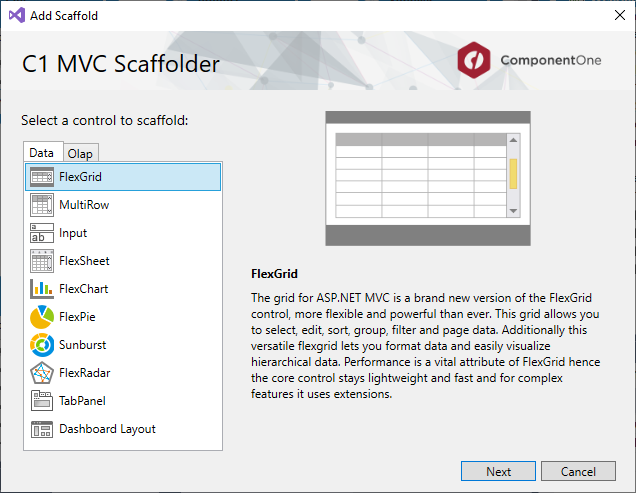
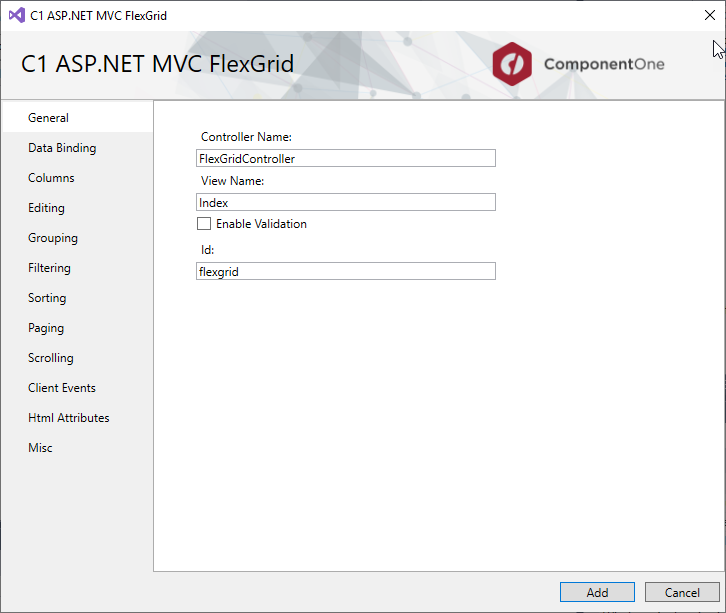
The **C1 ASP.NET MVC FlexGrid** wizard appears. By default, the wizard displays pre-filled fields in **General** tab.
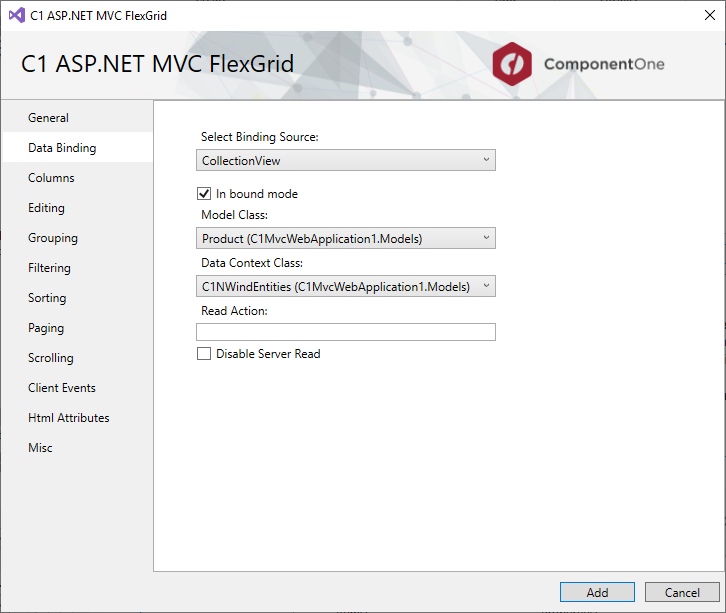
2. In the **Data binding** tab, specify the following:
1. Select **CollectionView** from the **Select Binding Source** drop-down.
2. Select **In bound mode** checkbox to be able to select the **Model class** and **Data Context Class**.
3. Select **Model Class** from the drop-down list. The list shows all the available model types in the application in addition to the C1NWind.edmx model added in Step 1. In our case, we selected **Product** to populate products in the FlexGrid.
4. Select **Data Context Class** from the drop-down list. In our case, we selected **C1NWindEntities**.
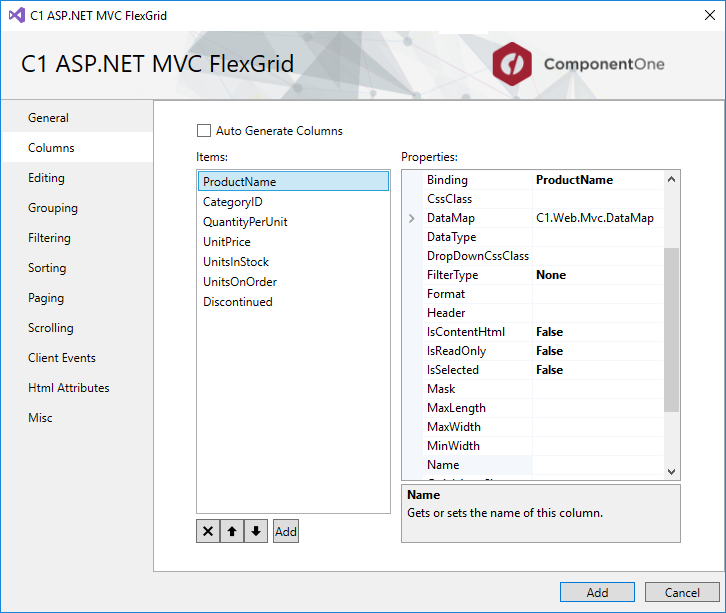
3. In the **Columns** tab, specify the columns in the FlexGrid control. By default, **Auto Generate Columns** is checked; if not, then you can add, delete, or move columns upward or downward in the sequence in which they should appear in the final view. In our case, we selected columns as shown in the following image:
4. In the **Editing** tab, select **Allow Edit** and **Allow Delete** check boxes.
5. In the **Grouping** tab, select **Show Groups** checkbox and **CategoryID** checkbox from **Group Descriptions** in the **Group Settings** panel, and provide a name in **Group Header Format**, say Group by Category ID.
6. In the **Filtering** tab, select **Allow Filtering** checkbox and let the other settings be same as default.
7. In the **Sorting** tab, select **Allow Sorting** and make sure **Show Sort** check box is also checked.
8. In the **Client Events** tab, select the **BeginningEdit** checkbox.
9. Click **Add**.
You will notice that the Controller and View for the selected model is added to your project. The codes generated for the Controller and View are as follows:
**FlexGridController.cs**
```csharp
using System;
using System.Collections.Generic;
using System.Linq;
using C1.Web.Mvc;
using C1.Web.Mvc.Serialization;
using System.Data;
using System.Data.Entity;
using System.Data.Entity.Validation;
using System.Web;
using System.Web.Mvc;
//This code was generated by C1 Scaffolder.
namespace C1MvcWebApplication1.Controllers
{
public class FlexGridController : Controller
{
C1MvcWebApplication1.Models.C1NWindEntities db = new C1MvcWebApplication1.Models.C1NWindEntities();
public ActionResult Index()
{
return View(db.Products);
}
public ActionResult Flexgrid_Update([C1JsonRequest]CollectionViewEditRequest requestData)
{
return Update(requestData, db.Products);
}
private ActionResult Update(CollectionViewEditRequest requestData, DbSet data) where T : class
{
return this.C1Json(CollectionViewHelper.Edit(requestData, item =>
{
string error = string.Empty;
bool success = true;
try
{
db.Entry(item as object).State = EntityState.Modified;
db.SaveChanges();
}
catch (DbEntityValidationException e)
{
error = string.Join(",", e.EntityValidationErrors.Select(result =>
{
return string.Join(",", result.ValidationErrors.Select(err => err.ErrorMessage));
}));
success = false;
}
catch (Exception e)
{
error = e.Message;
success = false;
}
return new CollectionViewItemResult
{
Error = error,
Success = success && ModelState.IsValid,
Data = item
};
}, () => data.ToList()));
}
public ActionResult Flexgrid_Delete([C1JsonRequest]CollectionViewEditRequest requestData)
{
return Delete(requestData, db.Products, item => new object[] { item.ProductID });
}
private ActionResult Delete(CollectionViewEditRequest requestData, DbSet data, Func getKeys) where T : class
{
return this.C1Json(CollectionViewHelper.Edit(requestData, item =>
{
string error = string.Empty;
bool success = true;
try
{
var resultItem = data.Find(getKeys(item));
data.Remove(resultItem);
db.SaveChanges();
}
catch (DbEntityValidationException e)
{
error = string.Join(",", e.EntityValidationErrors.Select(result =>
{
return string.Join(",", result.ValidationErrors.Select(err => err.ErrorMessage));
}));
success = false;
}
catch (Exception e)
{
error = e.Message;
success = false;
}
return new CollectionViewItemResult
{
Error = error,
Success = success && ModelState.IsValid,
Data = item
};
}, () => data.ToList()));
}
}
}
```
**Index**
```razor)
@using C1.Web.Mvc
@using C1.Web.Mvc.Fluent
@using C1.Web.Mvc.Grid
@model IEnumerable
@(Html.C1().FlexGrid()
.AllowDelete(true).AutoGenerateColumns(false).GroupHeaderFormat("Group by Category ID").OnClientBeginningEdit("flexgrid_BeginningEdit")
.Columns(csb=>
{
csb.Add().Binding("ProductName");
csb.Add().Binding("CategoryID");
csb.Add().Binding("QuantityPerUnit");
csb.Add().Binding("UnitPrice");
csb.Add().Binding("UnitsInStock");
csb.Add().Binding("UnitsOnOrder");
csb.Add().Binding("Discontinued");
})
.Filterable()
.Bind(cvsb=>cvsb
.GroupBy("CategoryID")
.Update(Url.Action("Flexgrid_Update")).Delete(Url.Action("Flexgrid_Delete")).Bind(Model))
.Height("800px").Id("flexgrid"))
```
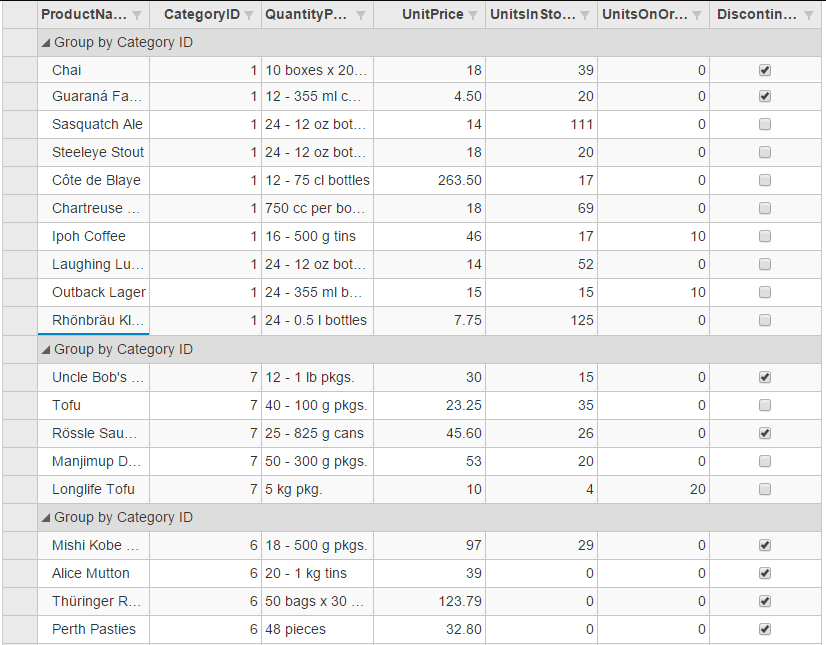
10. Run the project.
### Insert C1 MVC Control
In addition to adding C1 MVC controls at the time of application creation, you can also insert C1 MVC controls in an existing application using the **Insert C1 MVC Control** option. The **Insert C1 MVC Control** option allows you to easily add a fully functional control in the view code of an application. This option can be accessed through the context menu displayed in the design area of a View file in ASP.NET MVC application.
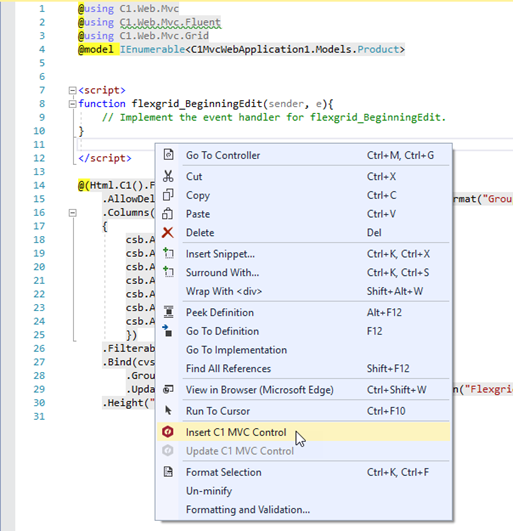
Selecting the **Insert C1 MVC Control** option from the menu invokes the **Add Scaffold** dialog, which can further be used the same way as described in step 2 and 3 of the above section.
### Update C1 MVC Control
Besides inserting C1 MVC Controls, you can also update C1 MVC controls in an existing application using the **Update C1 MVC Control** option. The **Update C1 MVC Control** option allows you to update the properties of a control. This option can be accessed through the context menu displayed in the design area of a View file in ASP.NET MVC application.
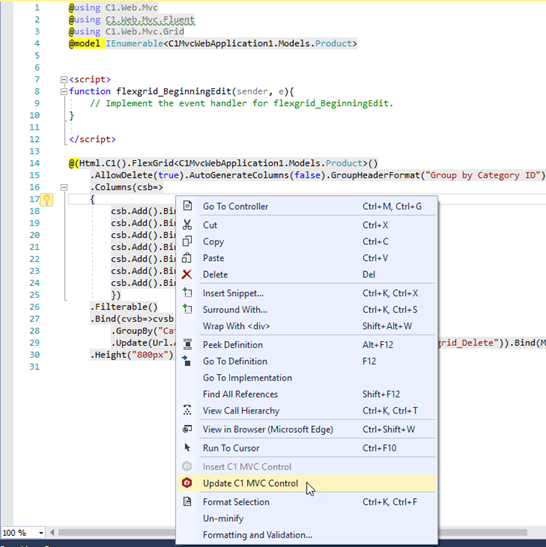
Selecting the **Update C1 MVC Control** option from the menu invokes the **Add Scaffold** dialog, which can further be used the same way as described in step 2 and 3 of the using C1 Scaffolder section above .