# Using Visual Studio Template
Develop powerful and lightweight web applications with ASP.NET MVC controls and Visual Studio Templates. Learn more about the Visual Studio templates in ASP.NET MVC documentation.
## Content
Visual Studio Project template allows you to create a simple ASP.NET MVC application. To use C1 MVC controls, few additional steps are required to configure the project created using the basic Visual Studio project template.
1. Open Visual Studio and Select **Create a new project**.
2. In the **Create a new project** window, select **ASP.NET Web Application (.NET Framework)** and click **Next**.
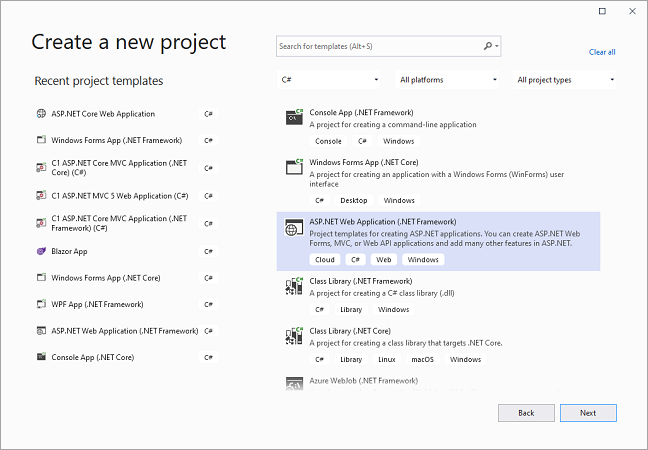
3. In the **Configure your new project** window, set a **Name** and **Location** for your application. Click **Create**.
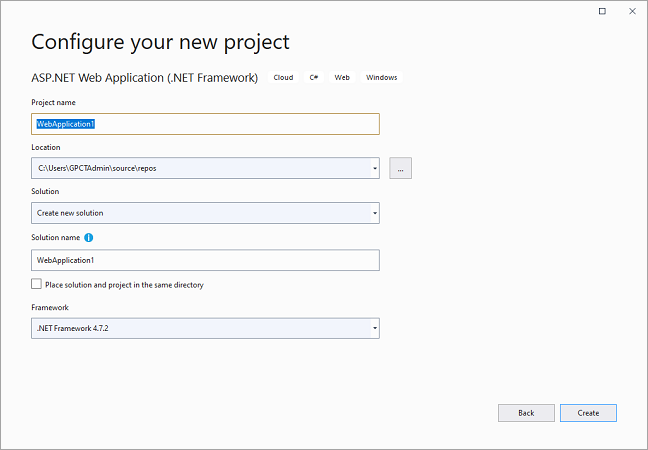
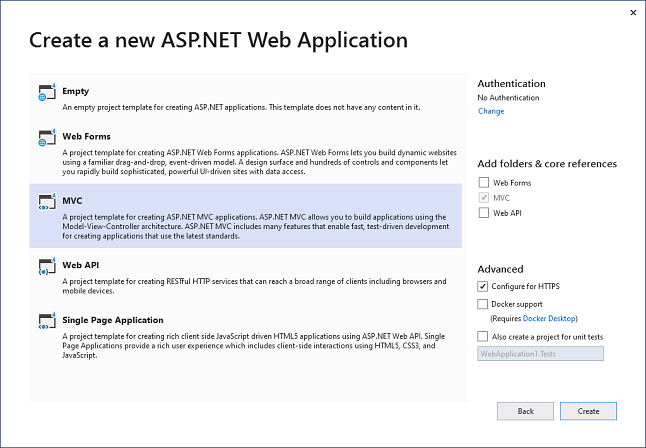
4. In the **Create a new ASP.NET Web application** window, select **MVC** and click **Create**.
5. From the **Solution Explorer**, expand the folder **Views** and double click the `web.config` file to open it.
6. Add the following markups in `\` tags, within the `` tags.
```html
```
7. (Optional) To add specific controls in your application, you need to add the following markups in \\ tags below the C1.Web.Mvc markup.
| **Control** | **Markup** |
| ------- | ------ |
| Financial Chart | `` |
| FlexSheet | ` ` |
| OLAP | ` ` |
| FlexViewer | ` ` |
| MultiRow | ` ` |
| TransposedGrid | ` ` |
| TransposedMultiRow | ` ` |
8. Save the changes made to web.config file.
9. Add a license file manually to the application. For detailed steps on adding the license file, see [Adding License File Manually](/componentone/docs/mvc/online-mvc/GettingStarted/Licensing#adding-license-file-manually).
10. Add the ASP.NET MVC Edition references to the project. In the **Solution Explorer**, right click **References \| Add Reference**. Now, browse to the location- **C:\\Program Files (x86)\\ComponentOne\\ASP.NET MVC Edition\\bin**, select **C1.Web.Mvc.dll** and click **Add**. Set the **Copy Local** property of the C1.Web.Mvc.dll to **True**.
11. (Optional) Add additional references to use specific controls in your MVC Application based on the control.
| **Control** | **Assembly** (**Location - C:\\Program Files (x86)\\ComponentOne\\ASP.NET MVC Edition\\bin**) |
| ------- | --------------------------------------------------------------------------------- |
| Financial Chart | `C1.Web.Mvc.Finance.dll` |
| FlexSheet | `C1.Web.Mvc.FlexSheet.dll` |
| OLAP | `C1.Web.Mvc.Olap.dll` |
| FlexViewer | `C1.Web.Mvc.FlexViewer.dll` |
| MultiRow | `C1.Web.Mvc.MultiRow.dll` |
| TransposedGrid | `C1.Web.Mvc.TransposedGrid.dll` |
| TransposedMultiRow | `C1.Web.Mvc.TransposedMultiRow.dll` |
>type=note
> **Note**: All the assemblies mentioned above automatically installs the required dependencies. For more information, see [Dependencies](/componentone/docs/mvc/online-mvc/GettingStarted/dependencies).
12. After completing the steps above, register the resources for the controls to be used in the application. For more information, see [Registering Resources](/componentone/docs/mvc/online-mvc/CreatingaNewProject/RegisteringResources).