# Model Binding
## Content
The topic describes how to add TreeView control to your MVC web application and add data to it using model binding. This topic comprises following three steps:
* [Step 1: Create a Datasource for TreeView](/componentone/docs/mvc/online-mvc-core/WorkingwithControls/TreeView/TreeViewFeatures/DataBindingTreeView/TreeViewModelBinding#step-1-create-a-datasource-for-treeview)
* [Step 2: Add a TreeView Control](/componentone/docs/mvc/online-mvc-core/WorkingwithControls/TreeView/TreeViewFeatures/DataBindingTreeView/TreeViewModelBinding#step-2-add-a-treeview-control)
* [Step 3: Build and Run the Project](/componentone/docs/mvc/online-mvc-core/WorkingwithControls/TreeView/TreeViewFeatures/DataBindingTreeView/TreeViewModelBinding#step-3-build-and-run-the-project)
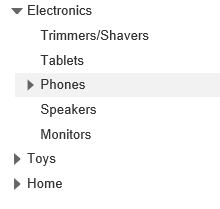
The following image shows TreeView control after completing the above steps.
### Step 1: Create a Datasource for TreeView
1. Add a new class to the **Models** folder (Name: `Property.cs`). For more information on how to add a new model, see [Adding Controls](/componentone/docs/mvc/online-mvc-core/Adding-Controls).
2. Add the following code to `Properties.cs` model. We are using `Property` class to represent a list of hierarchical data.
```csharp
using System;
using System.Collections.Generic;
using System.Linq;
using System.Web;
public class Property
{
public string Header { get; set; }
public string Image { get; set; }
public bool NewItem { get; set; }
public Property[] Items { get; set; }
public static Property[] GetData()
{
return new Property[]
{
new Property
{
Header = "Electronics",
Items = new Property[]
{
new Property { Header="Trimmers/Shavers" },
new Property { Header="Tablets" },
new Property { Header="Phones",
Items = new Property[] {
new Property { Header="Apple" },
new Property { Header="Motorola", NewItem=true },
new Property { Header="Nokia" },
new Property { Header="Samsung" }}
},
new Property { Header="Speakers", NewItem=true },
new Property { Header="Monitors" }
}
},
new Property{
Header = "Toys",
Items = new Property[]{
new Property{ Header = "Shopkins" },
new Property{ Header = "Train Sets" },
new Property{ Header = "Science Kit", NewItem = true },
new Property{ Header = "Play-Doh" },
new Property{ Header = "Crayola" }
}
},
new Property{
Header = "Home",
Items = new Property[] {
new Property{ Header = "Coffeee Maker" },
new Property{ Header = "Breadmaker", NewItem = true },
new Property{ Header = "Solar Panel", NewItem = true },
new Property{ Header = "Work Table" },
new Property{ Header = "Propane Grill" }
}
}
};
}
}
```
### Step 2: Add a TreeView Control
Steps to add a TreeView control to the application, are as follows:
**Add a new Controller**
1. In the **Solution Explorer**, right click the folder **Controllers.**
2. From the context menu, select **Add | Controller**. The **Add Scaffold** dialog appears.
3. In the **Add Scaffold** dialog, follow these steps:
1. Select the **Empty MVC Controller** template.
2. Set name of the controller (For example: `TreeViewController`).
3. Click **Add**.
4. Include the following references as shown below.
```csharp
using .Models;
```
5. Replace the **Index()** method with the following method.
```csharp
public ActionResult Index()
{
return View(Property.GetData(Url));
}
```
**Add a View for the Controller**
In the view, we create an instance of TreeView control and bind it to a data source using **Bind** method. The [DisplayMemberPath](/componentone/api/mvc/online-mvc-core/dotnet-api/C1.AspNetCore.Mvc/C1.Web.Mvc.TreeView.DisplayMemberPath.html) sets the text to be displayed in the tree nodes and [ChildItemsPath](/componentone/api/mvc/online-mvc-core/dotnet-api/C1.AspNetCore.Mvc/C1.Web.Mvc.TreeView.ChildItemsPath.html) sets the array of child nodes.
1. From the **Solution Explorer**, expand the folder **Controllers** and double click the `TreeViewController.`
2. Place the cursor inside the method `Index()`.
3. Right click and select **Add View**. The **Add View** dialog appears.
4. In the **Add View** dialog, verify that the View name is **Index** and View engine is **Razor (CSHTML).**
5. Click **Add** to add a view for the controller, and then copy the following code and paste it inside **Index.cshtml**.
```razor
@using TreeViewCore.Models
@model Property[]
```
### Step 3: Build and Run the Project
1. Click **Build | Build Solution** to build the project.
2. Press **F5** to run the project.
> type=note
> Append the folder name and view name to the generated URL (for example: http://localhost:1234/**TreeView/Index**) in the address bar of the browser to see the view.