# Model Binding
## Content
This topic describes how to add a FlexGrid control to your MVC application and populate data in it. The below example demonstrates local model binding in FlexGrid control. Refer to [Remote Data Binding](/componentone/docs/mvc/online-mvc-core/WorkingwithControls/FlexGrid/WorkwithFlexGrid/DataBindingFlexGrid/FlexGridDataBinding) for detailed explanation on how to do remote binding in FlexGrid.
This topic comprises of three steps:
* [Step 1: Create a Datasource for FlexGrid](/componentone/docs/mvc/online-mvc-core/WorkingwithControls/FlexGrid/WorkwithFlexGrid/DataBindingFlexGrid/Model-Binding#step-1-create-a-datasource-for-flexgrid)
* [Step 2: Add a FlexGrid control](/componentone/docs/mvc/online-mvc-core/WorkingwithControls/FlexGrid/WorkwithFlexGrid/DataBindingFlexGrid/Model-Binding#step2)
* [Step 3: Build and Run the Project](/componentone/docs/mvc/online-mvc-core/WorkingwithControls/FlexGrid/WorkwithFlexGrid/DataBindingFlexGrid/Model-Binding#step-3-build-and-run-the-project)
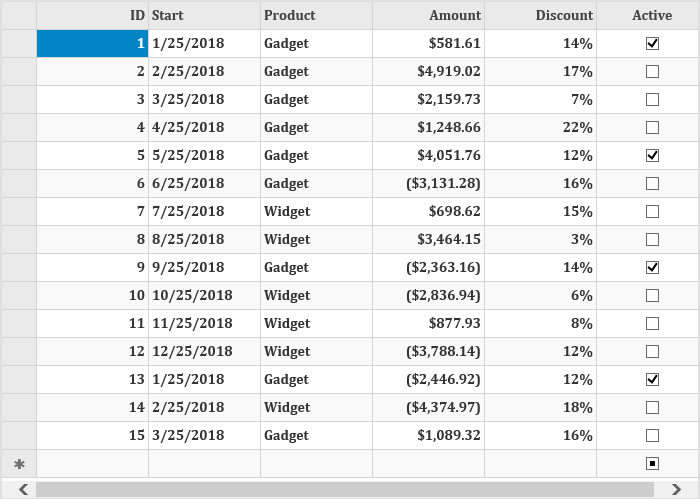
The following image shows how the FlexGrid appears after completing the steps above:
### Step 1: Create a Datasource for FlexGrid
2. Add a new class to the folder **Models** (for example: `Sale.cs`). See [Adding controls](/componentone/docs/mvc/online-mvc-core/Adding-Controls) to know how to add a new model.
3. Replace the following code in the new model to define the classes that serve as a datasource for the FlexGrid control.
```csharp
public class Sale
{
public int ID { get; set; }
public DateTime Start { get; set; }
public DateTime End { get; set; }
public string Country { get; set; }
public string Product { get; set; }
public string Color { get; set; }
public double Amount { get; set; }
public double Amount2 { get; set; }
public double Discount { get; set; }
public bool Active { get; set; }
public MonthData[] Trends { get; set; }
public int Rank { get; set; }
/// DOC-SUMMARY-TAG-OPEN
/// Get the data.
/// DOC-SUMMARY-TAG-CLOSE
///
///
public static IEnumerable GetData(int total)
{
var countries = new[] { "US", "UK", "Canada", "Japan", "China", "France", "German", "Italy", "Korea", "Australia" };
var products = new[] { "Widget", "Gadget", "Doohickey" };
var colors = new[] { "Black", "White", "Red", "Green", "Blue" };
var rand = new Random(0);
var dt = DateTime.Now;
var list = Enumerable.Range(0, total).Select(i =>
{
var country = countries[rand.Next(0, countries.Length - 1)];
var product = products[rand.Next(0, products.Length - 1)];
var color = colors[rand.Next(0, colors.Length - 1)];
var date = new DateTime(dt.Year, i % 12 + 1, 25, i % 24, i % 60, i % 60);
return new Sale
{
ID = i + 1,
Start = date,
End = date,
Country = country,
Product = product,
Color = color,
Amount = rand.NextDouble() * 10000 - 5000,
Amount2 = rand.NextDouble() * 10000 - 5000,
Discount = rand.NextDouble() / 4,
Active = (i % 4 == 0),
Trends = Enumerable.Range(0, 12).Select(x => new MonthData { Month = x + 1, Data = rand.Next(0, 100) }).ToArray(),
Rank = rand.Next(1, 6)
};
});
return list;
}
}
public class MonthData
{
public int Month { get; set; }
public double Data { get; set; }
}
}
```
### Step 2: Add a FlexGrid control
Complete the following steps to initialize a FlexGrid control.
**Add a new Controller**
1. In the **Solution Explorer**, right click the folder **Controllers.**
2. From the context menu, select **Add | Controller**. The **Add Scaffold** dialog appears.
3. Complete the following steps in the **Add Scaffold** dialog:
1. Select **Empty MVC Controller** template.
2. Set name of the controller (for example: `Default1Controller`).
3. Click **Add**.
4. Include the MVC references as shown below.
```csharp
using System.Collections;
using System.Globalization;
using System.Linq;
using System.Web.Mvc;
using C1.Web.Mvc;
using MVCFlexGrid.Models;
using System.Collections.Generic;
using System;
```
> type=note
> **Note**: Replace **MVCFlexGrid.Models;** with **_\._Models;**
in the references.
5. Replace the method Index() with the following method.
**IndexController.cs**
```csharp
public ActionResult Index()
{
return View(Sale.GetData(15));
}
```
**Add a View for the controller**:
1. From the **Solution Explorer**, expand the folder **Controllers** and double click the controller (for example: `Default1Controller`) to open it.
2. Place the cursor inside the method `Index()`.
3. Right click and select **Add View**. The **Add View** dialog appears.
4. In the **Add View** dialog, verify that the View name is **Index** and View engine is **Razor (CSHTML).**
5. Click **Add**. A view has been added for the controller.
6. In the Solution Explorer, double click `Index.cshtml` to open it.
7. Replace the default code of the **Views\\Index.cshtml** file with the one given below to initialize a **FlexGrid** control.
```html
@using TagFlexGrid.Models
@using C1.Web.Mvc.Grid
@model IEnumerable
```
### Step 3: Build and Run the Project
1. Click **Build | Build Solution** to build the project.
2. Press **F5** to run the project.