# Create Runtime App Key
## Content
This topic applies to licensing UWP, Xamarin, Web API and ASP.NET Core MVC applications which contain old versions of ComponentOne controls (version 2020 v1 and earlier). See the FAQ - [How do I find my ComponentOne product version?](/componentone/docs/license/online-license/faqs#q:-how-do-i-find-my-componentone-product-version?)
Note: It's highly recommended to update to the latest version for much easier licensing. For licensing the latest version, see [Licensing Applications](/componentone/docs/license/online-license/licensing-applications).
Older versions of ComponentOne UWP, Xamarin, Web API and ASP.NET Core MVC controls required that your application was licensed with a unique runtime app key.
The runtime app key can be generated through Visual Studio or developer.MESCIUS.com.
### Create Runtime App Key Through Visual Studio
1. From the **Tools** menu, select **MESCIUS > MESCIUS License Manager**
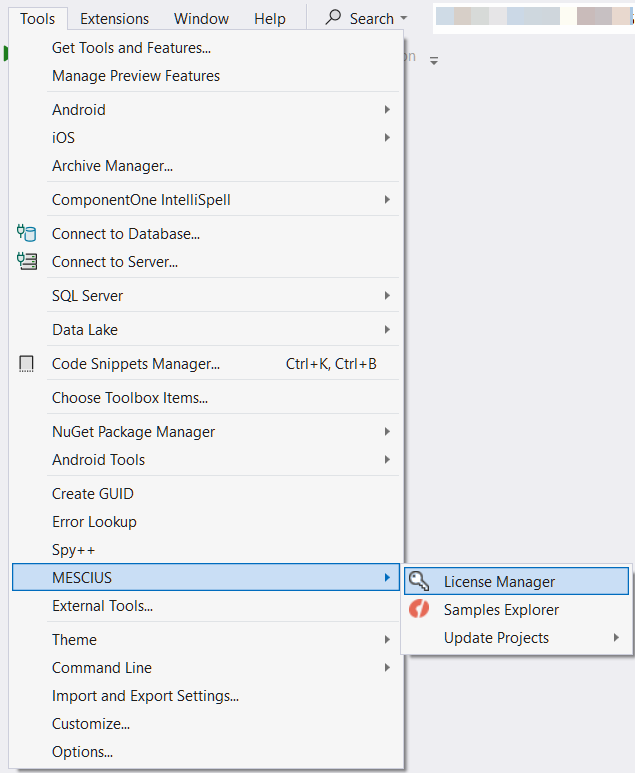
2. The **MESCIUS License Manager** window appears as shown in the image below:
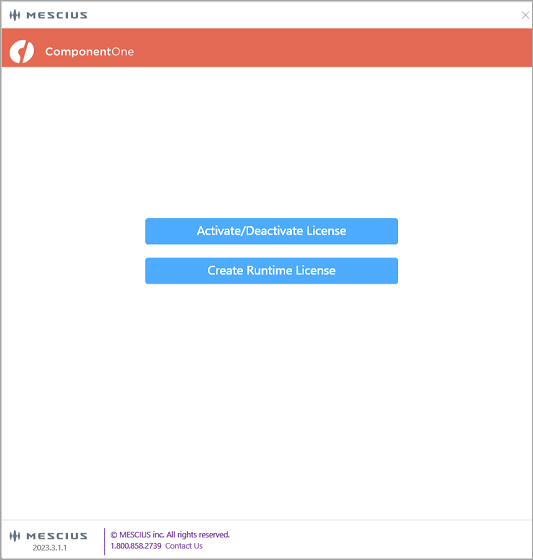
3. Select **Create RunTime License.** It allows the users to generate runtime license for the project(s). On clicking this option, the following window appears:
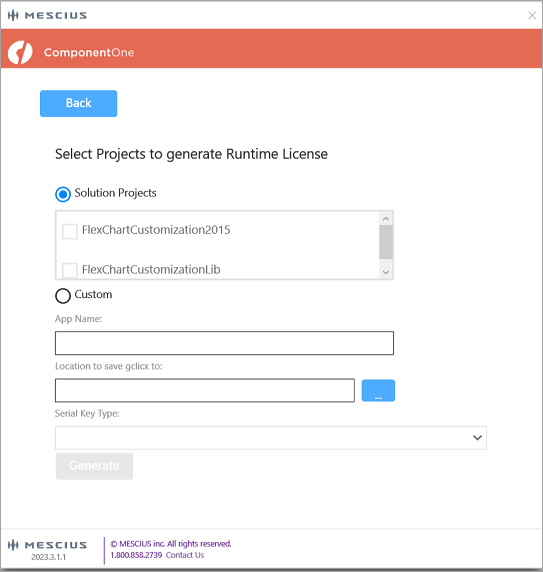
4. From the above window, you can license the project using **Solution Projects** or **Custom** options
In the **Solution Projects** option, select the license and the project for which license needs to be generated. On clicking the **Generate** button, a success message appears and a license file <**ProjectName>.gclicx** is generated.
On selecting **Custom** option, you can provide the **App Name** manually for which the license needs to be generated and the location where gclix file needs to save. Also select the type of license in the **Serial Key Type** dropdown. On clicking the **Generate** button, a success message appears and a license file <**ProjectName>.gclicx** is generated
### Create Runtime App Key Through MESCIUS.com
If you can't access the Visual Studio Extension, you may also generate runtime app keys from our website by following these steps:
1. Visit [https://developer.mescius.com/en/my-account/create-app-key](https://developer.mescius.com/my-account/create-app-key).
>type=note
> **Note**: You must create a MESCIUS account and login to access this web page.
2. If you are generating a full license, select your ComponentOne Ultimate serial number from the **Select License** drop-down menu on the page. If you are generating a trial license, leave it selected as **Evaluation**.
>type=note
> **Note**: You should have ComponentOne License to generate the runtime license.
3. Select app type from the **App Type** drop-down based on the type of application that you are building.
4. In the **App Name** textbox, enter the name of your application.
5. Click the **Generate APP KEY** button. A runtime license will be generated in the form of a string contained within a class.
6. Copy the license and complete the following steps to add it to your application.
1. Open your application in Visual Studio.
2. In the **Solution Explorer**, right click the project **YourAppName**.
3. Select **Add \| New Item**. The **Add New Item** dialog appears.
4. Under installed templates, select **Visual C\# \| Class\.**
5. Set the name of the class as License.cs and click **Add.**
6. In the class License.cs, replace the content with the copied runtime license key.
```auto
public static class License
{
public const string Key = "Your Key";
}
```
7. Follow the given step for the specific platform you are working on. **MVC**
From the **Solution Explorer**, open Startup.cs and assign the key as per the requirement to it as shown below.
```csharp
public void ConfigureServices(IServiceCollection services)
{
C1.Web.Mvc.LicenseManager.Key = License.Key;
C1.Web.Mvc.Finance.LicenseManager.Key = License.Key
C1.Web.Mvc.Sheet.LicenseManager.Key = License.Key
C1.Web.Mvc.Viewer.LicenseManager.Key = License.Key
C1.Web.Mvc.MultiRow.LicenseManager.Key = License.Key
C1.Web.Mvc.Olap.LicenseManager.Key = License.Key
C1.Web.Mvc.TransposedGrid.LicenseManager.Key = License.Key
}
```
**Web API**
From the **Solution Explorer**, open Startup.cs and assign the key to it as shown below.
```csharp
public void ConfigureServices(IServiceCollection services)
{
C1.Web.Api.LicenseManager.Key = License.Key;
services.AddMvc(); //To add Mvc services
}
```
**Xamarin**
From the **Solution Explorer**, open **App.xaml.cs** and set the runtime license, inside the constructor **App()** method as shown below.
```csharp
C1.Xamarin.Forms.Core.LicenseManager.Key = License.Key;
```
**UWP**
From the **Solution Explorer**, open the main initialization constructor for your app and set the runtime license as shown below.
```csharp
C1.UWP.LicenseManager.Key = License.Key;
```
**Service components**
From the **Solution Explorer**, open the main initialization constructor for your app and set the runtime license as shown below. In the following code, replace "XXX" with the service component's name. For example, DataEngine and TextParser.
```csharp
C1.XXX.LicenseManager.Key = License.Key;
```