# Deploy on AWS using a Linux Environment
This topic demonstrates how you can deploy your ActiveReports application on AWS using a Linux Environment.
## Content
This page demonstrates how you can deploy your ActiveReports application on AWS using a Linux Environment.
### Setup your application
1. Download the [JSViewer\_MVC\_Core](https://github.com/activereports/WebSamples19/tree/main/JSViewer_MVC_Core) sample from our [WebSamples19](https://github.com/activereports/WebSamples19) GitHub repository.
2. Open the application in Visual Studio and build and run the application.
3. Remove the **Reports** folder containing links to the reports from the project since we will be embedding the reports in the application.
4. Now add a new folder and name it 'Reports'.
5. Add all the files from **JSViewerReports** in the **Reports** folder and set the **Build Action** as 'Embedded Resource'.
6. If you are planning to publish the application on a Linux container, it is possible that the container might not contain the fonts used by reports. We will add a custom font resolver in our ActiveReports application that we are creating. For this please refer to our documentation page [Custom Font Resolver](/activereportsnet/docs/v20.1/developers/extensibility-in-activereports/custom-font-resolver).
1. Add a new folder **Fonts** in the project where we will add the required fonts.
2. Add all the required fonts in the **Fonts** folder and then
* make sure to set the **Build Action** of the font files to ‘Embedded Resource'.
OR
* add the following lines of code to the JSViewer\_MVC\_Core.csproj file to copy all the fonts to the build folder:
```xml
PreserveNewest
```
3. Add the following code in the .cs file to the add the script.
```csharp
using GrapeCity.Documents.Text.Windows;
public sealed class CustomFontResolver : GrapeCity.ActiveReports.IFontResolver
{
static readonly GrapeCity.Documents.Text.FontCollection _fonts = new GrapeCity.Documents.Text.FontCollection();
static CustomFontResolver()
{
_fonts.Clear();
var assembly = Assembly.GetExecutingAssembly();
var fontnames = assembly.GetManifestResourceNames().Where(str => str.EndsWith(".ttf"));
foreach (var fontname in fontnames)
{
Stream stream = assembly.GetManifestResourceStream(fontname);
_fonts.Add(GrapeCity.Documents.Text.Font.FromStream(stream));
}
_fonts.DefaultFont = _fonts.FindFamilyName("Arial");
}
public static GrapeCity.ActiveReports.IFontResolver Instance = new CustomFontResolver();
private CustomFontResolver() { }
GrapeCity.Documents.Text.FontCollection GrapeCity.ActiveReports.IFontResolver.GetFonts(string familyName, bool isBold, bool isItalic)
{
var fonts = new GrapeCity.Documents.Text.FontCollection();
var font = _fonts.FindFamilyName(familyName, isBold, isItalic);
if (font != null) fonts.Add(font);
fonts.Add(_fonts.DefaultFont);
return fonts;
}
}
```
4. In Startup.cs, specify the **UseFontResolver** property in the JavaScript Viewers as in the following code example.
```csharp
app.UseReportViewer(settings =>
{
settings.UseFontResolver = CustomFontResolver.Instance;
settings.UseEmbeddedTemplates(EmbeddedReportsPrefix, Assembly.GetAssembly(app.GetType()));
settings.UseCompression = true;
});
```
### Setup a user in AWS
Once you have set up everything the next step is to create a user in your AWS Account. You can also visit [AWS Docs](https://docs.aws.amazon.com/IAM/latest/UserGuide/getting-started.html) for more information.
1. Open the Sign In Page.
> type=note
> **Note**: If you are new to AWS then Sign Up to AWS and add MFA Authentication by logging in as a Root User first.
2. Select **IAM user** and enter your credentials.
3. Now from the AWS Management Console under All Services, select **IAM**. This will open the IAM Dashboard.
4. Select **Users** under the **Access Management** group
5. Click **Add users** on the top right of your screen. This will open the Add user page.
6. Set the **User name**. Here, for documentation purposes, we are adding 'AR\_Deployment\_Agent' as the username.
7. Select the **Access key-Programmatic access** that gives this user programmatic access. Then click **Next: Permissions**.
8. Now we will add a user to a group. Select an existing group or create a new group:
a. Click on **Create a Group** option.
b. Enter the **Group Name**. Here we are using 'AR\_Deployment\_Agents' as the group name.
c. In the policies option, check **AdministratorAccess-AWSElasticBeanstalk** and **IAMFullAccess**.
d. Click **Create** group.
9. Click **Next: Tags**. Here you can add the tags that can be used in your application for now we are going to skip this.
10. Click **Next: Review**. Here, you can review the user properties and then select **Create user**.
11. Now copy the **Access key ID** and **Secret access key** and save it.
Note you can also download the CSV from this page.
### Setup AWS Profile in Visual Studio
Now that we have set up everything on the AWS account, let us set up our application with AWS and deploy it on the cloud.
1. Open the JSViewer\_MVC\_Core sample in Visual Studio.
2. From **View**, go to **AWS Explorer**.
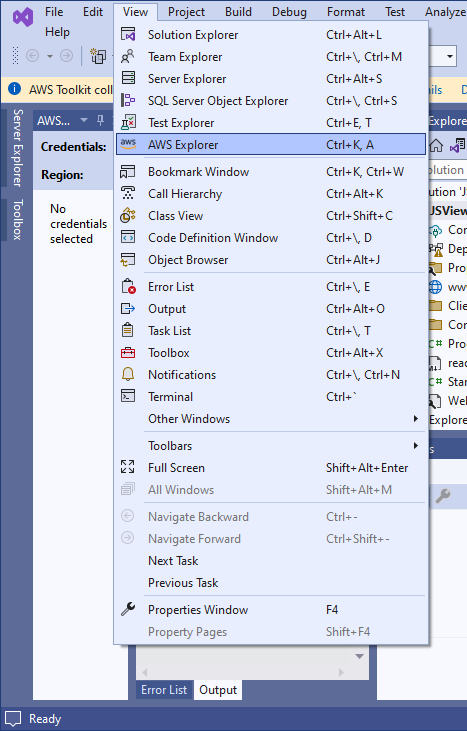
3. In the AWS Explorer window, click the “+” icon to create a new profile.
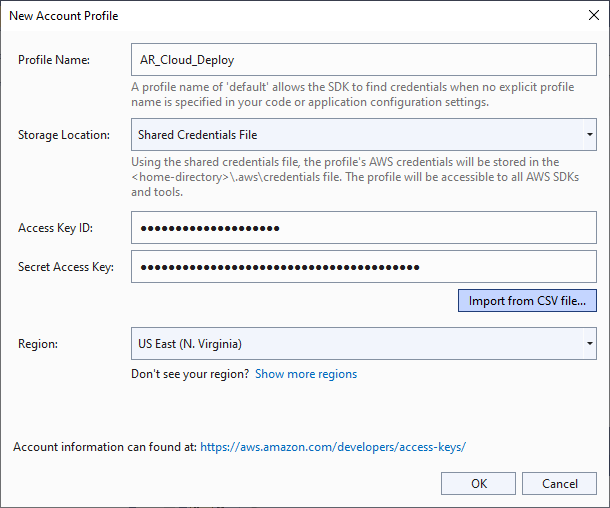
4. Enter a **Profile Name** (AR\_Cloud\_Deploy), the saved **Access Key ID**, and the **Secret Access Key**.
Note that you can also import the CSV if you chose to download it while creating the user account.
### Publish and deploy your application
To publish your application for AWS Elastic Beanstalk, follow these steps.
1. Right-click on the project in the Solution Explorer and click **Publish to AWS Elastic Beanstalk**.. option in the context menu.
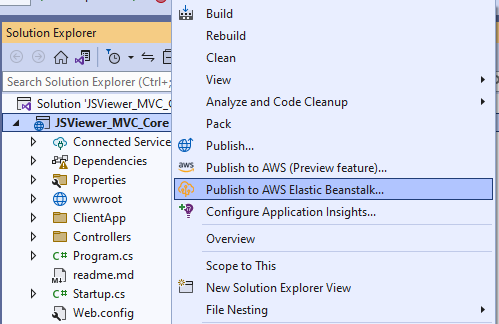
2. Now in the Publish to Amazon Web Services window, set the Region. Although AWS has many different regions for this sample, we are selecting the region as US East (N. Virginia).
3. Select **Create a new application environment** option and then **Next**.
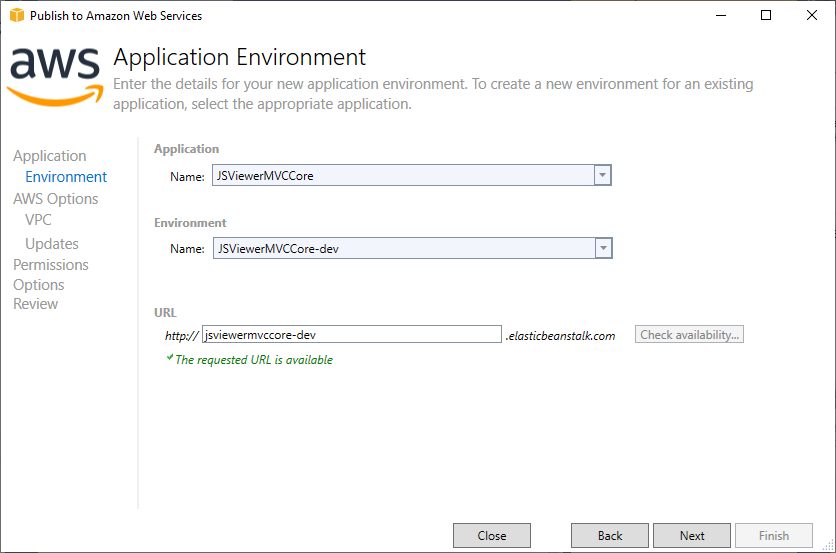
4. Set the **Application** **Name** and the **Environment** **Name**.
A URL should be added automatically after the previous step. You can add some other URL as well.
5. Check the URL availability by clicking the **Check availability**… button. If the URL is available, “The requested URL is available” message should appear on your screen. Now, click **Next**.
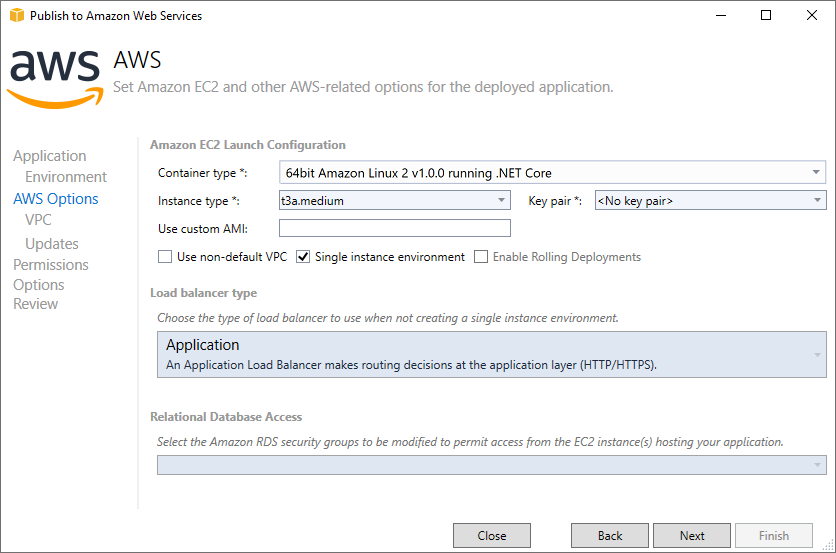
6. Set the **Container type** to **64bit Amazon Linux 2 v1.0.0 running NET Core.** Now, click Next.
Now, we must configure all our **AWS Options**. For the sample purposes, we are leaving most of the options as default.
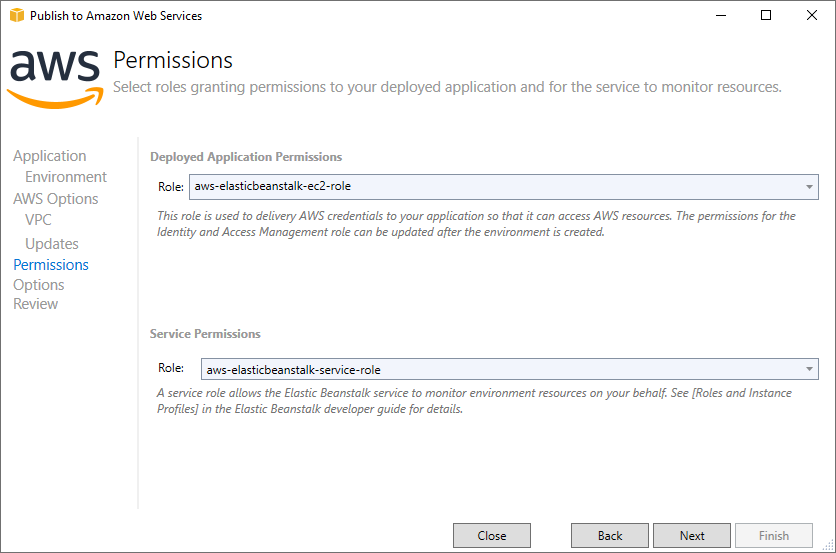
7. In the next **Permissions** window, we will select roles granting permissions to your deployed application for the service to monitor resources. Input the following values in the permissions options and then click **Next**.
**Deployment Application Permissions**
Role: aws-elasticbeanstalk-ec2-role
**Service Permissions**
Role: aws-elasticbeanstalk-service-role
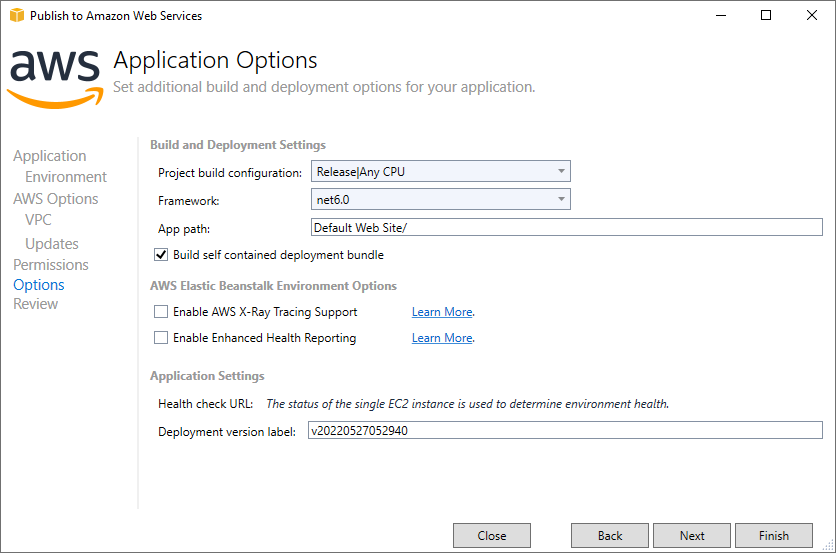
8. In the **Application** **Options** window, change the **Project build configuration** from Debug|Any CPU to **Release|Any CPU**.
9. Set the **Framework** to net6.0.
10. Check the **Build self contained deployment bundle** option and then click **Next**.
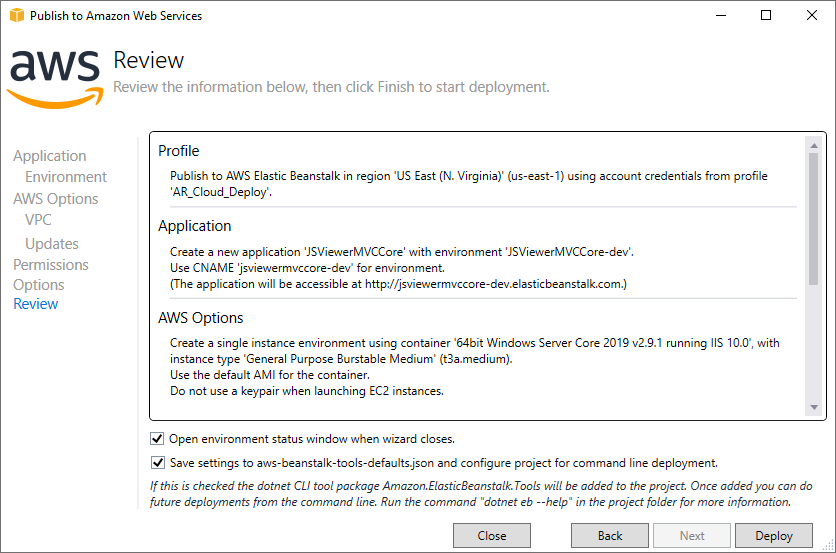
11. Go through the **Review** page to ensure you have selected all the required options as per your organization and application.
12. Click **Deploy**.
Once you click Deploy, it takes several minutes to create the environment and launch your ActiveReports application to the cloud.
Once your application is successfully launched, you will see the following Event statement in the Event’s tab in the Environment window:
> type=note
> Successfully launched environment: JSViewerMVCCore-dev
Also, the Status of the environment would be Environment is healthy.
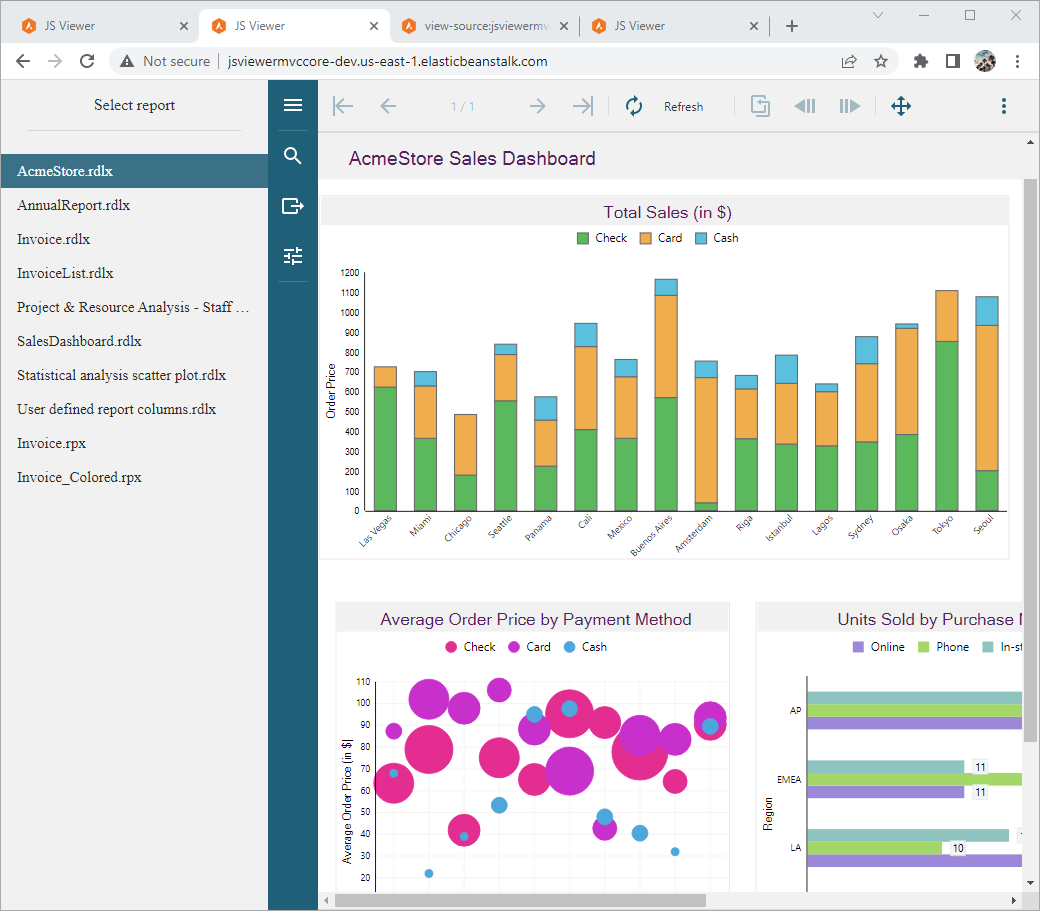
Now your application has successfully launched to the cloud. Now you can open it using the URL given at the top of the Environment window.
### Clean up
To avoid any incurring charges if you are done working with Elastic Beanstalk for now, you can terminate your .NET environment. To terminate your **Elastic Beanstalk** environment:
1. Open the **Elastic Beanstalk** **console**, and in the Regions list, select your AWS Region
2. In the navigation pane, choose **Environments**, and then choose the name of your environment from the list.
3. Choose **Environment actions** and then choose **Terminate environment**.