# Customizing the WebViewer UI
This topic explains how you can customize the WebViewer interface using JQuery methods.
## Content
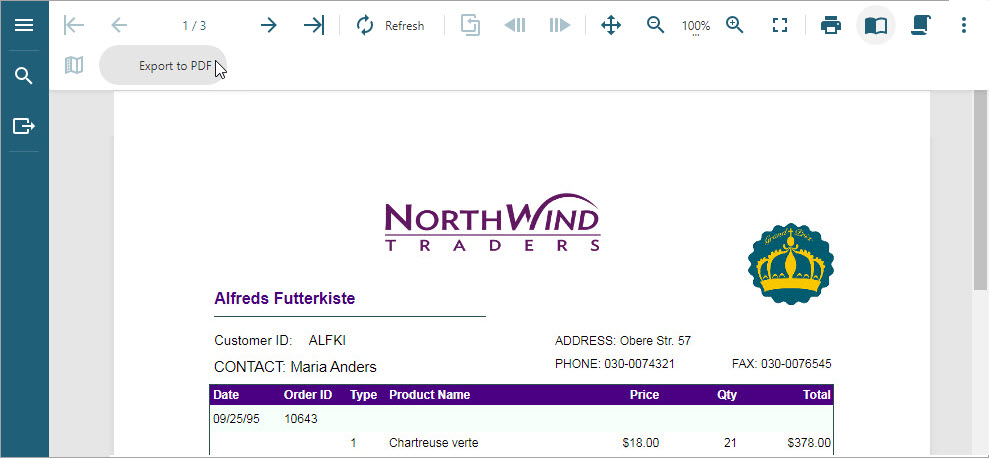
You can customize the WebViewer interface using JQuery methods. WebViewer control adds JQuery library in page scripts. Use the code in this walkthrough to add a button on the toolbar and add a client side PDF export implementation.
When you complete this walkthrough you get a WebViewer that looks similar to the following at run time.
## Load an ActiveReport to the Web application
1. Create a new Visual Studio **ASP.NET Web Forms** application.
2. Install **MESCIUS.ActiveReports.Web** package. Go to **Tools > NuGet Package Manager > Manage** **NuGet Packages** **for Solution...**, browse for the package and click **Install**.
3. In Solution Explorer, right-click the project and select **Add > New Item**.
4. Select WebForm and click **Add**.
5. Go to the **Design** view of the newly added WebForm.aspx and drag and drop the WebViewer control to the WebForm designer. The default viewer type is **HTMLViewer**.
6. Load a report in the WebViewer by setting the **ReportName** property.
> type=note
> **Note**: You may load any report, section or page in the HTMLViewer viewer type of WebViewer. See [ASP.NET WebViewer Application](/activereportsnet/docs/v20.1/developers/create-applications/aspnet-webviewer-application) for information on loading a report.
## Add the jQuery library to the Web application project
In the Source view of the **WebForm.aspx** file, add the following code.
```
```
## Access the WebViewer view model
The HTML WebViewer is created using the MVVM pattern that provides a view model which does not depend on the UI. The code can access the Viewer's view model and bind the custom UI to it by using well-documented properties and methods. For MVVM support, the code can use knockout.js which is the standard MVVM library for JavaScript. Knockout.js provides declarative bindings, observable objects and collections in HTML markup.
Follow the steps below to access the ViewModel.
1. In the Source view of the **WebForm****.aspx** file, add a \
...
```
3. Add the following Javascript code inside the **viewer\_loaded** event handler to access WebViewer's view model:
```javascript
function viewer_loaded()
{
var viewModel = GetWebViewer('ArWebViewerDiv_WebViewer1');
};
```
4. Add the following Javascript code inside the **document\_onload** event handler to bind WebViewer's Loaded event to client side viewer\_loaded event:
```javascript
function document_onload()
{
$('#WebViewer1').ready(viewer_loaded);
};
```
## Add a button to the WebViewer toolbar
In the Source view of the WebForms.aspx file, add the following Javascript code inside the **viewer\_loaded** event handler to access the WebViewer toolbar. Lets add the custom button in the toolbar - an export button and add PDF export functionality to it.
```javascript
function viewer_loaded()
{
var viewModel = GetWebViewer('ArWebViewerDiv_WebViewer1');
var pdfExportButton = {
key: '$pdfExportButtonKey',
text: 'To PDF',
iconCssClass: 'mdi mdi-file-pdf',
enabled: true,
action: function (item) {
console.log('Export to PDF function works here');
},
onUpdate: function (arg, item) {
console.log(The Viewer UI was updated, check/update button state here');
}
};
viewModel.toolbar.desktop.addItem(pdfExportButton);
};
```
The complete code for WebForm1.aspx in the Source view is as shown:
```html
<%@ Page Language="C#" AutoEventWireup="true" CodeBehind="WebForm1.aspx.cs" Inherits="WebApplication1.WebForm1" %>
<%@ Register assembly="MESCIUS.ActiveReports.Web" namespace="GrapeCity.ActiveReports.Web" tagprefix="ActiveReportsWeb" %>
```
## To remove a button from the viewer's UI
```javascript
function viewer_loaded()
{
var viewModel = GetWebViewer('ArWebViewerDiv_WebViewer1');
...
viewModel.toolbar.desktop.removeItem($newButtonKey); //(key of the button)
};
```
> type=note
> **Note**:
>
> * Replace 'WebViewer1' in the code snippets above, with the actual ID of the WebViewer control in your application.
> * When trying to get access of a WebViewer using GetWebViewer method, we should add 'ArWebViewerDiv\_' prefix before the WebViewer ID.
> * In case you provide report name which contains special symbols (like backslash '\\'), e.g. webViewer.ReportName="Folder\\Report.rdlx", you need to update the web.config file to allow such characters. Otherwise, "Report not found" error occurs. Please see [Troubleshooting](/activereportsnet/docs/v20.1/ar-troubleshooting) on resolving this issue.
> * If your report has parameters, you can choose to set the parameters pane position to the top of the viewer using the **ParametersPanelLocation** to 'Top'.