# Add Data to a Map
Learn to add analytical and spatial data to maps in your reports with ActiveReports.
## Content
ActiveReports provide numerous ways to add spatial data to the map. You can either use the **Map** **Wizard** and add data from an ESRI shapefile or use the **Map Layer Data Properties** dialog for using advance options. You can also add spatial data from the Properties Panel.
## Add Spatial Data
### Using Map Wizard
1. From the Visual Studio toolbox, drag and drop a [Map](/activereportsnet/docs/v19.2/report-authors/report-controls/report-controls-page-rdl-report/map) control onto the design surface.
2. In the **Select a Map Template** wizard that appears, select **From ESRI file**.
3. In the **Open** dialog that appears, navigate to the folder that contains the .shp and .dbf files, select the .shp file, use the Map Resolution slider to simplify vector data and click **Open**.
This option automatically imports the spatial data stored in the shapefile and adds a related layer to the map control.
### Using the Map Layer Data Properties dialog
The **Map Layer Data Properties** dialog provide the following advance options to add spatial data. For more information on Map Layer Data Properties dialog, see [Map](/activereportsnet/docs/v19.2/report-authors/report-controls/report-controls-page-rdl-report/map).
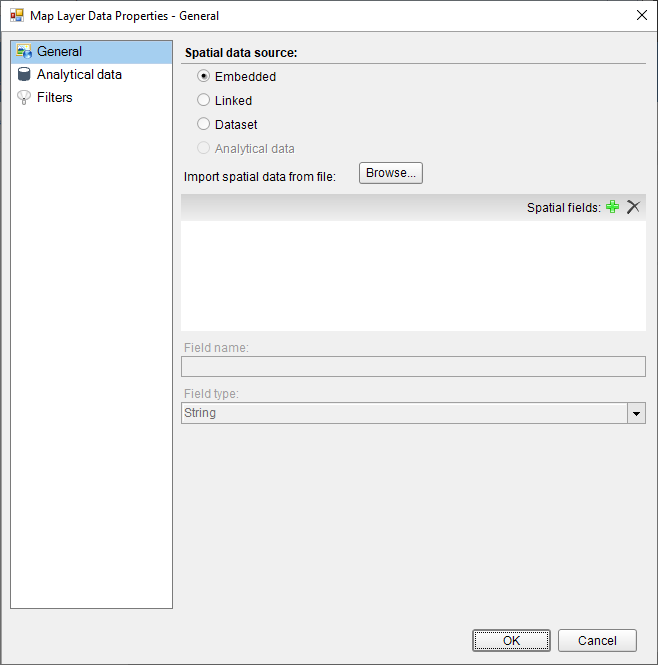
**Embedded**: Use this option where you want to add spatial data from an ESRI file along with an additional option of adding custom spatial data fields if required.
### Add Spatial data from an ESRI file using the Embedded option
1. In the **Map Layer Data Properties** dialog, on the **General** page, select the **Embedded** option and click the **Browse** button.
2. In the **Open** dialog that appears, navigate to the folder that contains the .shp and .dbf files.
3. Select the .shp file, use the Map Resolution slider to simplify vector data and click **Open**. The fields list gets populated with spatial data fields that are added from the shapefile.
4. In **Dataset**, set the name of the dataset.
5. In the Fields list, click the Add (+) button to add a new empty spatial data field.
6. With the newly added spatial data field selected in the list, in **Field name**, enter the name of the field.
7. In **Field type**, set the field type of newly added spatial data field.
8. Click **OK** to close the dialog.
> type=note
> **Note**: In order to apply the new spatial data field on a layer, you must provide its value for each map layer element like polygons, points or lines in the added map layer Designer Collection Editor dialog.
**Linked**: Use this option when you just want to add spatial data from an ESRI shapefile without any additional modifications or additions.
### Add Spatial data from an ESRI file using the Linked option
1. In the **Map Layer Data Properties** dialog, on the **General** page, select the **Linked** option and click the **Browse** button.
2. In the **Open** dialog that appears, navigate to the folder that contains the .shp and .dbf files.
3. Select the .shp file and click **Open**.
4. Click **OK** to close the dialog.
**Dataset**: Use this option when you have a dataset that stores a spatial data field to provide spatial data to the Map. You can directly use the data fields from the dataset to display data on a map layer without setting the match fields for analytical data. Therefore, it also provides you an additional option of having different dataset for analytical data and spatial data respectively.
### Add Spatial data from a Dataset
1. In the **Map Layer Data Properties** dialog, on the **General** page, select the **Dataset** option.
2. In **Dataset**, set the name of the dataset.
3. In **Field name**, enter the data field name that contains the spatial data.
> type=warning
> **Caution**:
>
> * Simply type the name of the dataset field that contains spatial data. For example, enter value as **_StateName_**, not as _**=[StateName\]**._
> * You cannot use the MapPoint() function in parameters.
4. Click **OK** to close the dialog.
> type=note
> **Note**:
>
> * **MapPoint()** function is supported for Point layer only.
> * Simple (non spatial) data can also be added as Spatial field using MapPoint() expression as ` =MapPoint(, )` from Expression Editor.
**Analytical** : Use this option when you want to use the spatial data field from the same dataset that you may use for adding Analytical data to the layer. For using this option you need to first set the dataset for analytical data and then use the spatial data field from the dataset to provide spatial data to the map layer.
### Add spatial data from Analytical data
1. Configure Analytical data for the Map control. See the dropdown section below to learn adding Analytical data.
> type=note
> **Note**: Once the Analytical data has been set, the Analytical option on the General page of the Map Layer Data Properties dialog becomes active.
2. In the **Map Layer Data Properties** dialog, on the **General** page, select the **Analytical** option.
3. In **Field name**, enter the data field name that contains the spatial data.
> type=warning
> **Caution**: In **Field name**, enter the data field name as **_**=[StateName\]**_**, not as _**StateName**._
4. Click **OK** to close the dialog.
### Using Properties Panel
These steps assume that you have a Map control containing at least one map data layer placed on the design surface. To learn how to add a layer to the Map control, see [Layers](/activereportsnet/docs/v19.2/report-authors/design-reports/design-page-rdl-reports/layers).
1. With the Map control selected, go to the Properties window, click the **Layers (Collection)** property and then click the ellipsis button that appears.
2. In the **LayerDesigner Collection Editor** that appears, under Members, select the map data layer you want to use and expand the **SpatialData** property.
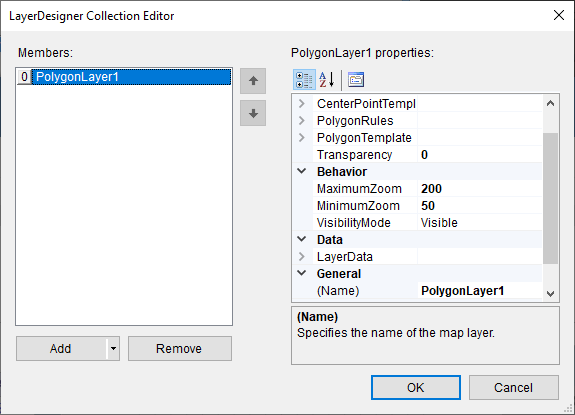
3. In **Type**, choose the spatial data source of the layer from the following supported options:
* **Embedded**: Use this option when you want to add custom spatial data to the map data layer. This can be done by first adding the spatial data fields for the embedded spatial data using the MapFieldDefinitionDesigner Collection Editor which can be accessed through the **FieldDefinitions** property. And then later adding spatial data (points, polygons or lines) using the PolygonDesigner Collection Editor, PointsDesigner Collection Editor or LineDesigner Collection Editor depending on the layer in use. These Editor dialogs can be accessed using the **SpatialData** > **Polygons**, **SpatialData** > **Points** or **SpatialData** > **Lines** property.
* **File**: Use this option when you want to add spatial data from an ESRI file. Use the **Source** property to specify the location of the shapefile.
> type=note
> **Note**: The specified location must contain the shape format (.shp) and attribute format (.dbf) files.
* **DataSet**: Use this option when you have a dataset that stores a spatial data field to provide spatial data to the Map. This option is equivalent to the DataSet option in the **Map Layer Data Properties** dialog. Use the **SpatialData** > **DataSetName** property to specify the name of the dataset and the **SpatialData** > **SpatialField** property to specify the data field that contains spatial data.
> type=note
> **Note**:
>
> * **MapPoint()** function is supported for Point layer only.
> * Simple (non spatial) data can also be added as Spatial field using MapPoint() expression as ` =MapPoint(, )` from Expression Editor.
> type=note
> **Caution**: You cannot use the **MapPoint()** function in parameters.
* **DataRegion**: Use this option when you have a dataset that stores a spatial data field to provide spatial data to the Map. This option is equivalent to the **Analytical** option in the **Map Layer Data Properties** dialog. Use the **LayerData** > **DataSetName** property to specify the name of the dataset and the **SpatialData** > **VectorData** property to specify the data field or expression that contains spatial data.
4. Click **OK** to close the dialog.
## Add Analytical Data
Analytical data is the data that you want to visualize on the map, for example, tourist attractions in a city or product sales by region. For analytical data, you can associate it with map elements by indicating match fields in the **Match** box of the **Map Layer Data Properties** dialog. You can use one or more fields in the **Match** box of the **Map Layer Data Properties** dialog; for each spatial data field you must indicate a unique analytical data field. This data is optional.
You can get analytical data from the following types of data sources.
* **Dataset field**: A field from a dataset.
* **Spatial data source field**: A field from the spatial data source. For example, you can often find that an ESRI Shapefile contains both spatial and analytical data. Field names from the spatial data source are marked with the # sign in the drop-down list of fields.
* **Embedded data for a map element**: After you embed polygons, lines, or points in a report, you can select the data fields for map elements and define custom values.
### Add Analytical Data to the Map control
Use the following steps to add analytical data to the map. These steps assume that you have added a page layout template to your report and have a data connection in place.
1. Add spatial data to the map control. See the dropdown sections above to learn adding spatial data to the map control.
2. In the **Map Layer Data Properties** dialog, go to the **Analytical data** page.
3. Select the dataset that you want to use from the **Dataset** dropdown list and click the **Add** (+) button located next to the **Match** field. This creates an empty match field expression and enables the **Spatial** and **Analytical** field properties.
4. In the **Spatial field** and **Analytical field** options set data fields that contain same data in both Spatial and Analytical databases. This builds the match field expression and relates analytical data to map elements on a map layer.
> type=note
> **Note**: It is necessary to set match fields if you want to use a spatial data field from analytical data, or if you want to visualize analytical data on the map layer. Match fields enable the report processor to build a relationship between the analytical data and the spatial data.
5. Click **OK** to close the dialog.
## See Also
[Map](/activereportsnet/docs/v19.2/report-authors/report-controls/report-controls-page-rdl-report/map)