# Document Map
Document map in ActiveReports provides a convenient way to navigate a lengthy report. Learn how to export and view the document map in Viewer.
## Content
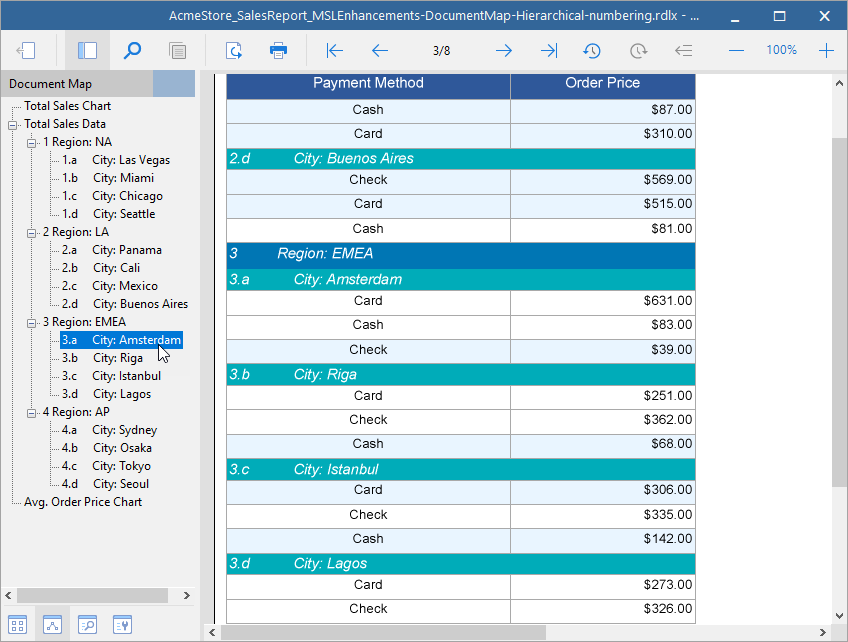
A document map functions as a table of contents and provides a convenient way to navigate a lengthy report. When you click an item in the document map, the viewer jumps to that item in the report.
In a Page or an RDLX report, you can add report controls, data regions, groups and detail groups to the document map. In an RDLX and RDLX Dashboard reports, the report sections too can be added to the document map.
## Viewing the Document Map
1. On the Viewer toolbar, click the **Side Panel** button to display the sidebar.

2. At the bottom of the sidebar pane, click the **Document Map** button to display the document map.
If there is no document map associated with the report, the button does not appear at the bottom of the sidebar pane.
3. In the Document map that appears, click the item you want to navigate to in the report.
## Exporting Document Map
At preview, the document map appears in a sidebar to the left of the report, but when you export your report to various file formats, they handle document maps differently.
| Export Filter | Effect on Document Map |
| --- | --- |
| HTML | A .toc file containing the document map is exported along with the HTML report. |
| PDF | Document map appears in the bookmarks panel. |
| Text | Document map does not appear in the exported report. |
| Rich Text Format | Document map does not appear in the exported report. |
| TIFF | Document map does not appear in the exported report. |
| Excel | Document map does not appear in the exported report. |
> type=note
> **Note**: For printing and rendering purposes use [Table of Contents](/activereportsnet/docs/v19.2/report-authors/report-controls/report-controls-page-rdl-report/tableofcontents) control in your report to display a navigation pane.
### DocumentMap Property of Report
The report items that appear in the Document Map are based on the settings in the **DocumentMap** property as described below. For the setting to apply, the report controls or the report sections must have the **Label** property or the **HeadingLevel** (available for only TextBox control) property set.
* **Levels**: Customize the document map levels.
* **NumberingStyle**: Specifies the numbering style for headings.
* **Source**:
* None: No navigation nodes are added to the document map.
* Labels Only: Shows navigation nodes for the report controls or sections that have **Label** property set. The report sections' labels are displayed as a parent for all available labels in that section.
* Headings Only: Shows navigation nodes for the TextBox controls that have **HeadingLevel** property (Heading 1, Heading 2, etc.) set. The numbering is applied only to TextBox controls that have HeadingLevel property set. Note that numbering is not applicable to the report sections.
* Labels and Headings: Shows both Labels and Headings in the navigation panel.
## To add a report section to the Document Map
1. On the design surface, select the report section you want to add to the Document map
2. Go to the **Label** property in the Properties panel.
3. Enter a text or an expression in the **Label** property to represent the report section in the Document map.
4. With the **Report** selected, check that the **DocumentMap** > **Source** is set to either the default value 'Labels and Headings' or 'Labels Only'.
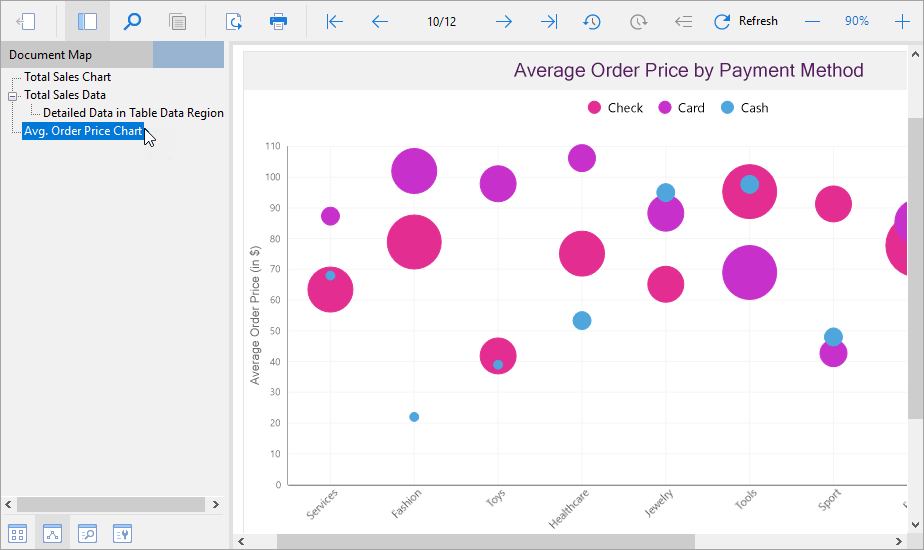
The section’s label is the parent label for all other labels that are contained within that section, preserving the hierarchy of the report structure.
## To add a report control to the Document Map
**Using Label** **Property**
1. On the design surface, select the report control you want to add to the Document map and right-click to choose **Properties** from the context menu.
2. In the Properties panel that appears, enter a text or an expression in the **Label** property to represent the report control in the Document map.
3. With **Report** selected, set the **DocumentMap** > **Source** to 'Labels Only'
**Using Document Map Label Property**
1. On the design surface, select a control you want to add to the Document map and right-click to choose **Properties** from the context menu.
2. In the command section of the Properties Panel, click the **Property dialog** to open the control's dialog.
3. In the dialog that appears, go to the **Navigation** page and under the **Document map label**, enter a text or an expression representing the control in the Document map.
4. With **Report** selected, set the **DocumentMap** > **Source** to 'Labels Only'
**Using HeadingLevel Property**
1. On the design surface, select the report control you want to add to the Document map (e.g. TextBox).
2. In the Properties panel that appears, set the **HeadingLevel** property of the report control.
> type=note
> **Note** The **HeadingLevel** property defines the DocumentMap level for that control.
3. With **Report** selected, set the **DocumentMap** > **Source** to 'Headings Only' and **DocumentMap** > **NumberingStyle** to any marker other than 'None'.
## To create a hierarchical Document Map
Let us take a scenario where an RDLX report has multiple sections. The report also contains a Table data region, which has one group nested inside the other.
We want to be able to navigate to the report sections, and the nested table groups. The table groups are such that the outer group is 'region' (=Fields!region.Value) and the inside group is 'city' (=Fields!city.Value). You have already learned how to [add report sections to the document map](/activereportsnet/docs/v19.2/report-authors/design-reports/design-page-rdl-reports/interactivity/document-map#to-add-a-report-section-to-the-document-map).
To add the hierarchy of table groups to the document map, perform the following steps.
1. Select the Table data region and in the Properties Panel that appears, select the **Property dialog** command at the bottom of the panel to open the data region dialog.
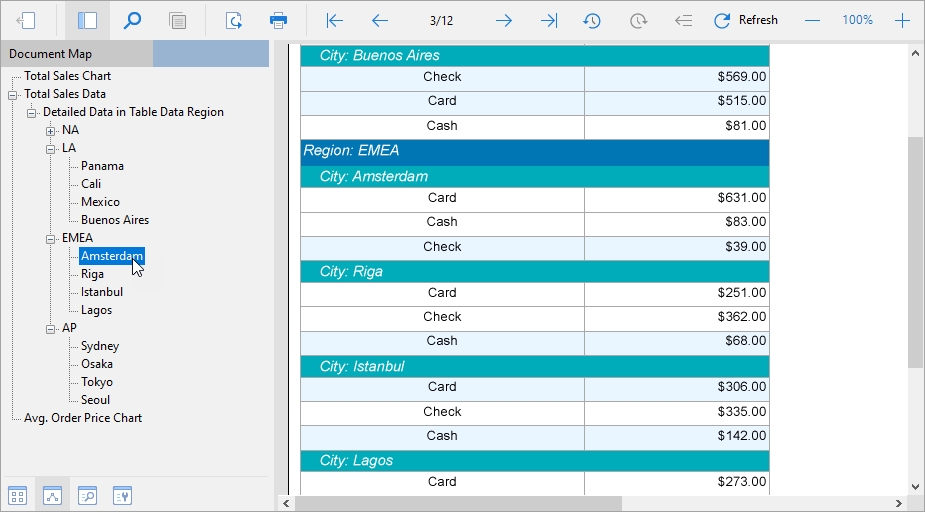
2. On the same **Groups** page, set the **Document map label** of the respective groups to the value of the grouping expression, for example, =Fields!region.Value for 'region' and =Fields!city.Value for 'city'. These values will be evaluated as labels in the document map.
3. For the table goup 'city', set the **Parent label** as =Fields!region.Value.
4. From the **Report Explorer**, select the report and set the **DocumentMap** > **Source** property to 'Labels'.
5. Preview the report to view the document map in the side panel.
> type=note
> **Note**: In an Page report, you can also set grouping and set the document map label on the **FixedPage dialog > Groups** page.
## To set the numbering style for Document Map levels
You can set the numbering style for all document map levels using the **DocumentMap** property.
Let us take a scenario where an RDLX report has multiple sections. The report also contains a Table data region, which has one group nested inside the other. We want to be able to navigate to the report sections, and the nested table groups. The table groups are such that the outer group is 'region' (=Fields!region.Value) and the inside group is 'city' (=Fields!city.Value). You have already learned how to [add report sections to the document map](/activereportsnet/docs/v19.2/report-authors/design-reports/design-page-rdl-reports/interactivity/document-map#to-add-a-report-section-to-the-document-map).
To add the numbered headings from the textboxes in table groups to the document map, perform the following steps.
1. With the textbox in the outermost group 'region' selected, set its **HeadingLevel** as 'Heading 2'.
2. With the textbox in the nested group 'city' select, the **HeadingLevel** as 'Heading 3'.
3. In the Report Explorer, select **Report**.
4. From the Properties panel, go to **DocumentMap** property > click the **Levels (Collection)** property.
5. In the **DocumentMapLevelDesigner Collection Editor**, add three levels (Report.DocumentMap.Levels.0, Report.DocumentMap.Levels.1, and Report.DocumentMap.Levels.2) and set a unique **NumberingStyle** for each level.
The selected style would be applied to all the document levels and only to the selected source that you set next.
> type=note
> **Note**: Any customization made here gets directly applied to the [Table of Contents](/activereportsnet/docs/v19.2/report-authors/report-controls/report-controls-page-rdl-report/tableofcontents) control.
6. Set the **Source** property to 'Labels and Headings'.
7. Click **OK** to close the dialog.