# Connect to a Data Source
This topic describes the whole concept behind connecting to a data source at design time through the Report Explorer.
## Content
This topic discusses about connecting to a data source at design time through the Report Explorer in a Page report or an RDLX report. You can also connect to a shared data source if you want to use the same data source for many reports.
Checkout data binding while creating a new report using the wizard that guides you through the whole process in the topics that follow.
In ActiveReports Designer, you can setup the data source connection in the Report Data Source dialog. The Report Data Source dialog is where you select the type of data source to use, provide a connection string, and choose other options for your data source. You can also decide to use a shared data source, use a single transaction, and select a method for handling credentials. Once you add a data source, it appears in the Report Explorer under the Data Sources node. You can also add multiple data sources in a single report.
## Add a data source
Use the following steps to add a new data source in your report.
1. In the designer, go to the **Report Explorer**-
* Right-click the **Data Sources** node and select the **Add Data Source** option.
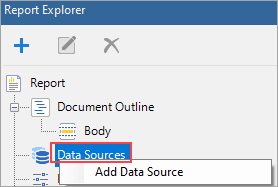
Or,
* Click the **Add** button and then select the **Data Source** option.
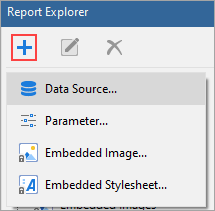
2. In the **Report Data Source** dialog that appears, select the **General** page and enter the name of the data source. By default, the data source name is set to DataSource1. This name appears as a child node to the Data Sources node in the Report Explorer.
3. Under **Type**, select the type of data source you want to use.
* Microsoft SQL Client Provider
* CSV
* Dataset and Object Providers
* Excel
* JSON Provider
* Microsoft ODBC Provider
* Microsoft OLEDB Provider
* MySQL Provider
* PostgreSQL Provider
* XML Provider
4. Depending on the data source selected, different options/tabs are displayed to configure the connection.
* For SQL or OleDb data sources, **Connection Properties**, **Connection String**, and **Advanced Settings** tabs appear.
* For XML data source, the **Connection Properties** and **Connection String** tabs appear.
* For JSON data source, the **Content**, **Schema** and **Connection String** tabs appear.
* For other data source types, only the **Connection String** tab appears.
> type=note
> **Note**: You can create dynamic connection strings by using the runtime variables, such as report parameters.
5. Enter the configuration details for the chosen data source type. See [Report Data Source dialog properties](https://docapp.mescius.io/activereportsnet/v19.1/docs/report-authors/data-binding/data-binding-page-rdl-reports/connect-to-a-data-source#report-data-source-dialog-properties) for more information.
6. Click the **OK** button on the lower right corner to close the dialog. You have successfully connected the report to a data source.
### Custom Data Providers
You can also implement some custom data providers such following, by manually setting up the dependencies and configuration file:
* SQLite (see [Configure ActiveReports using Config file](/activereportsnet/docs/v19.2/devops/customization/configure-ar))
For information on writing an SQL query that you can use for SQLite, see the [SQLite Tutorial](https://www.sqlitetutorial.net/). You will note that there are some differences in writing a standard SQL query and an SQL query for SQLite.
* Oracle (see [Oracle Data Provider](https://github.com/activereports/Samples19/tree/main/Advanced/PageAndRDLX/OracleDataProvider) sample)
* OData (see [OData Data Source](https://github.com/activereports/Samples19/tree/main/DataBinding/PageAndRDLX/ODataDataSource) sample)
Also, see the [Custom Data Provider](https://github.com/activereports/Samples19/tree/main/Advanced/PageAndRDLX/CustomDataProvider) sample.
You can also create a [shared data source](/activereportsnet/docs/v19.2/report-authors/data-binding/data-binding-page-rdl-reports/work-with-local-shared-datasource) if you want to use the same data source in different reports.
## Edit a data source
These steps assume that you have already connected your report to a data source.
1. To open the Report Data Source dialog, do one of the following:
* In the Report Explorer, right-click a data source node and in the context menu that appears, select **Edit** or [Work with Local Shared Data Sources](/activereportsnet/docs/v19.2/report-authors/data-binding/data-binding-page-rdl-reports/work-with-local-shared-datasource) option.
* In the Report Explorer toolbar, click the **Edit** button.
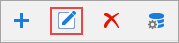
2. In the **Report Data Source** dialog that appears, edit the data connection information.
## Report Data Source dialog properties
The Report Data Source dialog provides the following pages where you can set data source properties.
### GENERAL
The General page of the Report Data Source dialog is where you can set the Name, Type, and Connection string of a new data source, or choose to use a shared data source reference.
* **Name**: Enter a name for the data source. This name must be unique within the report. By default, the name is set to DataSource1.
* **Shared Reference**: Select this check box to connect to a shared data source reference. See [Add a Shared Data Source](/activereportsnet/docs/v19.2/report-authors/data-binding/data-binding-page-rdl-reports/work-with-local-shared-datasource) for further information. Once you have chosen the **Shared Reference** option, the **Reference** field to select a Shared Data Source becomes available. In the **Reference** field, select **From File** and select a shared data source file on your machine.
If the **Shared Reference** checkbox is clear, you can select a data source type from the **Type** dropdown field.
* **Use Single Transaction**: Check this option to execute the datasets using this data source in a single transaction.
* **Type**: Choose the type of data source provider you want to use. The available options are Microsoft SQL Client Provider, Csv Provider, DataSet Provider, Object Provider, JSON Provider, Microsoft ODBC Provider, Microsoft OleDb Provider, and XML Provider.
If you select SQL or OleDb as the data source **Type** value, the **Connection Properties**, **Connection String** and **Advanced Settings** pages appear under the **Connection** section. For XML data source, **Connection Properties** and **Connection String** pages appear. For JSON data source, **Content**, **Schema**, and **Connection String** pages appear. In other data source types, only the **Connection String** page appears.
### CREDENTIALS
The Credentials page gives you the following four options for the level of security you need for the data in your report. This page is available if the data source **Type** value is set to Microsoft SQL Client Provider, Microsoft ODBC Provider, and Microsoft OleDb Provider.
* **Use Windows Authentication**: Select this option when you know that any users with a valid Windows account are cleared for access to the data, and you do not want to prompt them for a user name and password.
* **Use a specific user name and password**: Select this option when you want to allow only a single user name and password to access the data in the report.
* **Prompt for credentials**: Select this option when there is a subset of users who can access the data. The Prompt string textbox allows you to customize the text requesting a user name and password from users.
* **No credentials**: Select this option only if the data in the report is for general public consumption.