# Work with Subreports
Learn to load and run ActiveReports' subreports using scripts.
## Content
This tutorial illustrates creating a subreport using scripts.
ActiveReports allows you to use scripting to permit reports saved to an XML file to contain code. By including scripting when reports are saved into XML, the reports later can be loaded, run, and displayed directly to the viewer control without needing to use the designer.
> type=note
> **Note**: We are using Visual Studio 2019 and will be connecting to Microsoft Jet 4.0 OLE DB Provider. Since Visual Studio 2022 runs in 64 bit, it does not show Microsoft Jet 4.0 OLE DB provider; you should use one of the compatible providers (e.g. Microsoft.ACE.OLEDB.12.0).
>
> This walkthrough uses the Northwind database. The NWIND.mdb file can be downloaded from [GitHub](https://github.com/activereports/Samples19/tree/main/Data/): ..\\Samples19\\Data\\NWIND.mdb.
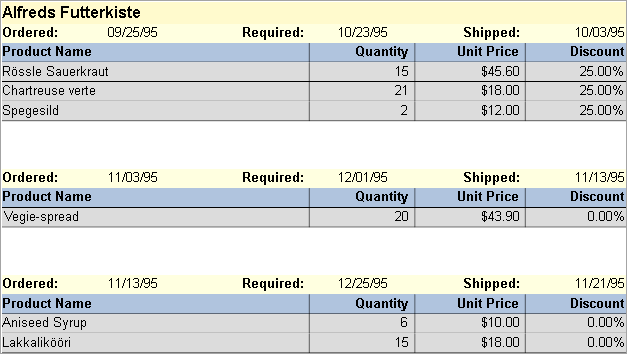
When you have finished this walkthrough, you will have main report that looks similar to the following.
### Create Project and the Main Report
2. Create a new or open an existing Windows Forms App (.NET Framework or .NET) in Visual Studio project.
3. Go to the Project Explorer, right-click the project and select **Add** > **New Item.**
4. Select **ActiveReports 19 Standalone Report** > **Add** and choose **Section** report type, and then click **Finish**.
The xml-based Section report (report.rpx) is added.
5. Rename the default report as 'rptMain'.
6. Double-click the rpx file to open the Section Report in the designer.
### Connect the Main Report to Data
1. In the Report Data Source dialog, on the **OLE DB** tab, next to Connection String, click the Build button.
2. In the Data Link Properties window that appears, select **Microsoft Jet 4.0 OLE DB Provider** and click the **Next** button to move to the Connection tab.
Note:
3. Click the ellipsis (...) button to browse to your database, for example the NWind.mdb sample database. Click **Open** once you have selected the appropriate database path.
4. Click the **Test Connection** button to see if you have successfully connected to the database.
5. Click **OK** to close the Data Link Properties window and return to the Report Data Source dialog. Notice that the Connection String field gets filled automatically.
6. In the **Query** field on the **OLE DB** tab, enter the following SQL query.
```sql
SELECT * FROM Orders INNER JOIN Customers ON Orders.CustomerID = Customers.CustomerID ORDER BY CompanyName, OrderDate
```
7. Click **OK** to save the data source and return to the report design surface.
### Add a Subreport
1. Go to the Project Explorer, right-click the project and select **Add** > **New Item.**
2. Select **ActiveReports 19 Standalone Report** > **Add** and choose **Section** report type, and then click **Finish**.
The xml-based Section report (report.rpx) is added.
3. In the Name field, rename the file as **rptSub**.
4. Click the **Add** button to open a new Section Report in the designer.
5. Right-click the PageHeader or PageFooter section and select **Delete**. Subreports do not render these sections, so deleting them saves processing time.
6. Click in the grey area below the report to select it, and in the Properties window, change the report's **ShowParameterUI** property to **False**. This prevents the subreport from requesting a parameter from the user.
### Connect the Subreport to Data
1. In the Report Data Source dialog, on the **OLE DB** tab, next to Connection String, click the Build button.
2. In the Data Link Properties window that appears, select **Microsoft Jet 4.0 OLE DB Provider** and click the **Next** button to move to the Connection tab.
3. Click the ellipsis (...) button to browse to your database, for example the NWind.mdb sample database. Click **Open** once you have selected the appropriate database path.
4. Click the **Test Connection** button to see if you have successfully connected to the database.
5. Click **OK** to close the Data Link Properties window and return to the Report Data Source dialog. Notice that the Connection String field gets filled automatically.
6. In the **Query** field on the **OLE DB** tab, enter the following SQL query.
```sql
SELECT * FROM [order details] inner join products on [order details].productid = products.productid
```
7. Click **OK** to save the data source and return to the report design surface.
### Create Layout for Main Report
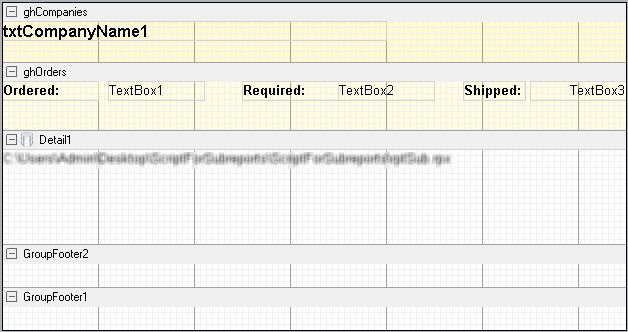
1. Right-click the design surface of rptMain and select **Insert** then **Group Header/Footer** to add group header and footer sections to the report.
2. In the Properties Panel, make the following changes to the group header.
| Property Name | Property Value |
| --- | --- |
| Name | ghCompanies |
| BackColor | LemonChiffon |
| CanShrink | True |
| DataField | CompanyName |
| GroupKeepTogether | All |
| KeepTogether | True |
3. In the Report Explorer, expand the **Fields** node, then the **Bound** node. Drag the **CompanyName** field onto ghCompanies and in the Properties window, set the properties as follows.
| Property Name | Property Value |
| --- | --- |
| Size | 4, 0.2 in |
| Location | 0, 0 in |
| Font Bold | True |
| Font Size | 12 |
4. Right-click the design surface of rptMain and select **Insert** then **Group Header/Footer** to add the second group header and footer sections to the report.
5. In the Properties Panel, make the following changes to the second group header.
| Property Name | Property Value |
| --- | --- |
| Name | ghOrders |
| BackColor | LightYellow |
| CanShrink | True |
| DataField | OrderDate |
| GroupKeepTogether | All |
| KeepTogether | True |
6. From the toolbox, drag three TextBox controls onto **ghOrders** and set the properties for each control as follows.
TextBox1
| Property Name | Property Value |
| --- | --- |
| DataField | OrderDate |
| OutputFormat | MM/dd/yy |
TextBox2
| Property Name | Property Value |
| --- | --- |
| DataField | RequiredDate |
| OutputFormat | MM/dd/yy |
TextBox3
| Property Name | Property Value |
| --- | --- |
| DataField | ShippedDate |
| OutputFormat | MM/dd/yy |
| Alignment | Right |
7. From the toolbox, drag three Label controls onto **ghOrders** and set the properties for each control as follows.
Label1
| Property Name | Property Value |
| --- | --- |
| Text | Ordered: |
| Font | Bold:True |
Label2
| Property Name | Property Value |
| --- | --- |
| Text | Required: |
| Font | Bold:True |
Label3
| Property Name | Property Value |
| --- | --- |
| Text | Shipped: |
| Font | Bold:True |
8. Select the Detail section and in the Properties window, set the **CanShrink** property to **True**.
9. From the toolbox, drag the [Subreport](/activereportsnet/docs/v19.2/report-authors/report-controls/report-controls-section-report/subreport-section) control onto the Detail section and in the Properties window, set the properties as follows.
| Property Name | Property Value |
| --- | --- |
| ReportName | **_full project path_**\\rptSub.rpx |
| Name | SubReport1 |
### Create a Layout for the SubReport

1. Right-click the design surface of rptSub and select **Insert** then **Group Header/Footer** to add group header and footer sections to the report.
2. In the Properties window, make the following changes to the group header.
| Property Name | Property Value |
| --- | --- |
| Name | ghOrderDetails |
| BackColor | LightSteelBlue |
| CanShrink | True |
| DataField | OrderID |
3. From the toolbox, drag four label controls to **ghOrderDetails** and set the properties for each label as follows.
Label1
| Property Name | Property Value |
| --- | --- |
| Text | Product Name |
| Font | Bold:True |
| Alignment | Left |
Label2
| Property Name | Property Value |
| --- | --- |
| Text | Quantity |
| Font | Bold:True |
| Alignment | Right |
Label3
| Property Name | Property Value |
| --- | --- |
| Text | Unit Price |
| Font | Bold:True |
| Alignment | Right |
Label4
| Property Name | Property Value |
| --- | --- |
| Text | Discount |
| Font | Bold:True |
| Alignment | Right |
4. Click the **Detail** section and in the Properties window, set the following properties.
| Property Name | Property Value |
| --- | --- |
| BackColor | Gainsboro |
| CanShrink | True |
5. From the toolbox, drag four TextBox controls onto the Detail section and set the properties as follows.
TextBox1
| Property Name | Property Value |
| --- | --- |
| DataField | ProductName |
| Alignment | Left |
TextBox2
| Property Name | Property Value |
| --- | --- |
| DataField | Quantity |
| Alignment | Right |
TextBox3
| Property Name | Property Value |
| --- | --- |
| DataField | Products.UnitPrice |
| Alignment | Right |
| OutputFormat | Currency |
TextBox4
| Property Name | Property Value |
| --- | --- |
| DataField | Discount |
| Alignment | Right |
| OutputFormat | Percentage |
### Embed script in the main report (rptMain)
1. Change the **ScriptLanguage** property for the report to the appropriate scripting language. The default setting is C#.
2. Click the Script tab located below the report designer to access the scripting editor.
3. Embed script to set the data source for the main report and pass data into the subreport.
```vbnet
Dim rptSub As GrapeCity.ActiveReports.SectionReport
Sub ActiveReport_ReportStart
'Create a new instance of the generic report
rptSub = new GrapeCity.ActiveReports.SectionReport()
'Load the rpx file into the generic report
rptSub.LoadLayout(me.SubReport1.ReportName)
'Connect data to the main report
Dim connString As String = "Provider=Microsoft.Jet.OLEDB.4.0;Data Source=[User Folder]\Samples19\Data\NWIND.mdb;Persist Security Info=False"
Dim sqlString As String = "Select * from orders inner join customers on orders.customerid = customers.customerid order by CompanyName,OrderDate"
Dim ds As new GrapeCity.ActiveReports.Data.OleDBDataSource()
ds.ConnectionString = connString
ds.SQL = sqlString
rpt.DataSource = ds
End Sub
Sub Detail_Format
Dim rptSubCtl As GrapeCity.ActiveReports.SubReport = me.SubReport1
Dim childDataSource As New GrapeCity.ActiveReports.Data.OleDBDataSource()
childDataSource.ConnectionString = CType(rpt.DataSource, GrapeCity.ActiveReports.Data.OleDBDataSource).ConnectionString
'Set a parameter in the SQL query
childDataSource.SQL = "Select * from [order details] inner join products on [order details].productid = products.productid where [order details].orderid = <%OrderID%>"
'Pass the data to the subreport
rptSub.DataSource = childDataSource
'Display rptSub in the subreport control
rptSubCtl.Report = rptSub
End Sub
```
```csharp
GrapeCity.ActiveReports.SectionReport rptSub;
public void Detail_Format()
{
GrapeCity.ActiveReports.SectionReportModel.SubReport rptSubCtl = this.SubReport1;
GrapeCity.ActiveReports.Data.OleDBDataSource childDataSource = new GrapeCity.ActiveReports.Data.OleDBDataSource();
childDataSource.ConnectionString = ((GrapeCity.ActiveReports.Data.OleDBDataSource) rpt.DataSource).ConnectionString;
//Set a parameter in the SQL query
childDataSource.SQL = "Select * from [order details] inner join products on [order details].productid = products.productid where [order details].orderid = <%OrderID%>";
//Pass the data to the subreport
rptSub.DataSource = childDataSource;
//Display rptSub in the subreport control
rptSubCtl.Report = rptSub;
}
public void ActiveReport_ReportStart()
{
//Create a new instance of the generic report
rptSub = new GrapeCity.ActiveReports.SectionReport();
//Load the rpx file into the generic report
rptSub.LoadLayout(this.SubReport1.ReportName);
//Connect data to the main report
string connString = @"Provider=Microsoft.Jet.OLEDB.4.0;Data Source=[User Folder]\Samples19\Data\NWIND.mdb;Persist Security Info=False";
string sqlString = "Select * from orders inner join customers on orders.customerid = customers.customerid order by CompanyName,OrderDate";
GrapeCity.ActiveReports.Data.OleDBDataSource ds = new GrapeCity.ActiveReports.Data.OleDBDataSource();
ds.ConnectionString = connString;
ds.SQL = sqlString;
rpt.DataSource = ds;
}
```
### Preview report
Click the preview tab to view the report at design time.
OR
Open the report in the Viewer. See [Save Section Reports](/activereportsnet/docs/v19.2/developers/working-with-reports-devs/section-report-developers/save-load-sectionreport) for further information on how to load the xml-based Section Report onto the viewer.