# Overlaying in Reports (Letterhead)
This topic demonstrates a step-by-step tutorial to overlay an ActiveReport with a static letterhead report.
## Content
ActiveReports allows you to overlay static report formats over data reports.
These steps demonstrate how to overlay an ActiveReports report, displaying customers orders by country, with a static letterhead report.
> type=note
> **Note**: The report connects to NWIND.db that can be downloaded from [GitHub](https://github.com/activereports/Samples19/tree/main/Data/).
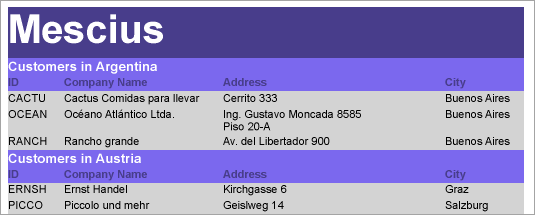
The final report will look as shown.
### Create a report
1. Open Visual Studio to create a new project.
2. Follow topic [Design Code-based Section Reports in .NET Core](/activereportsnet/docs/v19.2/developers/working-with-reports-devs/section-report-developers/code-based-section-reports/designing-code-based-section-reports-in-net-core) to create application with code-based section report in .NET Core.
3. In the **Project name** field, rename **SectionReport1.cs** as **rptData**.
4. Click **Create**.
5. Double-click **rptData.cs** to open the report in the Section Report designer.
### Bind Report to Data
1. As you create a new report, the **Report Data Source** dialog appears for you to configure the report data connection. You can also access this dialog by clicking the **DataSource Icon** in the Detail section band.
2. Choose **Custom** tab > **SQLite Provider** in the Report Data Source dialog, and bind the report to Sqlite data using the following connection string and query.
```plaintext
data source=c:\data\NWIND.db
```
```sql
Select * from Customers ORDER BY Country
```
3. Click **OK** to close the Report Data Source dialog and return to the report design surface.
### Design Report Layout (rptData)
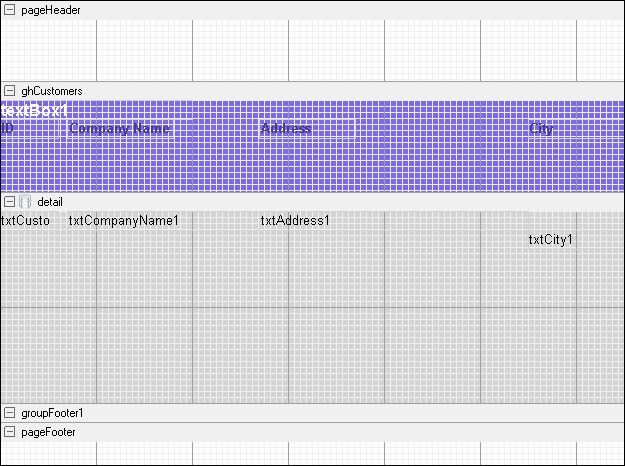
1. Select the **PageHeader** section and in the Properties Window, set the **Height** property to **0.65**. (This will match the height of the page header in the template.)
2. On the design surface, select the grey area outside the report and in the Properties window, set the **PrintWidth** property to **6.5**.
3. Right-click the report and select **Insert > GroupHeader/Footer** to add group header and group footer sections.
4. Select the group header and in the Properties window, set the properties as follows.
| Property Name | Property Value |
| --- | --- |
| Name | ghCustomers |
| BackColor | MediumSlateBlue |
| CanShrink | True |
| DataField | Country |
| GroupKeepTogether | FirstDetail |
| KeepTogether | True |
5. From the toolbox, drag the following controls to **ghCustomers** and in the Properties window, set the properties as follows.
TextBox1
| Property Name | Property Value |
| --- | --- |
| DataField | ="Customers in " + Country
(DataField) |
| Size | 2, 0.2 in |
| Location | 0, 0 in |
| Font Bold | True |
| ForeColor | White |
| Font Size | 12 |
Label1
| Property Name | Property Value |
| --- | --- |
| Text | ID |
| Size | 0.6, 0.2 in |
| Location | 0, 0.2 in |
| Font Bold | True |
| ForeColor | DarkSlateBlue |
Label2
| Property Name | Property Value |
| --- | --- |
| Text | Company Name |
| Size | 1.1, 0.2 in |
| Location | 0.7, 0.2 in |
| Font Bold | True |
| ForeColor | DarkSlateBlue |
Label3
| Property Name | Property Value |
| --- | --- |
| Text | Address |
| Size | 1, 0.2 in |
| Location | 2.7, 0.2 in |
| Font Bold | True |
| ForeColor | DarkSlateBlue |
Label4
| Property Name | Property Value |
| --- | --- |
| Text | City |
| Size | 1, 0.2 in |
| Location | 5.5, 0.2 in |
| Font Bold | True |
| ForeColor | DarkSlateBlue |
6. Click the **Detail** section and in the Properties window, set the properties as follows.
| Property Name | Property Value |
| --- | --- |
| BackColor | LightGray |
| CanShrink | True |
7. From the toolbox, drag four TextBox controls onto the **Detail** section and set the properties of each textbox as follows.
TextBox1
| Property Name | Property Value |
| --- | --- |
| DataField | CustomerID |
| Size | 0.6, 0.2 in |
| Location | 0, 0 in |
TextBox2
| Property Name | Property Value |
| --- | --- |
| DataField | CompanyName |
| Size | 2, 0.2 in |
| Location | 0.7, 0 in |
TextBox3
| Property Name | Property Value |
| --- | --- |
| DataField | Address |
| Size | 2.8, 0.2 in |
| Location | 2.7, 0 in |
TextBox4
| Property Name | Property Value |
| --- | --- |
| DataField | City |
| Size | 1, 0.2 in |
| Location | 5.5, 0 in |
8. Select the group footer and in the Properties window, set the **Height** property to **0**.
### Create a report and design Report Layout (rptLetterhead)
1. Go to **Project** in the Visual Studio menu and select **Add New Item...**
2. Select **ActiveReports 19 Section Report (code-based)**.
3. In the **Project name** field, rename **SectionReport2.cs** as **rptLetterhead**.
4. Click **Create.**
5. Double-click **rptLetterhead.cs** to open the report in the Section Report designer.
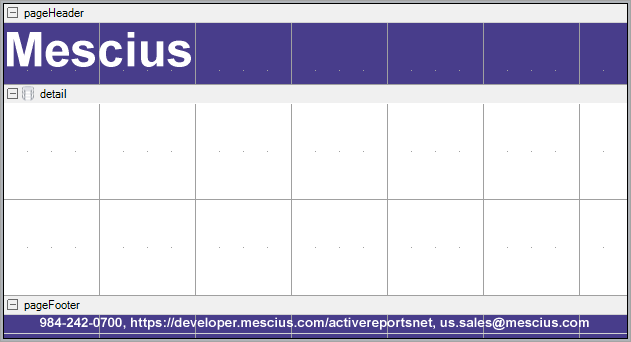
6. Select the **Page Header** and in the Properties window, set the properties as follows.
| Property Name | Property Value |
| --- | --- |
| BackColor | DarkSlateBlue |
| Height | 0.65 |
7. From the toolbox, drag a Label control onto the **Page Header** and in the Properties window, set the properties as follows.
Label1
| Property Name | Property Value |
| --- | --- |
| Size | 6.5, 0.65 in |
| Location | 0, 0 in |
| Font Size | 36 |
| Font Bold | True |
| ForeColor | White |
| Text | Mescius |
8. Select the **Page Footer** and in the Properties window, set the **BackColor** property to **DarkSlateBlue**.
9. From the toolbox, drag a [Label](/activereportsnet/docs/v19.2/report-authors/report-controls/report-controls-section-report/label) control onto the Page Footer and in the Properties window, set the properties as follows.
| Property Name | Property Value |
| --- | --- |
| Size | 6.5, 0.2 in |
| Location | 0, 0 in |
| Alignment | Center |
| Font Bold | True |
| ForeColor | White |
| Text | 984-242-0700, [https://developer.mescius.com/activereportsnet](https://developer.mescius.com/activereportsnet),
[activereports.sales@mescius.com](mailto:activereports.sales@mescius.com) |
### Add Code to Overlay Data Report Pages with Letterhead Report
1. Double-click the title bar of the Windows Form to create an event-handling method for the Form\_Load event.
2. Add the following code to the handler to set the viewer to display the rptData report document an to overlay rptLetterhead on rptData.
```vbnet
Dim rpt As New rptData()
rpt.Run()
Dim rpt2 As New rptLetterhead()
rpt2.Run()
Dim i As Integer
For i = 0 To rpt.Document.Pages.Count - 1
rpt.Document.Pages(i).Overlay(rpt2.Document.Pages(0))
Next
Viewer1.Document = rpt.Document
```
```csharp
rptData rpt = new rptData();
rpt.Run();
rptLetterhead rpt2 = new rptLetterhead();
rpt2.Run();
for(int i = 0; i < rpt.Document.Pages.Count; i++)
{
rpt.Document.Pages[i].Overlay(rpt2.Document.Pages[0]);
}
viewer1.Document = rpt.Document;
```
3. Improve the appearance of the report and preview.
## See Also
#### Developers
[Design Code-based Section Reports in .NET Core](/activereportsnet/docs/v19.2/developers/working-with-reports-devs/section-report-developers/code-based-section-reports/designing-code-based-section-reports-in-net-core)