# Create Mail Merge with RichTextBox
Learn the steps to create a mail merge report that uses the RichTextBox control, containing field place holders that can be replaced with values at run time.
## Content
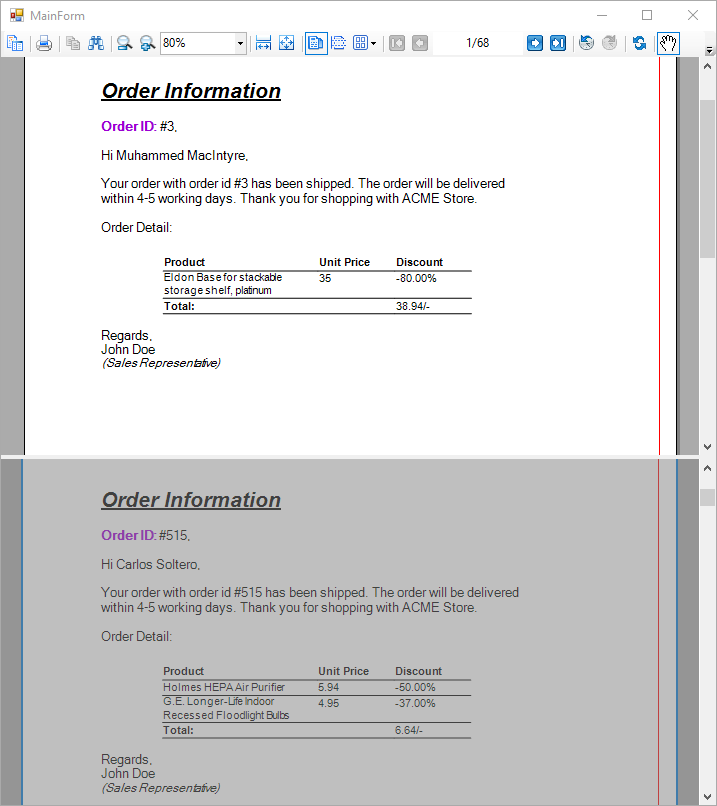
The RichText control can contain field place holders that can be replaced with values (merged) at run time. Let's create a mail merge report that uses the **RichTextBox** control.
When you complete this walkthrough you get a layout that looks similar to the .
### Create a Report
1. In Visual Studio, create a new Windows Forms App (.NET Framework) project and click **Next**.
2. In the **Configure your new project** dialog, type a name for your project, set **Framework** to .NET Framework 4.7 and click **Create**.
3. Select **ActiveReports 19 Code-Based Report** and click **Next**.
4. Enter a **Project name**, select a **Framework** and click **Create**.
5. Rename **SectionReport1.cs** and in the Name field, rename the file as **OrderLetter**.
6. Double-click **OrderLetter.cs** to open the report in the Section Report designer.
### Bind Report to Data
> **Connect to a Data Source**
1. On the detail section band, click the Data Source Icon.
2. In the **Report Data Source** dialog that appears, select the **CSV** tab to connect to a CSV data source. Let us connect to MyOrders.csv data available on [GitHub](https://github.com/activereports/Samples19/tree/main/Data/). See [CSV Provider](/activereportsnet/docs/v19.2/report-authors/data-binding/data-binding-in-section-reports/connect-to-a-datasource-section/csv-data-source-section) page for details on binding with CSV data. The connection string for our data is as shown:
```plaintext
Path=data\\MyOrders.csv;Locale=en-IN;TextQualifier=";ColumnsSeparator=,;RowsSeparator=\r\n;Columns=ID,Product,Customer,OrderNumber,Stock,Total,UnitPrice,City,ProductLine,Discount;HasHeaders=True
```
3. Click **OK** to save the changes and return to the report design surface. The dataset is also automatically added.
### Design Report
1. On the design surface of the report, right-click and select **Insert**, then **Group Header/Footer** to add group header and footer sections.
2. On the design surface, select the grey area outside the report and in the Properties window, set the **PrintWidth** property to **6.5**.
3. Select the group header and in the Properties window, set the properties as follows.
| Property Name | Property Value |
| --- | --- |
| DataField | OrderNumber |
| KeepTogether | True |
4. On the design surface of the report, select the group footer section and in the Properties window, set the following properties.
| Property Name | Property Value |
| --- | --- |
| KeepTogether | True |
| NewPage | After |
5. On the design surface of the report, select the pageHeader section and in the Properties panel, set the following properties.
| Property Name | Property Value |
| --- | --- |
| BackColor | Coral |
6. From the toolbox, drag the [Label](/activereportsnet/docs/v19.2/report-authors/report-controls/report-controls-section-report/label) control to the pageHeader section and in the Properties panel, set the properties as follows.
| Property Name | Property Value |
| --- | --- |
| Location | 0, 0 in |
| Text | Company |
| Font > Size | 20 |
| Font > Bold | True |
7. From the toolbox, drag three **TextBox** controls to the **groupHeader** section and in the Properties panel, set the properties as follows.
| Property Name | Property Value |
| --- | --- |
| **TextBox1** | |
| Location | 0.8, 1.8 in |
| Text | Product |
| Font > Bold | True |
| **TextBox2** | |
| Location | 2.80, 1.8 in |
| Text | Unit Price |
| Font > Bold | True |
| **TextBox3** | |
| Location | 3.80, 1.8 in |
| Text | Discount |
| Font > Bold | True |
8. In the **Report Explorer**, expand the **Fields** node, then the **Bound** > **Document** node. Drag the **Product** field onto the detail section and in the Properties panel, set the following properties:
| Property Name | Property Value |
| --- | --- |
| **Product** field | |
| Location | 0.8, 0 in |
| Name | textProduct1 |
| **UnitPrice** field | |
| Location | 2.8, 0 in |
| Name | txtUnitPrice1 |
| **Discount** field | |
| Location | 3.8, 0 in |
| Name | txtDiscount1 |
9. In the Report Explorer, expand the **Fields** node, then the **Bound** >**Document** node. Drag the **Total** field onto the **groupFooter** section and in the Properties panel, set the following properties.
| Property Name | Property Value |
| --- | --- |
| Location | 3.8, 0 in |
| Name | txtTotal |
10. From the toolbox, drag the **TextBox** control to the **groupFooter** section and in the Properties panel, set the properties as follows.
| Property Name | Property Value |
| --- | --- |
| Location | 0.8, 0 in |
| Text | Total: |
| Font > Bold | True |
11. From the tool bar drag two **RichTextBox** controls to the **groupHeader** and set the following properties:
| Property Name | Property Value |
| --- | --- |
| **RichTextBox1** | |
| Location | 0, 0 in |
| AutoReplaceFields | True |
| Name | richTextBox1 |
| **RichTextBox2** | |
| Location | 0, 0.35 in |
| AutoReplaceFields | True |
| Name | richTextBox2 |
#### Add fields to the RichText control
1. Double-click **richTextBox1** control box, delete the default text, and add the following text to the richTextBox1 control box:
```plaintext
OrderOrder ID: #[!OrderNumber],
Hi [!Customer],
Your order with order id #[!OrderNumber] has been shipped. The order will be delivered within 4-5 working days. Thank you for shopping with ACME Store.
Order Detail:
```
2. Similarly, add the following text to the richTextBox2 control box:
```plaintext
Regards,
John Doe
(Sales Representative)
```
3. Arrange the text and fields within the control as you would in any text editor.
> type=note
> **Note**: You can add field to the RichTextBox control by
>
> 1. Double click the control to open the edit mode.
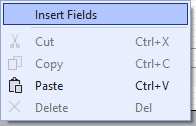
> 2. Right-click and select Insert Field.
> 3. Enter the field name and click OK.
#### Add code to update RichText fields
1. On the design surface, double click the **detail** section band.
2. Double-click in the group header section of the report to create an event-handling method for the group header's **Format** event.
3. Add code to the handler to:
* Replace the OrderNumber field in the RichText control with the current OrderNumber field value.
* Replace the Customer field with the current Customer field value
```csharp
//Use the OrderNumber Field Value
richTextBox1.ReplaceField("OrderNumber", Fields["OrderNumber"].Value.ToString());
//Use the Customer Field Value
richTextBox1.ReplaceField("Customer", Fields["Customer"].Value.ToString());
```
### Improve the appearance of the report and preview.
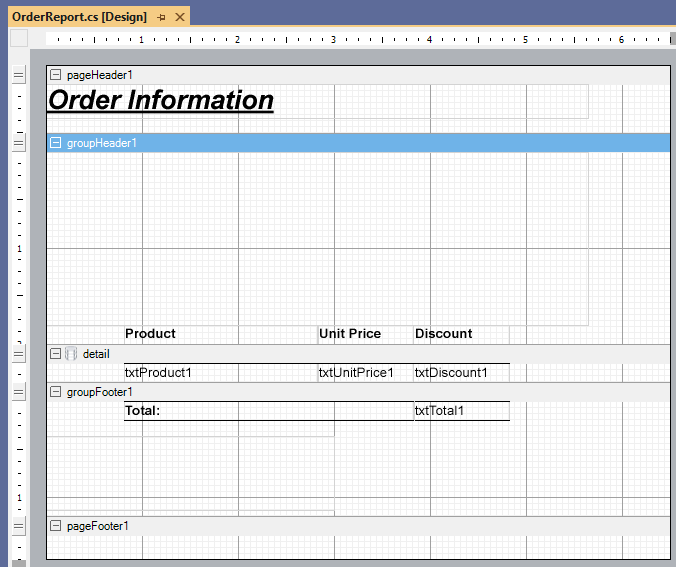
1. Select all the textBoxes in the **detail** section then, right-click on the text box and go to **Format Border** and select the 5th preset in the first column to have a border line on top of the textBox as shown in the image below:
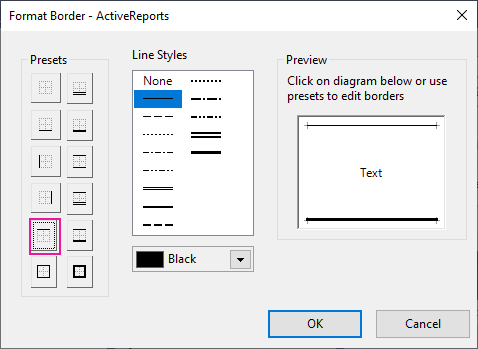
2. Select all the textBoxes in the **groupFooter** section then, right-click on the text box and go to **Format Border** and select the 4th preset in the 1st column also, select the 2nd preset in the 1st column to have two border lines on the textbox controls(top and bottom) as shown in the image below:
## See Also
#### Report Authors
[RichTextBox](/activereportsnet/docs/v19.2/report-authors/report-controls/report-controls-section-report/richtextbox)