# Customize the WinForms Viewer Control
In this topic, you will learn many ways to customize the Viewer control for your Windows application. You can add and remove buttons from the toolbars, add and remove menu items, create custom dialogs, and call these dialogs from custom click events.
## Content
There are a number of ways in which you can customize the Viewer control to make it a perfect fit for your Windows application. You can add and remove buttons from the toolbars, add and remove menu items, create custom dialogs, and call these dialogs from custom click events.
### Customize Viewer Toolbar
You can use the methods listed in the [System.Windows.Forms.ToolStripItemCollection](https://learn.microsoft.com/en-us/dotnet/api/system.windows.forms.toolstripitemcollection?view=netframework-4.8) documentation on MSDN to customize each ToolStrip.
### ToolStrip
The **ToolStrip** contains the following **ToolStripItems** by index number.
* 0 Toggle sidebar
* 1 Separator
* 2 Print
* 3 Galley mode
* 4 Separator
* 5 Copy
* 6 Find
* 7 Separator
* 8 Zoom out
* 9 Zoom In
* 10 Current Zoom
* 11 Separator
* 12 Fit width
* 13 Fit page
* 14 Separator
* 15 Single page
* 16 Continuous mode
* 17 Multipage mode
* 18 Separator
* 19 First page
* 20 Previous page
* 21 Current
* 22 Next page
* 23 Last page
* 24 Separator
* 25 History back
* 26 History forward
* 27 Separator
* 28 Back to parent
* 29 Separator
* 30 Refresh
* 31 Cancel button
* 32 Separator
* 33 Pan mode
* 34 Copy select
* 35 Snapshot
* 36 Separator
* 37 Annotations
You can access these ToolStripItems by index with the **Insert** and **RemoveAt** methods. Other methods, including **Add** and **AddRange**, are described in the [System.Windows.Forms.ToolStripItemCollection](https://learn.microsoft.com/en-us/dotnet/api/system.windows.forms.toolstripitemcollection?view=netframework-4.8) documentation on MSDN.
### ToolStrip Implementation
When you add a new item to a ToolStrip, you need to add an **ItemClicked** event handler and an **ItemClicked** event for the ToolStrip with the new item. At run time, when a user clicks the new ToolStrip item, they raise the ItemClicked event of the ToolStrip containing the item
Add the event handler to the **Load** event of the Form that contains the Viewer control, and use the IntelliSense Generate Method Stub feature to create the related event. For example, of the code to create an event hander, as explained in the below section.
You can modify both viewer's mouse mode and touch mode toolbars by accessing the index number corresponding to the toolbar button and set custom commands. For example, in the following sample codes we show customization specific to mouse mode toolbar and touch mode toolbar.
### Create a Viewer Form and Load Report in Viewer
See [Load Reports](/activereportsnet/docs/v19.2/developers/create-applications/dotnet-viewer-application/working-with-win-viewer/load-reports-in-win-viewer) topic to create a WinForms application and preview a report in the Viewer.
### Customize the Mouse Mode Toolbar
Lets display a custom print button as shown in the following image on the WinForms Viewer toolbar (mouse mode):
1. Add a second Windows Form (Form2.cs) to the project created above and name it **frmPrintDlg**.
2. Add a label to **frmPrintDlg** and change the **Text** property to **This is the custom print dialog**.
3. Add a button to **frmPrintDlg** and change the **Text** property to **OK**.
4. Back on the viewer form, double-click the title bar of the form to go to the Form Load event.
5. Add the following code to the Form Load event to remove the default print button and add your own.
```csharp
//Remove the original print button.
viewer1.Toolbar.ToolStrip.Items.RemoveAt(2);
//Remove the extra separator.
viewer1.Toolbar.ToolStrip.Items.RemoveAt(1);
//Add a new button to the end of the tool strip with the caption "Print."
ToolStripButton tsbPrint = new ToolStripButton("Print");
viewer1.Toolbar.ToolStrip.Items.Add(tsbPrint);
//Create a click event handler for the button.
tsbPrint.Click += new EventHandler(tsbPrint_Click);
```
```vbnet
'Remove the print button.
Viewer1.Toolbar.ToolStrip.Items.RemoveAt(2)
'Remove the extra separator.
Viewer1.Toolbar.ToolStrip.Items.RemoveAt(1)
'Add a new button to the end of the tool strip with the caption "Print."
Dim tsbPrint As New ToolStripButton("Print")
Viewer1.Toolbar.ToolStrip.Items.Add(tsbPrint)
'Create a click event handler for the button.
AddHandler tsbPrint.Click, AddressOf tsbPrint_Click
```
6. Add the following code to the Form class below the Load event to display 'frmPrintDlg' when a user clicks the custom print button.
```csharp
//Call the custom dialog from the new button's click event.
private void tsbPrint_Click(object sender, EventArgs e)
{
this.CustomPrint();
}
//Call the custom print dialog.
private void CustomPrint()
{
frmPrintDlg _printForm = new frmPrintDlg();
_printForm.ShowDialog(this);
}
```
```vbnet
'Call the custom dialog from the new button's click event.
Private Sub tsbPrint_Click(sender As Object, e As EventArgs)
Me.CustomPrint()
End Sub
'Call the custom print dialog.
Private Sub CustomPrint()
Dim _printForm As New frmPrintDlg()
_printForm.ShowDialog(Me)
End Sub
```
7. Press **F5** to run the project and click on the print button of main viewer to view custom print dialog.
### Customize the Touch Mode Toolbar
1. Double-click in the title bar of the Viewer form to create a Form Load event.
2. Add the following code to add a custom Zoom Out button.
```csharp
viewer1.TouchMode = GrapeCity.Viewer.Common.Model.TouchMode.True;
var zoomOutButton = viewer1.TouchModeToolbar.ToolStrip.Items[8];
zoomOutButton.Visible = true;
```
```vbnet
viewer1.TouchMode = GrapeCity.Viewer.Common.Model.TouchMode.[True]
Dim zoomOutButton = viewer1.TouchModeToolbar.ToolStrip.Items(8)
zoomOutButton.Visible = true
```
> type=warning
> **Caution**: Any customization done in mouse mode does not apply to the touch mode and vice versa.
* * *
### Customize Viewer Sidebar
The following code customizes the background of Thumbnail in Sidebar of the Viewer.
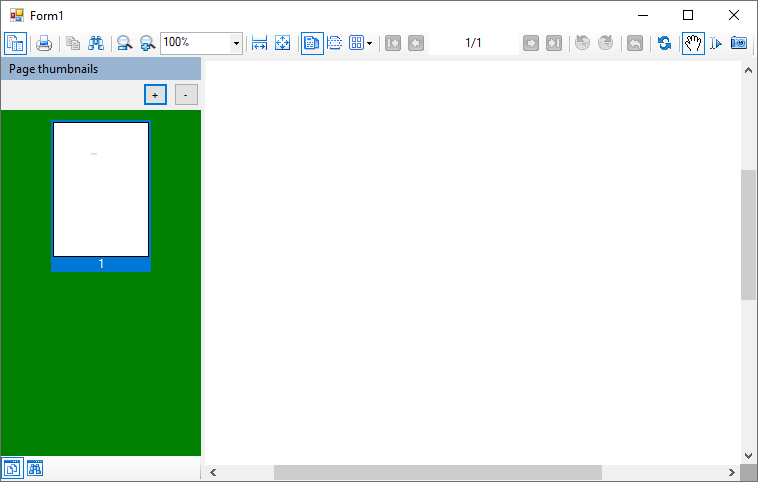
In the Viewer Form Load event, add the code as follows:
```csharp
private void Form1_Load(object sender, EventArgs e)
{
Control o = GetControlByName(viewer1, "thumbnailViewer1");
o.BackColor = System.Drawing.Color.Green;
//write code to load report
}
public Control GetControlByName(Control ParentCntl, string NameToSearch)
{
if (ParentCntl.Name == NameToSearch)
return ParentCntl;
foreach (Control ChildCntl in ParentCntl.Controls)
{
Control ResultCntl = GetControlByName(ChildCntl, NameToSearch);
if (ResultCntl != null)
return ResultCntl;
}
return null;
}
```
```vbnet
Private Sub Form1_Load(sender As Object, e As EventArgs) Handles MyBase.Load
Dim o As Control = GetControlByName(Viewer1, "thumbnailViewer1")
o.BackColor = System.Drawing.Color.Green
'write code to load report
End Sub
Public Function GetControlByName(ByVal ParentCntl As Control, ByVal NameToSearch As String) As Control
If ParentCntl.Name = NameToSearch Then Return ParentCntl
For Each ChildCntl As Control In ParentCntl.Controls
Dim ResultCntl As Control = GetControlByName(ChildCntl, NameToSearch)
If ResultCntl IsNot Nothing Then Return ResultCntl
Next
Return Nothing
End Function
```